Last updated: 2025-11-30
Contacts and Businesses - Key Relations Content Link
- Overview
- Key Relations Section
- Adding a Key Relation
- Working with Dependents
- Creating Relationship Definitions (Relationship Setup)
- Household-Key Relations Sync
- Business Relations Section
- Adding a Business Relation
- Business Hierarchy Section
- Adding a Contact or Business to the Hierarchy
- Adding a Key Relation to a Business' Employee Census
- Viewing a Key Relation's Policies
- Referred Contacts Section
- Adding a Referral
Overview
When viewing a contact or business, the user can access this content link to track key relationships between that contact/business and other contacts/businesses stored in SmartOffice.
Tip: Users who have the Microsoft Plug-in for SmartOffice installed on their computers can also view and manage key relations directly from Microsoft Outlook. Learn more.
The information available on this content link varies depending on the record type (contact or business). Contact Key Relations Content Link
Business Key Relations Content Link
Key Relations Section
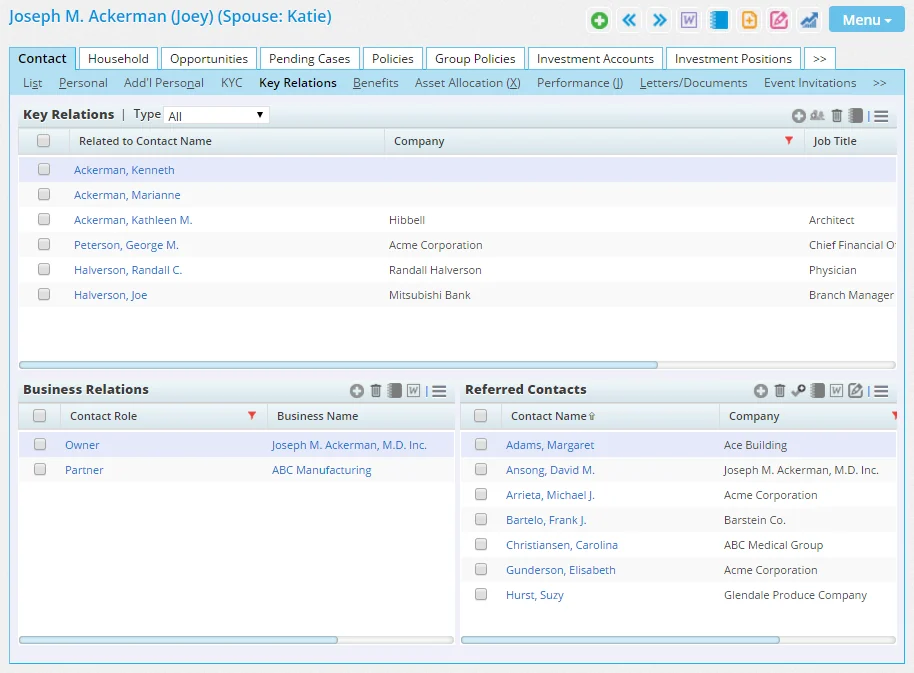
In contact records, the Key Relations section lists the contact's spouse, children, business associates and other relationships.
 Watch the Training Class:
key relations
Adding a Key Relation
- Click the Options button
 and select New 'Key Relation' record to open the Search Contacts dialog box.
- Search for and select the contact to open the Key Relationship Detail dialog box.

- From the Relation Type drop-down list, select the general relationship type (Family, Business, Personal or Professional).
- In the Define Their Relationship section, use the drop-down lists to specify the exact relationships between the household members. If the appropriate relationship option does not exist, click the Relationship Setup button to create a relationship definition (see Creating Relationship Definitions for more information).
- Click the OK button.
Working with Dependents
A dependent is a special contact type in SmartOffice. It is used primarily to store information about non-clients who have dependent relationships with clients.
dependent
For example, the user might want to record details about a client's children because those children are beneficiaries. However, the children themselves do not have any policies, investments or other holdings that the user needs to track using a full contact record.
Note: By default, dependents are not included in contact searches, but the user can include them in search results by selecting the Dependents option in the contact search dialog box. To reveal the Dependents option, the user must select the Contacts option in the contact search dialog box.
To add a dependent to a contact's key relations:
- In the Key Relations section, click the Options button and select Add Dependent to open the Search Contacts dialog box.
- Search for the dependent contact. (If the dependent does not exist in the system, click the New button to create it.)
- When the list of search results displays, select a contact to open the Key Relationship Detail dialog box.
- In the Define Their Relationship section, use the drop-down lists to specify the exact relationship between the dependent and the other household members.
- Click the OK button.
If a dependent eventually becomes a client, the dependent contact record can be quickly converted to a normal client contact record. Similarly, a regular contact record can be converted to a dependent contact record:
- In the Key Relations section, tag a record to convert.
- Click the Options button and select Convert to Dependent or Contact to open the Search Contacts dialog box.
- When the confirmation message displays, click the Yes button.
Creating Relationship Definitions (Relationship Setup)
SmartOffice comes preconfigured with the most common contact relationships. However, the user can create additional relationship definitions.
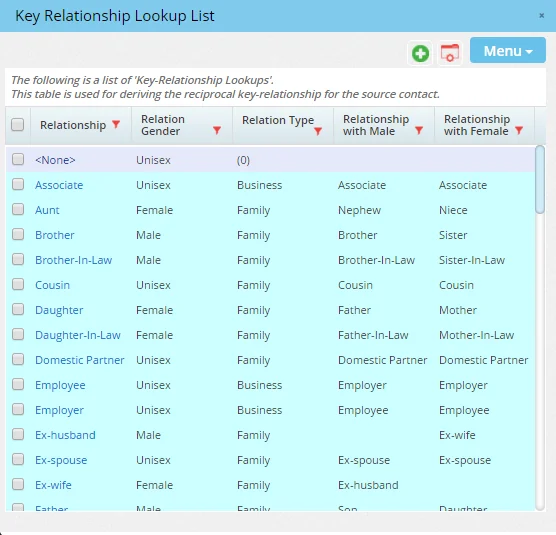
- In the Key Relations section, click the Options button and select Relationship Setup to open the Key Relationship Lookup List dialog box.
- Select Menu > New 'Relationship' record to open the Relationship Information dialog box.
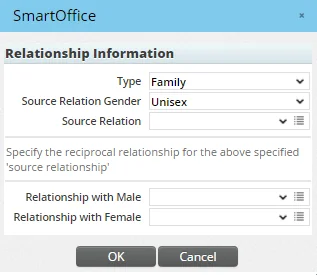
- From the Relationship Type drop-down list, select the general relationship type (Family, Business, Personal or Professional).
- From the Source Relation Gender drop-down list, specify whether the relationship is intended for either gender (the Unisex option) or whether the relationship indicates a specific gender (the Male or Female option). For example, a user creating a Godfather relationship would select the Male option (godfathers are always male), while a user creating a Supervisor relationship would typically select Unisex (supervisors can be male or female) .
- In the Source Relation field, specify the name of the relationship by doing one of the following:
- Select an existing option from the drop-down list. This enables the user to create a relationship with the same name as an existing relationship but with different settings.
- Users with the appropriate user rights can click the Customize Choice button
 to create a new name for the relationship. See Customizing Drop-Down Lists.
- Use the Relationship with Male/Female fields to specify other contacts' relationships. For example, if creating a Godfather relationship, the Relationship with Male would be Godson, while the Relationship with Female field would be Goddaughter. As with the Source Relation field, the user can select existing entries or create custom entries.
- Click the OK button.
Household-Key Relations Sync
and select Household-Key Relations Sync in the Key Relations section. For more information about this feature, see Households.
Business Relations Section
In contact records, the Business Relations section specifies the businesses with which the contact has some association (e.g., as an employee, owner, partner, contractor, etc.).
Adding a Business Relation
- In the Business Relations section, click the Options button and select New 'Business Relationship' record to open the Business Key Relationship Details dialog box.
- Click the Business Name hyperlink to search for and select the business.
- From the Contact Role drop down list, specify the contact's association with the selected business. Users who have the Drop-down Choice Customization user right can click the Customize Choice button to add choices to the drop-down list. See Customizing Drop-Down Lists.
- To add the selected business' address to the contact's Personal content link, select the Add Business Address to Record option. To make this address the user's preferred address, select the Preferred Address option as well.
- Click the OK button.
When a business is added to this section, the contact is added to the business' Business Hierarchy section.
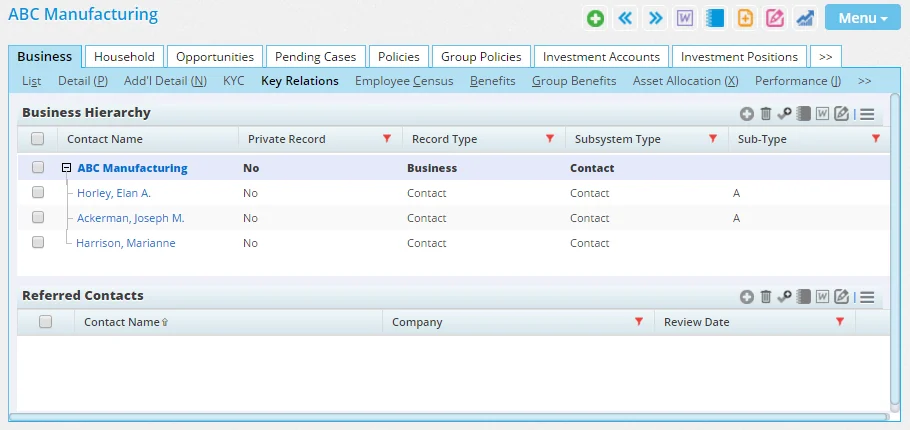
Business Hierarchy Section
In business records, this section lists other contact and business records in SmartOffice that are associated with this business. These associations are displayed in a hierarchical tree to help the user easily visualize the relationships.
Watch the Training Class:
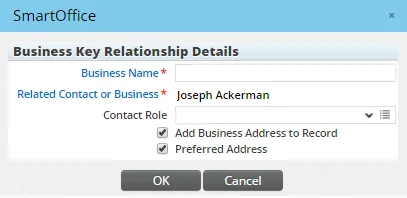
Adding a Contact or Business to the Hierarchy
- In the Business Hierarchy section, select the entry under which the new entry will be created.
- Click the Options button and select New 'Business Relationship' record to open the Business Key Relationship Details dialog box.
- Click the Related Contact or Business hyperlink to search for and select the contact or business.
- From the Contact Role drop down list, specify the contact's or business' association with the selected business. Users who have the Drop-down Choice Customization user right can click the Customize Choice button to add choices to the drop-down list. See Customizing Drop-Down Lists.
- Click the OK button.
When a business is added to the hierarchy, a corresponding entry is created in that business' Business Hierarchy. When a contact is added to the hierarchy, the contact's Key Relations content link (specifically, the Business Relations section) reflects that relationship.
Adding a Key Relation to a Business' Employee Census
and select Add Key Relation to Employee. For more information, see SmartBenefits - Employee Census and Group Benefits.
Viewing a Key Relation's Policies
From the Business Hierarchy section, users can quickly view the insurance policies linked to any business's key relations.
- In the Business Hierarchy section, select one or more key relations
- Click the Options button and select Related Policies.
A list of policies linked to the select key relations opens. From this list, the user can click a policy to view its details. (PMG-829313)
Referred Contacts Section
The Referred Contacts section lists other SmartOffice contacts or businesses that were referred by this contact/business. This information helps the user evaluate the real value of a contact in terms of direct and indirect business generated through that contact. This evaluation is accomplished using the Customer Referral Value feature.
Adding a Referral
- In the Referred Contacts section, click the Options button and select New 'Referred Contacts' record to open the Search Contacts and Businesses dialog box.
- Search for and select the contact or business.
