Last updated: 2025-11-30
Lists - Printing or Exporting a List
- Overview
- Printing a List
- Basic Steps
- Mandatory List Disclaimers
- Exporting a List
- User Setup
- Preparing the List for Export
- Creating the Export File
- Logging and Reporting
Overview
Once a list of records appears on your screen, you can either print it or export it in any of these formats:
- Excel (.xls)
- Comma-separated values (.csv)
- Extensible Markup Language (.xml)
- TAB-separated
Exporting a list allows you to import the data into another program.
export list
Printing a List
When you print a list, SmartOffice opens the list as a PDF document that you can print or save to your computer.
Basic Steps
Note: To prevent possible performance issues, avoid printing more than 1,000 records at a time.
- Select Menu > Print List to open the Print Options dialog box.
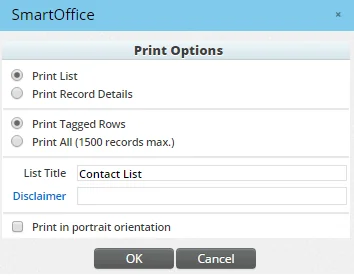
- Print List: Print the list in list format, just as it appears.
- Print Record Details: Instead of printing a list, print the details of each record (one record per page).
- Print Tagged Rows: Print only those records whose check boxes you have selected.
- Print All: Print all records in the list.
- Select your printing options:
Additional options are available when you select the Print List option:
- List Title: Enter the title that will display at the top of the printed list.
- Disclaimer: If appropriate, click this hyperlink to select a disclaimer to be printed on the list (for information about disclaimers, see PDF Reports). Note that this field appears only if the Crystal/PDF Report Administrator user right is enabled for your user account.
- Print in portrait orientation: By default, lists are printed in landscape orientation. Select this option to print the list in portrait orientation.
- Click the OK button.
When you print record details, a window opens to display the information that will be printed.
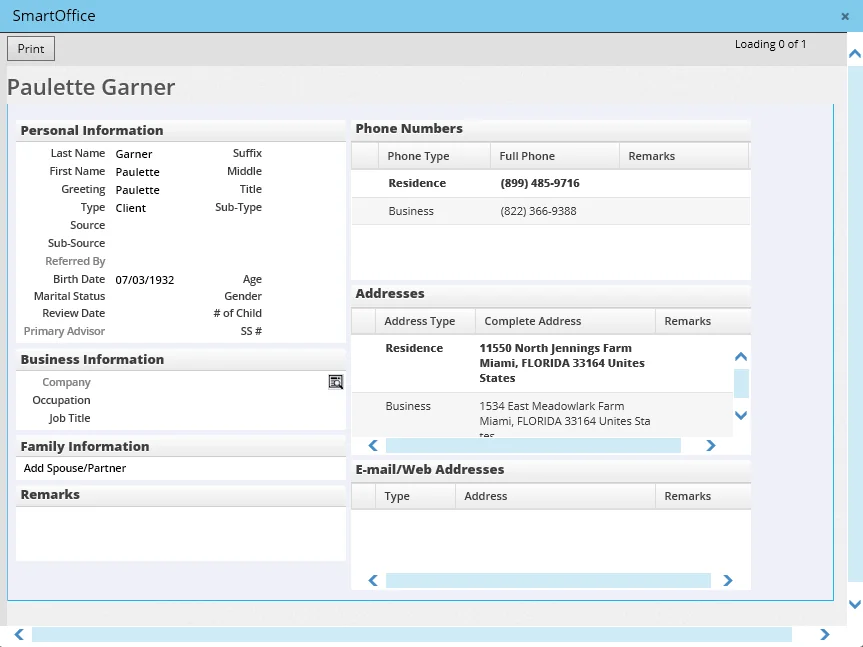
After reviewing the information, click the Print button.
Mandatory List Disclaimers
You can configure SmartOffice to insert a mandatory disclaimer at the bottom of each page of all lists printed in the office.
- From the SmartOffice side menu, select Reports > PDF Reports to open the Report Packages List.
- From the View menu, select PDF List.
- Select Menu > Report Disclaimers to open the Disclaimers list.
- Select Menu > New 'Dynamic Report Disclaimers' Record.
- In the Name field, enter a name for the disclaimer (e.g., Mandatory List Disclaimer).
- From the Disclaimer Type drop-down list, select Mandatory List Disclaimer.
Note: The Mandatory List Disclaimer option is not available if another disclaimer has already been selected as the mandatory list disclaimer. To find the currently designated mandatory list disclaimer quickly, customize the list layout to add the Disclaimer Type column.
- In the Disclaimer field, enter the text of the disclaimer as it will appear in printed lists.
- Click the OK button.
For more information about working with disclaimers in SmartOffice, see PDF Reports - Disclaimers.
Exporting a List
export list
User Setup
To export list data in SmartOffice, a you must have the Data Export user right. For more information, see User Accounts - User Rights.
Preparing the List for Export
When a list extends over multiple pages (see Lists - Navigation), SmartOffice exports all rows on all pages, not just those rows currently displayed. To limit the number of rows exported, use column filters or select the Keep Tagged Rows Only command (see Lists - Customizing Rows) to display only the rows you want to export.
Creating the Export File
- While viewing a list, select Menu > List Options > Export List to open the Export List Contents to Local Computer dialog box.

- Select an export file format from the Format of Exported Data drop-down list. Choose a format that is appropriate for how you plan to view/use the exported data. Available options are:
- XLS: This option exports the list as an Excel (.xlsx) file. To open this file, you will need Microsoft Excel or another application that supports this format. The data will contain some formatting, including bold column headings, a shaded first row, shaded alternating rows, and cell borderlines.
- CSV: The comma-separated values option exports each list row as a series of values separated by commas to indicate the columns. This is a plain-text format that is supported by a variety of applications.
- XML: This option exports the list data in Extensible Markup Language (XML) format. This format that is useful primarily for making the exported data available to other applications that read XML data.
- TAB Separated: This option exports each list row as a series of values separated by tab characters to indicate the columns. This is a plain-text format that is supported by a variety of applications.
- Select any additional options that appear after you select a file format:
- Include Column Headings: For the CSV and tab-separated formats, selecting this option includes the list's column headings in the export file.
- Post Message to Export Log: Select this option to have a log message posted to the Office Export Log for each record in the list (see the next section for more information about export logging). Then type a message in the box for the log, such as the reason the data was exported.
Tip: A SmartOffice administrator can specify whether the Post Message to Export Log option is selected by default. See Office Settings - SmartPad/New Contact/E-mail Posting.
- Export Grouped List into a Single Sheet: For a grouped list being exported to XLS (Excel) format, select this option to keep all list groupings in a single sheet in the Excel file. Clear this option to create a separate sheet in the Excel file for each list grouping.
- Browser: Displays the exported data in a new browser window.
- Save to file: Saves the exported data as a file to the local computer. The file will be saved as a .csv, .xml or .tsv file, depending on the file format you selected.
- MS Word: Saves the exported data as a Microsoft Word (.doc) file.
- MS Excel: Saves the exported data as a file that can be opened in Microsoft Excel. The file will be saved as a .csv or .tsv file, depending on the file format you selected.
- Notepad: Saves the exported data as a plain-text (.txt) file that can be opened with Windows Notepad or another text editor.
- For the CSV, XML and TAB Separated formats, select one of the following options from the Application to View Exported Data drop-down list (the available applications vary depending on the file format selected):
- Click the OK button to download/view the export file.
 button in the alert.
Logging and Reporting
Data Export Log
To see a log of your recent list exports, select Utilities > Data Export Log. The log displays information about your exports only, not those of other users in the office.
From this log, you can also redownload the export file by clicking the Open icon in the Download Link column.
Office Export Log
Administrators who have access to office settings can view details about records exported by all users in the office. To do so, access the Office Export Log content link in Office Settings.
Note: A log entry appears in the Office Export Log only when a user selects the Post Message to Export Log option while exporting the data.
Reporting and Filtering
If you have the appropriate rights, you can create export log filters and Dynamic Reports using the Export Log filter/report category.
