Last updated: 2025-11-30
Advisors/Agencies - Cont./Appt. Content Link
- Overview
- Advisor Contract List Section
- Adding Contracts Individually
- Adding Multiple Contracts Using Contract Templates
- Viewing Advisor Contract Notes
- Adding an Advisor Contract Note
- Viewing the Contract Hierarchy
- Viewing Policies Related to a Contract
- Viewing Advisor Commission Transactions Linked to Contract
- Mass Projecting Commissions for a Specific Advisor Contract
- Viewing Commission Rates Related to an Advisor Contract
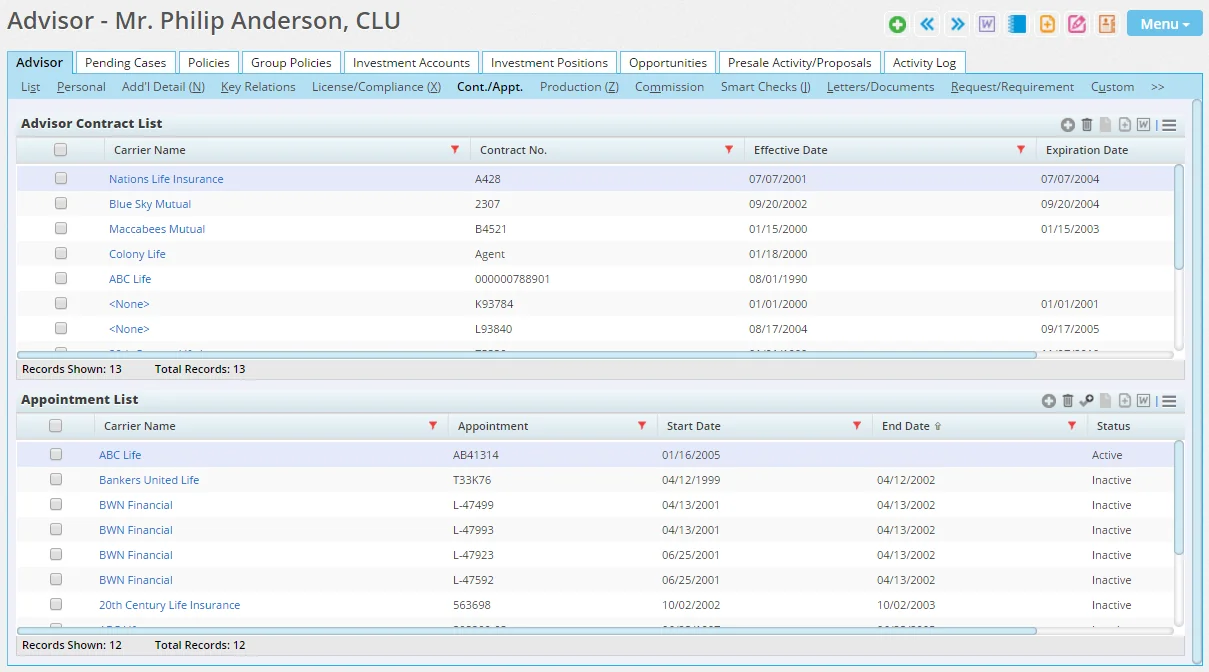
- Appointment List Section
- Adding an Appointment
- Mass Assigning Appointment Records
- Mass Editing Appointment Records
Overview
 Watch the Training Class:
When viewing an advisor or agency, the user can access this content link to track contract and appointment information.
Note: The Cont./Appt. content link is available only to users who have the Advisor Contract/License Management license enabled on the User Accounts - User Rights content link.
However, an advisor or agency that is a SmartView for Advisors user can view its own Cont./Appt. content link.
Advisor Contract List Section
The Advisor Contract List section tracks the contracts an advisor or agency has with carriers to sell those carriers' products.
Adding Contracts Individually
Existing Contracts
If the contract has already been added to the system in Contract Setup:
- Click the Options button
 and select New 'Advisor Contract' record in the Advisor Contract List to open the Contract Information dialog box.
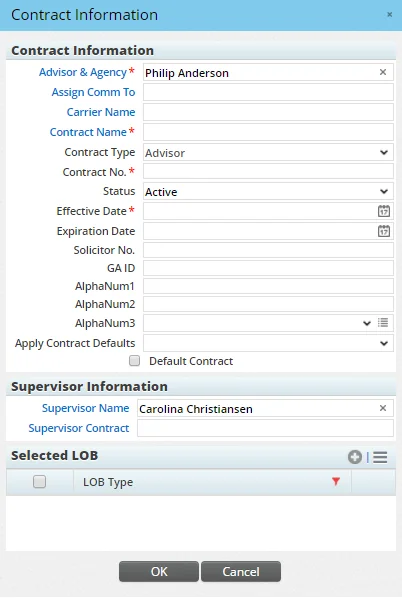
- Click the Contract Name hyperlink and use the Search Contracts dialog box to find and select the appropriate contract.
- Fill in the remaining fields, noting the following:
- The Contract No. and Effective Data fields are mandatory unless the Status field is set to Incomplete.
- In lists, the Expiration Date appears in red if it falls within the next 30 days.
- In the Selected LOB section, click the Options button and select New 'LOB Type' record.
- Select the lines of business to which the contract applies.
- Click the OK button.
Tip: To add LOB information more quickly when entering contract information, the user can define product license types for selection in the Product License Type field. For more information, see Policy/Case Setup - Licensing/Contracting Setup.
New Contracts
If the contract has not already been added to the system in Contract Setup:
- Click the Options button and select New (Comprehensive) 'Advisor Contract' record to open the comprehensive Contract Information dialog box.
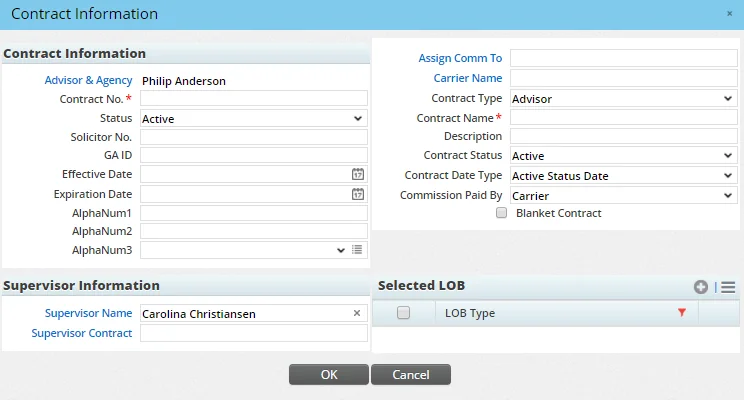
- Complete the required Contract No. and Contract Name fields in addition to any other applicable fields. For information about these fields, see Commissions Setup.
- In the Selected LOB section, click the Options button and select New 'LOB Type' record.
- Select the lines of business to which the contract applies.
- Click the OK button.
Tip: To add LOB information more quickly when entering contract information, the user can define product license types for selection in the Product License Type field. For more information, see Policy/Case Setup - Licensing/Contracting Setup.
Adding Multiple Contracts Using Contract Templates
To quickly add multiple contracts to the Advisor Contract List, the user can apply a contract template.
Note: Contract templates can be applied to advisor and agency records. For agency records, contract templates can be applied only if the House Account option is not selected on the agency Add'l Detail content link.
- Click the Options button and select Apply Contract Template to open the Advisor Contract Templates dialog box.
- If the template does not exist yet, create it by selecting Menu > New 'Contract Template' Record. Learn more about creating a contract template.
- Select one or more contract templates to apply, and then select OK. to open the Contract Information dialog box.
- Enter contract details as you would when adding an individual contract (these details will apply to all of the contracts), and then select OK.
Viewing Advisor Contract Notes
- Select a contract in the Advisor Contract List.
- Click the Options button and select View Advisor Contract Notes to open the Advisor Contract Notes dialog box.
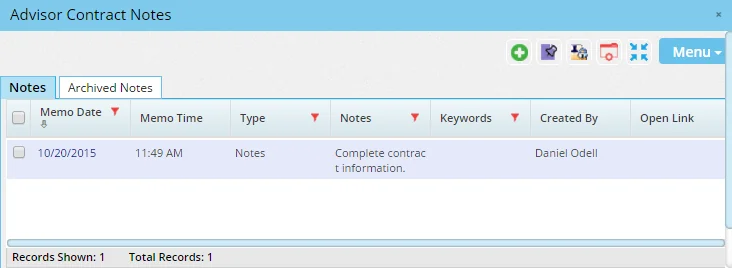
- Click a note's date to view the note.
Adding an Advisor Contract Note
- Select a contract in the Advisor Contract List.
- Click the Options button and select New Advisor Contract Note to open the New Advisor Contract Note dialog box.
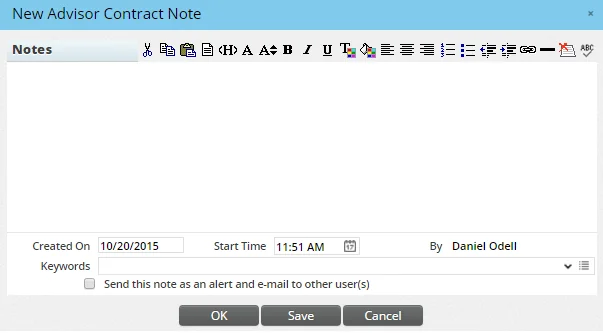
- Enter notes and then click the OK button.
Viewing the Contract Hierarchy
- Select one or more contracts in the Advisor Contract List.
- Click the Options button and select View Contract Hierarchy to open the Contract Hierarchy dialog box.
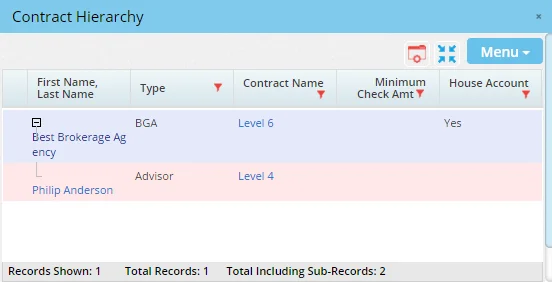
Once the dialog box displays, the user can:
- Alter the column layout to include commission rate and banding information (see List Layout Customization).
- Export the list to Excel or another format (see Printing or Exporting a List).
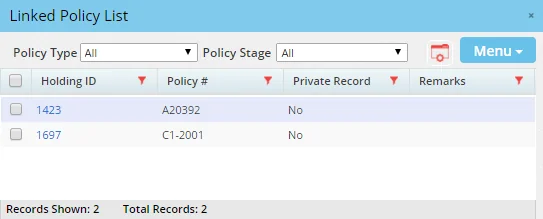
Viewing Policies Related to a Contract
This feature displays pending cases and policies whose commission hierarchies include the selected advisor, carrier and contract. The advisor/carrier/contract can be located anywhere within the hierarchy, and the advisor does not have to be listed in the policy's Policy Advisor List.
- Select a contract in the Advisor Contract List.
- Click the Options button and select Related Policies to open the Linked Policy List.
Viewing Advisor Commission Transactions Linked to Contract
- Select a contract in the Advisor Contract List.
- Click the Options button and select Linked Commpayable to open the Advisor Transaction List.
Mass Projecting Commissions for a Specific Advisor Contract
. For more information, see SmartCommissions - Projected and Expected Commissions.
Once an advisor contract has been referenced by an advisor hierarchy or in a policy, some of the contract's fields become read-only. This occurs because changes to those fields can affect existing hierarchies and policies. The Contract Change Utility, available from the advisor Cont./Appt. content link, enables the user to modify those fields.
- Select a contract in the Advisor Contract List.
- Click the Options button and select Contract Change Utility.
- Change the necessary fields, and then click the OK button.
Viewing Commission Rates Related to an Advisor Contract
From the advisor Cont./Appt. content link:
- Select a contract in the Advisor Contract List.
- Click the Options button and select Advanced Options > Related Commission Rates.
Appointment List Section
This section tracks the appointments an advisor/agency has obtained to sell products belonging to particular lines of business in a specified state or states.
Adding an Appointment
- Click the Options button and select New 'Appointment' record in the Appointment List to open the Appointment Information dialog box.
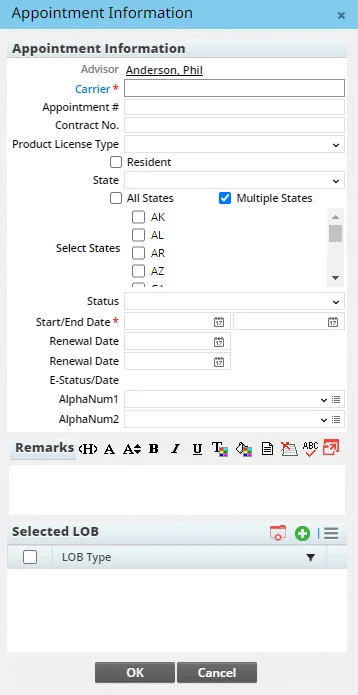
- Complete the fields under Appointment Information, noting the following:
- Carrier: This field is required.
- Start Date: This field is required unless the status is Pending.
- State: If the appointment applies to a single state, select the state from this drop-down list. Otherwise, select the All States or Multiple States option. Note that this field cannot be modified when the All States or Multiple States option is selected.
- All States: Select this option if the appointment applies to all states. Selecting this option automatically selects the Multiple States option.
- Multiple States: Select this option if the appointment applies to more than one state (but not all states). Selecting this option displays the Selected States list.
- Selected States: This list appears when the Multiple States option is selected but the All States option is not selected. The list displays either all states or only those states for which the advisor has a license (this preference can be configured in the Licensing/Contracting Setup section of Policy/Case Setup).
- Status: In this drop-down list, selecting any of the Electronic Request options tells SmartOffice to request updated appointment data from an appointment data provider. SmartOffice displays a Service field, and the user can select the Service hyperlink to choose an available data provider (providers are configured by the administrator in Policy/Case Setup - Licensing/Contracting Setup under Electronic L&A Setup). The E-Status/Date fields display the latest status of the appointment data update request. Update requests are queued and transmitted overnight.
- Termination Reason: This drop-down list appears only when the Status field is set to Electronic Request - Termination. The choices available vary depending on the value selected in the State field (if the All States or Multiple States option is selected, all applicable choices are available).
- License Class Code: This drop-down list appears only when the Status field is set to Electronic Request - Termination. The choices available vary depending on the value selected in the State field (if the All States or Multiple States option is selected, no choices are available).
- AlphaNum1 and AlphaNum2: These are custom fields that can be used to track any additional information about the appointment (for more information about working with custom fields, see Contacts and Businesses
- Custom Content Link).
- (Optional) Type any remarks about this appointment in the Remarks section.
- In the Selected LOB section, click the Options button and select New 'LOB Type' record.
- Select the lines of business to which the appointment applies.
- Click the OK button.
Tip: To add state and LOB information more quickly when entering contract information, the user can define product license types for selection in the Product License Type field. For more information, see Policy/Case Setup - Licensing/Contracting Setup.
Mass Assigning Appointment Records
Follow these steps to quickly assign an appointment record to multiple advisors/agencies at once:
- Go to the Advisor & Agency List.
- Select one or more advisors/agencies.
- Select Menu > Advanced Options > Mass Assign Appointment Records to open the Appointment Information dialog box.
- Enter the details of the appointment (for help, see Adding an Appointment).
- Select OK to add the appointment to all of the selected advisors/agencies.
Mass Editing Appointment Records
To quickly edit appointment records for multiple advisors/agencies at once:
- Go to the Advisor & Agency List.
- Select one or more advisors/agencies.
- Select Menu > Advanced Options > Mass Edit Appointment Records to open the appointment search dialog box.

- To narrow down the list of appointments you want to mass edit for the selected advisor/agency records, enter the appointment criteria in the search box, or click the Filter hyperlink to select a filter (for more help, see Filters). Leaving the fields blank displays all appointment records linked to all of the selected advisor/agency records.
- Select Search to open the Appointment Editable List dialog box.
- Edit the fields for the listed appointment records (note that not all fields can be edited), To save your work and continue editing fields at any point, select Save.
- When finished, select OK.
