Last updated: 2025-09-19
Office Settings - Department/Team Hierarchy
- Overview
- Example Hierarchy Scenario
- Creating a Root Department/Team
- Creating a Child Department/Team
- Establishing Proxies Based on the Hierarchy
Overview
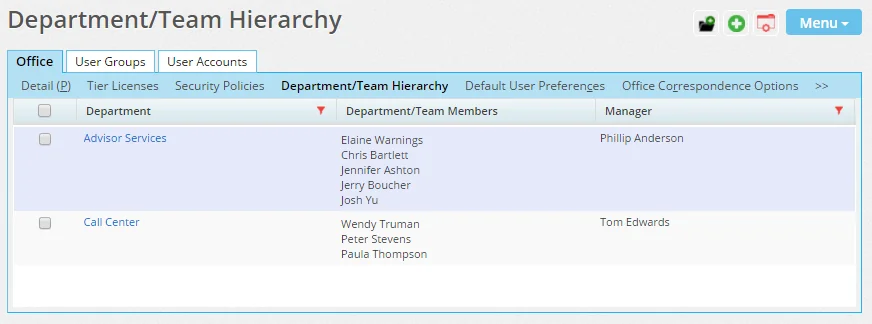
The Department/Team Hierarchy content link in Office Settings enables the administrator to create user proxy assignments by creating a hierarchy of "departments" defining what data users in the office can view.
Note: Department/team hierarchies are one method of creating proxies. The more common method is to create proxies individually from a user's Proxy: Whose Data This User Can See content link.
Example Hierarchy Scenario
Suppose that a team of new business clerks in an office needs access to the calendars, contacts and other data of the advisor team in the office.
Using a department/team hierarchy, the clerks could be added to a "root" department, and the advisors could be added to a department below the root department (i.e., as a "child" department). This would enable the clerks to see the data of all the advisors, but the advisors would not be able to see the data of the clerks.
In setting up the hierarchy, the administrator could also specify whether members within each department/team can proxy for each other (i.e., see each other's data). In this example, it may be appropriate for the new business clerks to proxy for each other. However, it may not be appropriate for the advisors to proxy for each other if the advisors need to be restricted to seeing their own data only.
Note: Department/team hierarchies and the proxy relationships they create do not apply to Super Users, who can view all non-privatized data in the office regardless of proxies.
Creating a Root Department/Team
- On the Department/Team Hierarchy content link, select Menu > New 'Root Department/Team' record to open the Define Department/Team Hierarchy dialog box.
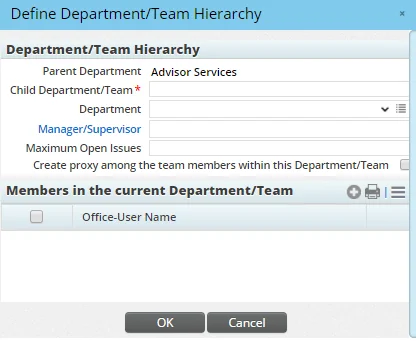
- Enter the name of the root department in the Child Department/Team field (e.g., New Business Clerks).
- (Optional) Select the Create proxy among the team members within this Department/Team option to enable the members of this department to proxy for each other (i.e., to see each other's contacts, activities and other data).
- In the Members in the current Department/Team section, click the Options button
 and select New 'User Member' record to add users to this department.
 - When the list of users displays, tag the applicable users and then click the OK button.
- Click the Manager/Supervisor hyperlink to add a user as the department/team manager.
Note: The manager/supervisor is not included when proxy relationships are created. To include the manager/supervisor in proxy creation, add that user to the department/team member list.
- Click the OK button to return to the Department/Team Hierarchy content link.
Creating a Child Department/Team
- On the Department/Team Hierarchy content link, select a root department/team.
- Select Menu > New 'Department/Team Hierarchy' record.
- Complete the fields in the Define Department/Team Hierarchy dialog box as described in the previous section.
Establishing Proxies Based on the Hierarchy
- After creating departments/teams, select Menu > Create User/Proxy using Department/User Hierarchy Definition.
- When asked whether to delete all manually created proxies before creating the new proxies, click the Yes button to delete any existing proxies or the No button to retain existing proxy relationships and add the new proxies to the existing ones.
- When the confirmation message indicates that the proxies were created successfully, click the OK button.