Last updated: 2025-11-30
Lists - List Layout Customization
- Overview
- Requirements
- Modifying a List Layout
- Opening the List Layout Customization Dialog Box
- Adding Columns
- Removing Columns
- Reordering Columns
- Setting Column Attributes
- Setting List Sorting/Grouping Options
- Setting Layout Options
- Saving Layout Changes
- Calculated Columns
- Creating a Calculated Column
- Editing or Deleting a Calculated Column
- Adding a Calculated Column to a List Layout
- Resetting a List to Its Default Layout
Overview
List layout customization provides the user with advanced, comprehensive control over the appearance and positions of columns in a SmartOffice list, as well as the sorting and grouping of list data.
In addition to making lists more useful, list layout customization plays an important role in creating Dynamic Reports.
list custom2
Note: You can make certain basic changes (e.g., sorting, grouping, customizing rows and columns, applying simple filters) directly to a list without accessing these advanced options. For more information, see Lists - Introduction.
Requirements
To use list layout customization, the user must have one of the following rights enabled on the User Accounts - User Rights Content Link:
- Office-Level List Customization: With this right, the user can customize list layouts for him/herself or for all other users in the office.
- Office-Level List Customization SmartView for Advisor: This is a special user right that is like the standard Office-Level List Customization user right, except that it is available only for SmartView for Advisors user accounts. For more information, see SmartView for Advisors.
- User-Level List Customization: With this right, the user can customize list layouts only for him/herself.
When the appropriate user right is enabled, the Menu > List Options > Customize List Layout command becomes available. In addition to these user rights, the following optional user rights can be enabled:
- Calculated Columns Setup: This right enables a user to create special columns that display values calculated from values in other columns (see Calculated Columns).
Modifying a List Layout
Opening the List Layout Customization Dialog Box
Click the Customize List Layout button or select Menu > List Options > Customize List Layout to open the List Layout Customization dialog box.
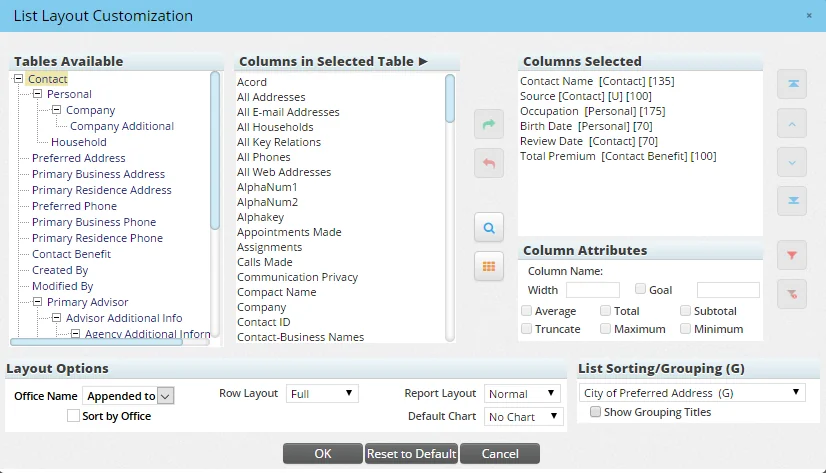
The dialog box displays the list's current columns in the Columns Selected section.
Adding Columns
To add columns, use one of these methods:
- In the Tables Available section, select a table. Tables can be thought of as categories or collections of related columns. When the table's associated columns display in the Columns in Selected Table section, select a column and then click the Add button.
Tip: A quick way to select a column is to double-click it; this immediately adds the column to the Columns Selected section. Also, to select multiple columns at once, hold down the CTRL key while clicking each column.
Note: Tables for custom fields appear in the Tables Available section only when custom fields have been defined for the associated record type.
Example: For Contact-category reports, the Contact Custom table is not available unless at least one custom field has been defined on the contact Custom content link. See Contacts and Businesses - Custom Content Link for more information about defining custom fields.
Users who belong to more than one user group should also be aware that their default user group setting on the user account Detail content link determines which custom fields are available to include in reports. Only those custom fields linked to the user's current default group will be available.
- Click the Search button
 to display the Search Columns dialog box. Enter all or part of the column name in the Column Name field. When the matching column displays, select the appropriate column and then click the OK button.
Removing Columns
To remove a column:
- Select the column in the Columns Selected section.
- Click the Remove button.
Reordering Columns
In the Columns Selected section of the dialog box, the first item corresponds to the left-most column in the list itself. To change the order of the columns, select a column and then click the Up or Down button.
To quickly move a column to the top or bottom of the list, select the column and then click the First or Last button.
Setting Column Attributes
- Select a column in the Columns Selected section.
- Select among the following options in the Column Attributes section:
- Width: Enter a new value in this field to change the width of the selected column
- Goal: For columns that present numerical goal-oriented data (e.g., Appointments Made, Calls Made), select this option to track the progress toward that goal. Then, in the adjacent field, enter the goal itself. Completing this field and selecting the Goals option from the Default Chart drop-down list under Layout Options displays an interactive gauge at the top of the list that indicates progress toward the goal. Note that not all columns support goals. For more information, see Charts and Gauges.
- Average, Subtotal, Total, Minimum, Maximum: These options are for columns that display totals, such as Total Income, Premium, etc. Select the appropriate option depending on the type of information the user wants to display.
- Truncate: This option is for columns that contain text (e.g., Latest SmartPad Notes). Select this option to prevent rows from becoming too wide when displaying text.
Setting List Sorting/Grouping Options
This Sorting/Grouping section of the List Layout Customization dialog box offers options predefined by SmartOffice that represent common sorting and grouping methods. However, users can create their own sorting and grouping options.
Sorting specifies the column that should be used to order the data. For example, to sort the Contact List alphabetically by name, select Contact Name from the drop-down list. To order the list numerically by age, select the Age option.
Options followed by (G) are grouping options. A grouped list is divided into sections corresponding to the group criteria selected. For example, when the user selects the Primary Advisor grouping option, the list displays light blue bars containing the primary advisors' names, with the contacts belonging to each advisor listed underneath.
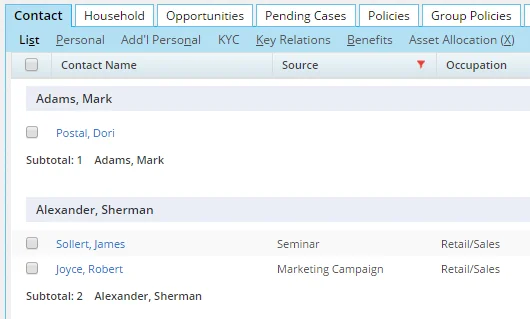
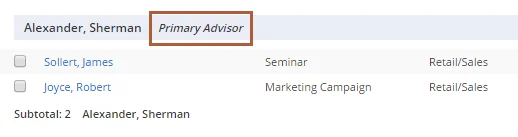
If the Show Grouping Titles option is selected, the blue bars also indicate the type of data the list is grouped by.
If none of the predefined options is suitable, the user can create a custom sorting/grouping:
- Select the Custom Sort option from the List Sorting/Grouping drop-down list to open the custom sort dialog box.
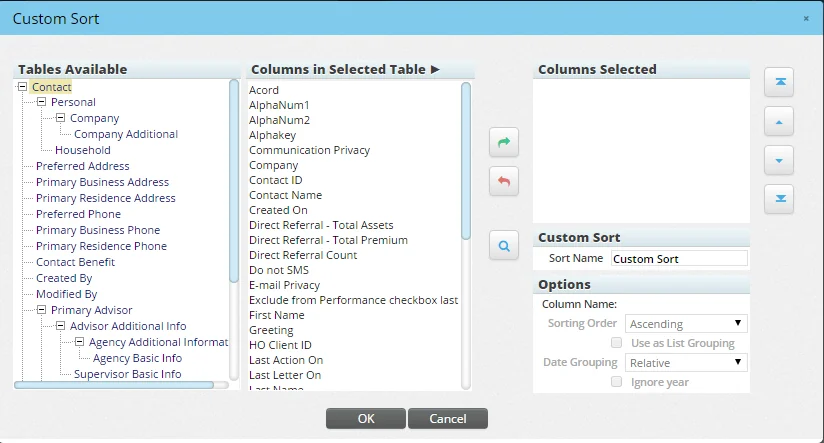
- Using the same methods described in Adding Columns, add columns to the Columns Selected section. The columns selected will be used to determine list sorting.
- Use the First, Up, Down and Last buttons to specify the order of the columns. SmartOffice will sort columns in the order selected. For example, if the user selects the Age and Modified On columns, the list will be sorted first by age and then by modification date.
- Enter a descriptive name for the custom sort in the Sort Name field.
- In the Options section, specify the sorting order and date grouping for each column. To do so, select a column in the Columns Selected section, and then specify the options for that column. The options are:
- Sorting Order: Using this drop-down list, specify whether the selected column should be sorted in ascending or descending order.
- Use as List Grouping: Select this option to break the list up into sections with headings corresponding to the selected column's data. For example, if this option is selected for the contact Type field, the list will be divided into sections according to contact type, such as Client, Beneficiary, Lead, Prospect and so on. If this option is selected for the Created On field, the list will be divided into sections according to the date that the records were created.
- Date Grouping: This drop-down list is available for date columns when the Use as List Grouping option is selected. Select Relative to label the group headings relative to the current date (e.g., Previous Month, Previous Year, etc.). Select Month to label the group headings with the month and year (e.g., June 2007). Select Week to label the group headings with the week number, date range and year (e.g., Week 18 (Apr 29 - May 5) 2001). Select Day to label the group headings with the exact date (e.g., Tuesday June 5, 2007). Select Year to label the group headings with the year (e.g. 2011).
- Click the OK button.
Note: When the user creates a custom sort, an Edit Custom Sort hyperlink displays in the List Sorting/Grouping section so that the user can make additional changes to the sort if necessary.
Setting Layout Options
The Layout Option section contains additional options for defining the appearance of the list.
- Office Name: This drop-down list appears only when the user has Enterprise View turned on. It specifies how SmartOffice should identify the office in which each record in the list resides. The available options are:
- Not shown: Office names are not shown in the list layout.
- Appended to: Office names are appended to whatever value is in the first column of the list. Example: DENVER: Ackerman, Joseph.
- Office Name Column: This option inserts an Office Name column into the list layout to display the office name. The name displayed is the same name found in the Office field on the office Detail content link.
- Office Full Name Column: This option inserts an Office Full Name column into the list layout to display the office's full name. The name displayed is the same name found in the Office Full Name field on the office Detail content link.
If the user selects the Office Name Column or Office Full Name option, the Sort by Office option becomes available. Selecting this option groups the list by the office name or office full name.
- Row Layout: This drop-down list affects the way rows display when they contain data spanning multiple lines: Full, Compact or Preview. For descriptions of these options, see Lists - Customizing Rows.
- Report Layout: From the Report Layout drop-down list, the user can specify whether the list should be viewed in Normal, Summary or Tree mode. Select Normal to display the list in a standard spreadsheet-style format. The other two options in the drop-down list require that a grouping option be selected as described in Setting List Sorting/Grouping Options. Select Summary to display a list of hyperlinked groupings and their total record counts (to see the individual records in each grouping, click a hyperlink). Select Tree to display a list of groupings, each of which can be expanded or collapsed to display or hide its individual records.
- Default Chart: The user has the option of displaying a chart or goals "gauge" at the top of the list. The chart or gauge displays list data in an interactive graphical format for easy visualization. To select a chart, the user must have a grouping option selected as described in Setting List Sorting/Grouping Options. To select the Goals option, the user must assign goals for one or more columns as described in Setting Column Attributes. For more information about the different types of charts, see Charts and Gauges.
Saving Layout Changes
Once all changes have been made in the List Layout Customization dialog box, click the OK button. For users who have the right to modify lists only for themselves, the list displays using its new layout.
For users who have the right to modify lists for other users in the office, a dialog box opens to display three options:
- Save layout changes for this user only
- Save layout changes for all users in the office
- Save layout changes for all users who have not made adjustments
Select the appropriate option to finalize the list layout changes.
Calculated Columns
Calculated columns are special columns whose values are automatically calculated using values from other columns. For example, a user can create a column that displays the sum of the values of two other columns.
To create and modify calculated columns, a user must have the Calculated Columns Setup user right enabled for his or her user account. This user right is not required for adding calculated columns to list layouts.
Creating a Calculated Column
- Do one of the following:
- From the SmartOffice side menu, select Setup > Calculated Columns to open the Column Name dialog box, and then click the New button.
- Open the List Layout Customization dialog box and click the Add button located under the Search button.

- When the Calculated Columns List opens, select Menu > New 'Calculated Columns' record.
- Click the table containing the columns that will be used for the calculation. The New Calculated Column dialog box opens.
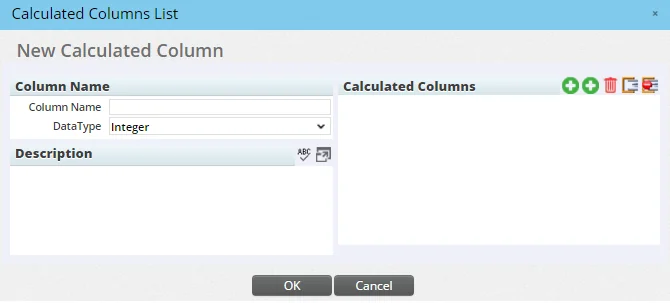
- Enter a name and description for the column in the appropriate fields.
- From the Data Type drop-down list, select the appropriate data type for the new column.
- In the Calculated Columns section, use the buttons along the top to specify the columns whose values will be used in the calculation:
- To add the first column, click the Add Columns button, select the appropriate column and click the OK button. Repeat those steps to add additional columns. The additional columns display a drop-down list containing the arithmetic operations that can be performed (Plus, Subtract, Multiply, Divide). Select the appropriate operation.
- To add flat numbers to the calculation, click the Add Flat Values button and enter the value.
- To delete any item, tag it and click the Delete Calculated Columns button.
- To group mathematical expressions, tag two or more items, and then click the Define Brackets button. To ungroup items, tag the group and click the Un-Define Brackets button.
- Click the OK button.
Editing or Deleting a Calculated Column
To change the settings for an existing calculated column:
- From the SmartOffice side menu, select Setup > Calculated Columns to open the Column Name dialog box.
- Enter the column name and any other relevant search criteria, or leave the fields blank to retrieve all calculated columns.
- Click the Search button to display the Calculated Columns List.
- Do one of the following:
- To edit a column, click its first-column hyperlink (its name, by default) to open the settings dialog box. Make changes, and then click the OK button.
- To delete a column, tag it and select Menu > Delete ‘Calculated Columns’ record.
Adding a Calculated Column to a List Layout
- Open the List Layout Customization dialog box if it is not already open.
- Open the Calculated Columns List if it is not already open by clicking the Add button located under the Search button.
- Click the name of the column to add it to the list layout.
Note: A calculated column can be added to a list layout only when the list supports the appropriate tables. For example, a calculated column that uses values from columns in the Contact table can be added to a list layout only if that list can contain columns from the Contact table.
Resetting a List to Its Default Layout
To reset a list to the SmartOffice default layout:
- From the list, click the Customize List Layout button to select Menu > List Options > Customize List Layout to open the List Layout Customization dialog box.
- Click the Reset to Default button.
