Last updated: 2025-12-22
SmartPolicies - Policy Import
Table of Contents
- Overview
- Setup
- User Account Setup
- SmartOffice Setup
- Import File Requirements
- File Format
- Columns/Fields
- Column Headings
- Phone Number Format
- Date Format
- Additional Guidelines
- Import Process
- Initial Import
- Subsequent Imports
- Viewing the Data Import History
Overview
The Policy Import feature, part of the Data Import Wizard, enables the user to import individual policy data from a file directly into SmartOffice or set up an automatic, recurring import of a file from an FTP or SFTP site. This feature is useful for creating multiple policies in SmartOffice without having to enter them manually.

Note: This feature is different from Inforce Policy Import, which imports inforce policy data feeds directly from insurance carriers.
Setup
User Account Setup
To use the Policy Import feature, a user must have the following user rights and licenses enabled in User Accounts - User Rights:
- Data Import
- Policy CSV Import
- Policy Tracking
SmartOffice Setup
Carriers and Products
Before policies can be imported, their associated carriers and products must already exist in SmartOffice. For more information, see Creating a Carrier and Creating a Product.
Contacts and Advisors
The contacts and advisors associated with the imported policies do not have to exist in SmartOffice; the import process creates these records if necessary. However, for advisor records, using the Advisor Import feature of the Data Import Wizard before importing the policies enables the user to map additional information, such as the advisor's address, phone number and supervisor information. For more information, see Data Import.
Duplicate Records
In preparation for importing policies, any duplicate records in SmartOffice should be merged and deleted. For more information, see Record Merge. In addition, any records in the Deleted Records area should be permanently deleted. These steps eliminate problem data and reduce the chances of record duplication during the import process.
"Created Today" Filter
Setting up "Created Today" filters for contacts, advisors and policies is recommended. After a policy import, these filters can be used to quickly find and display records imported into SmartOffice on the current day. This helps the user differentiate between data that already existed in SmartOffice and data that was just imported. For more information, see Filters.
Import File Requirements
File Format
The policy data to be imported must be in the comma separated values (.csv) file format, which can be created in programs such as Microsoft Excel or exported from a variety of other programs.
Columns/Fields
To import policies successfully without causing errors or duplicate records in SmartOffice, ensure that the following columns exist in the .csv file:
- Primary insured's last name
- Primary insured's first name
- Primary insured's date of birth or Social Security/tax ID number
- Product name or product code (if using product name, ensure that the name exactly matches the product name in SmartOffice)
- Policy number
- Primary advisor's last name
- Primary advisor's first name
- Primary advisor's date of birth or Social Security/tax ID number
The carrier is selected during the import process and therefore does not have to be mentioned in the import file.
Note: During the import process, record matching algorithms for contact and advisor records use the last name and date of birth and/or Social Security/tax ID number. While an import can be run without dates of birth or Social Security/tax ID numbers, duplicate records will result in SmartOffice.
Column Headings
It is recommended that the .csv file contain column headings so that the data in each column can be easily distinguished from data in other columns. These headings ease the import setup process. The column headings can be labeled as the user wishes; during the import process, the user will map these columns to the appropriate columns in SmartOffice.
Phone Number Format
If the import file contains contact phone numbers, postal codes or other contact-related fields beyond those required, that data should be unformatted, i.e., it should contain no dashes, periods or spaces.
Date Format
If date columns are included in the .csv file, ensure that all dates are formatted in a consistent way. For example, do not use the format "6/7/2011" for some dates and "6/7/11" for others. Using a consistent format makes the user's task easier when specifying a date format during the import process.
Additional Guidelines
For more information about formatting the .csv file for best results, see policy import best practices.
Import Process
Initial Import
If this is the first policy import that has been performed in the office, follow these steps:
1\. From the SmartOffice side menu, select Utilities > Data Import Wizard to open the Import Setup List.
The list displays any existing data imports that have been created and saved in the office.
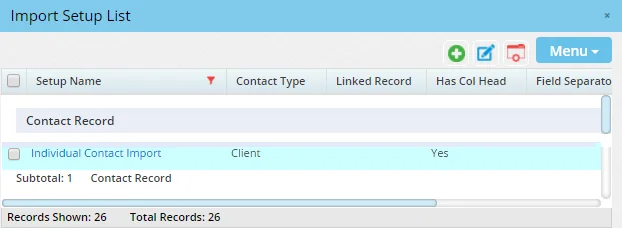
2\. Select Menu > New 'Import Setup' record to open the Add Import Definition dialog box.
3\. From the Select the type of records to be imported drop-down list, select Policy Import.
4\. In the Enter Setup Name field, type a name for the import setup to be created. This name will display in the Import Setup List the next time the user starts the Data Import Wizard, enabling the user to perform future policy imports more quickly (see Subsequent Imports).
5\. Click the Next button to open the Select File to Upload dialog box.
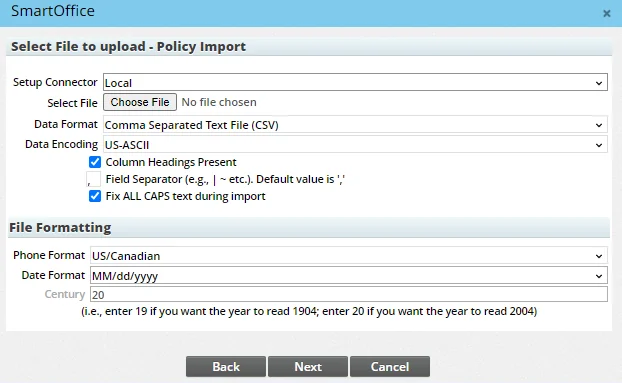
6\. From the Setup Connector drop-down list, choose one of the following:
- Local: This option creates a manual policy import setup. Choose this option if you plan to run imports manually using import files stored on your computer or other device.
- SFTP/FTP: (Note that this option may not be available for some SmartOffice customers.) This option displays fields for creating an automated policy download that connects to an SFTP or FTP site on a schedule and downloads any import files that it finds.
7\. If you chose the SFTP/FTP option in the previous step, make sure the Enable Setup option is selected, and then complete the fields:
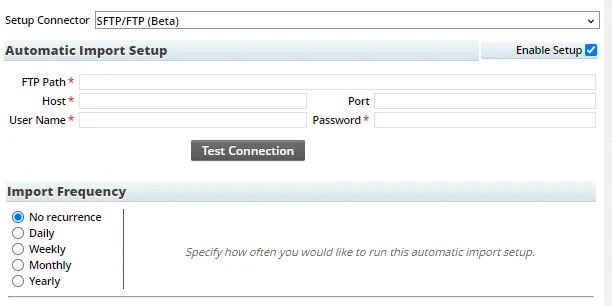
- FTP Path: Specify the path to the directory on the SFTP or FTP site that you want SmartOffice to monitor for new import files. Example: `/policy/import`
- Host: The address of the SFTP or FTP server. This can be an IP address or domain name.
- Port: The number of the port on the SFTP or FTP server that SmartOffice should try to connect to. The standard ports are 22 for SFTP and 20 or 21 for FTP, but the ports for your server may differ depending on your organization's network configuration.
- User Name: The user name of the account that SmartOffice should use to log in to the SFTP or FTP server.
- Password: The password of the account that SmartOffice should use to log in to the SFTP or FTP server.
Once these fields are complete, select the Test Connection button to ensure that SmartOffice is able to connect to the SFTP or FTP site using the information you provided. If you receive an error, review the settings, make any necessary changes, and then test the connection again.
Finally, under Import Frequency, specify how often SmartOffice should check for new files on the SFTP or FTP site. Selecting No Recurrence runs the automatic import only once.
8\. Click the Choose File button to locate and select an import file (make sure the file conforms to the import file requirements).
If you are setting up an automatic import from an SFTP or FTP site, choose a file containing the exact same columns that the import files on the SFTP/FTP site will contain. Note that SmartOffice will import any data present in the file you choose.
9\. Leave the other fields in this dialog box at their default settings, unless any specific changes are necessary to accommodate the import file. These fields are described in Data Import - Import Process.
10\. Click the Next button to open the Select Options dialog box.
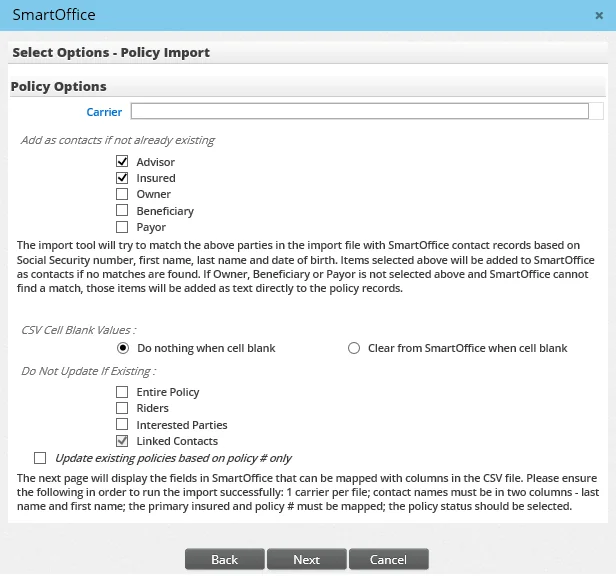
11\. In the Carrier field, enter the name of the carrier for which the policy import will be run (a policy import setup applies to only one carrier; you must create a separate import setup for each carrier). To search for the carrier, click the Carrier hyperlink to open the Search Carriers dialog box. See Searching for Carriers.
12\. Under the heading Add as contacts if not already existing, select any record types that exist in the import file but that do not exist in SmartOffice. The wizard will create these records in SmartOffice during the import process.
Note: If the import file contains advisors, contacts, etc., that do not exist in SmartOffice—and if the user does not select those record types in this dialog box—contact and policy data for these non-existent records will not be imported.
13\. Under the heading CSV Cell Blank Values, specify what the wizard should do when a record exists in SmartOffice and a corresponding record exists in the import file:
- Do nothing when cell blank: If a field in the import file is blank, the wizard will keep the corresponding field in SmartOffice intact.
- Clear from SmartOffice when cell blank: If a field in the import file is blank, the wizard will delete the data in the corresponding field in SmartOffice.
14\. Under the heading Do Not Update If Existing, choose the data elements, if any, that should not be updated at all by the import process if they already exist in SmartOffice.
15\. To update existing policies in SmartOffice for the specified carrier without adding new policies, select the Update existing policies based on policy # only option at the bottom of the dialog box. Selecting this option makes most of the other options in the dialog box unavailable, as those options do not apply to imports based only on policy number. Also, if this option is selected and the import file contains updates to flat extra amounts, the relevant commissionable modal premium amounts in SmartOffice will be automatically recalculated.
16\. Click the Next button to open the Select Mapping dialog box.
Under each column heading from the import file, the dialog displays two drop-down lists. The first drop-down list contains a list of tables (i.e., categories of fields) in SmartOffice. The second drop-down list contains the SmartOffice fields within the table selected from the first drop-down list.
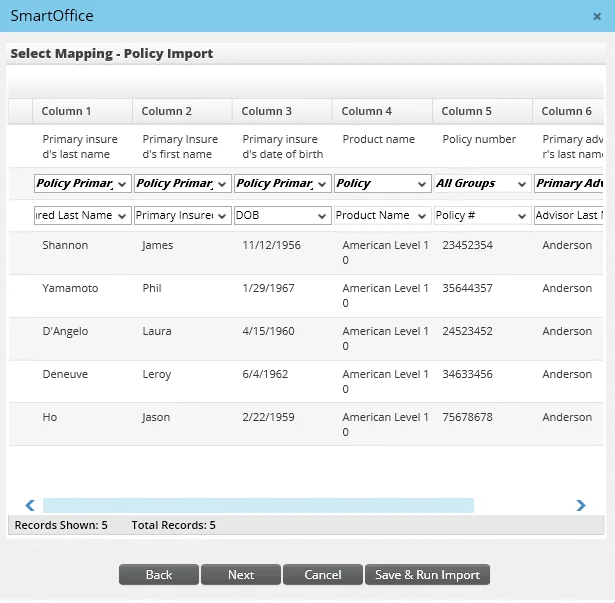
17\. Associate each column in the import file with the matching SmartOffice column (any unmapped columns will be ignored by the import process):
- Choose the appropriate table from the first drop-down list.
- From the second drop-down list, select the field that matches the import file column heading.
Example: If the import file column heading is "Contact Last Name," map it to the SmartOffice table "Policy Primary Insured" and the field "Primary Insured Last Name."
Tip: If your import file contains columns that do not match well with existing SmartOffice columns, you can import that data as custom fields. In the Select Mapping dialog box, select the Additional Info table for each of these columns, and then select a SmartOffice column to import the data into (make sure the column you choose is appropriate for the data type you are importing, e.g., alphanumeric, date, etc.). Once the import is complete, the custom data will appear on the policy Additional Info content link, where you will also be able to customize the field labels.
18\. When all column mappings are complete, click on the Next button to open the Import Mapping Problems dialog box.
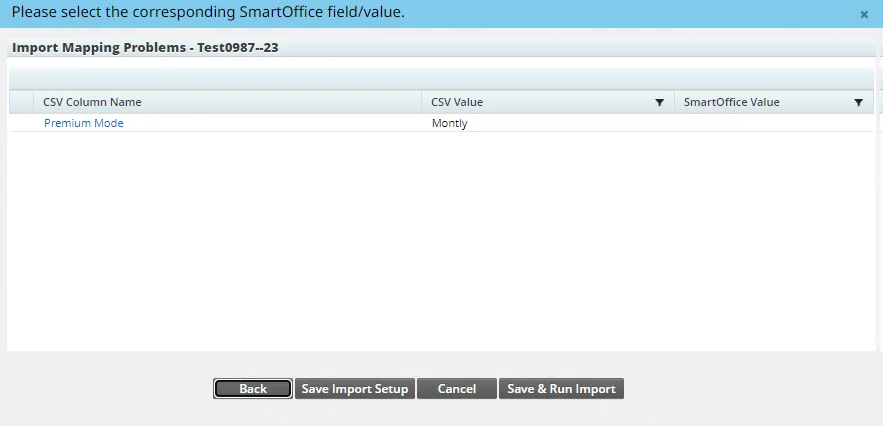
19\. If any problems are listed, resolve them as follows:
- If the problem is due to incorrect mapping for a complete column, click the Back button to go back to the Select Mapping dialog box and change the mapping.
- If the problem is due to a mismatch between the import file's field value and the available drop-down list values in SmartOffice, click the column value's name (under the CSV Column Name column) and then select the appropriate SmartOffice value from the dialog box that opens.
20\. After correcting any problems, click the Save & Run Import button. When the process is complete, the Import Completed dialog box opens.
The dialog box displays statistics about the import, including whether the import completed successfully, how many records were processed and how many records were added to SmartOffice.
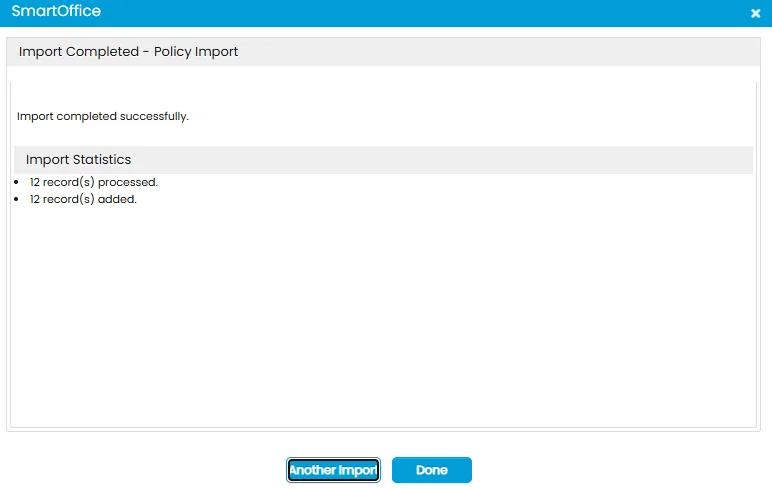
21\. Click one of the following buttons:
- Another Import: Return to the Import Setup List and run another import.
- Done: Exit the Data Import Wizard and view the Data Import History.
Subsequent Imports
Manual Imports
After creating and running a manual policy import for the first time, the user can rerun the same import setup to import additional policies. To make subsequent imports faster, SmartOffice remembers many of the settings selected during the first import; however, these settings can be changed.
- From the SmartOffice side menu, select Utilities > Data Import Wizard to open the Import Setup List.
- Tag the previously created import setup and then select Menu > Run Setup.
Automatic Imports
Automatic imports from an SFTP/FTP site normally require no further action. SmartOffice will import any .csv file it finds in the SFTP/FTP directory specified in the import setup. To temporarily stop the automated import, edit the import setup and clear the Enable Setup option.
After importing a file successfully from the SFTP or FTP site, SmartOffice renames the file to add a `.del` extension and ignores the file on subsequent connections.
If SmartOffice encounters an error importing a file from the SFTP or FTP site, SmartOffice renames the file to add an `.err` extension. SmartOffice then ignores the file on subsequent connections. To try importing the file again, first check the data import history for any errors indicating why the import failed. Then correct the import file and remove the `.err` extension from the file name. SmartOffice will attempt to import the file again the next time it connects to the SFTP or FTP site.
Viewing the Data Import History
The Data Import History displays when the user completes a policy import and exits the Data Import Wizard. The user can also access it by selecting Utilities > Data Import Log from the SmartOffice side menu.
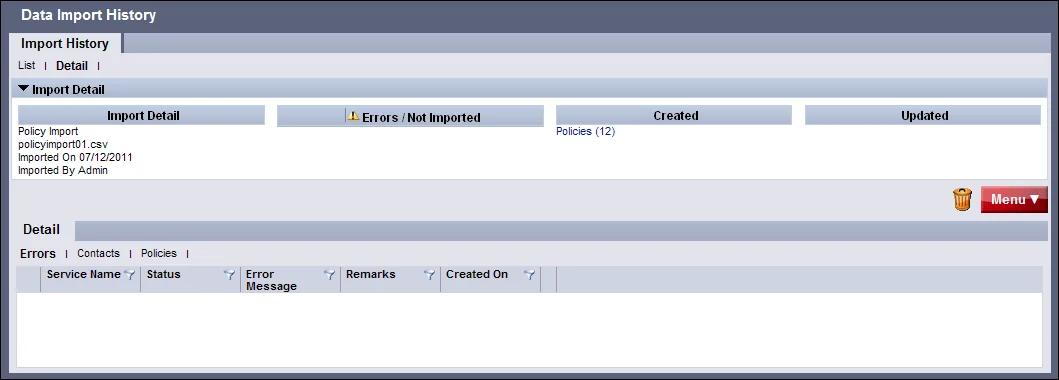
The Import Detail section displays any errors or non-imported data, as well as all data that was imported. Click a hyperlink under the Errors/Not Imported or Created headings to display the details of that log entry in the Detail section.