Last updated: 2025-09-19
Office Hierarchy
- Overview
- Benefits
- Example Office Hierarchy
- Data Flow and Visibility
- Contact Data
- System Data
- Identifying Data from Other Offices
- Creating an Office Hierarchy
- Modifying an Office Hierarchy
- Deleting an Office Hierarchy
Overview
An office hierarchy is an arrangement of two or more SmartOffice offices in a structure that permits users in one office to view certain types of data residing in other offices.
Note: Office hierarchy setup requires access to the System office. This type of access is normally available to SmartOffice enterprise customers.
In an office hierarchy, offices are referred to as "parent" offices and "child" offices depending on their relative positions in the hierarchy. These are relative terms; an office can be both a parent office and a child office if other offices exist above and below it in a hierarchy. Offices are also referred to as "higher offices" and "lower offices" to describe their relative positions in a hierarchy.
Benefits
An office hierarchy enables powerful standardization and supervision capabilities for organizations with multiple SmartOffice offices.
- Standardization: The corporate office or other key offices in a hierarchy can tightly control data, such as correspondence templates and Dynamic Reports, that must be standardized throughout the organization.
- Supervision/Compliance: There is often a need for corporate or regional managers to review the data of agents who are under their jurisdiction. When an office hierarchy is used in conjunction with Enterprise View, these managers can access data for agents in other offices. For example, a broker-dealer's office of supervisory jurisdiction (OSJ) could use this capability to more easily supervise branch offices.
Example Office Hierarchy
Offices are typically arranged in a hierarchy that mirrors the organization's structure (for example, a corporate home office at the top and various field offices below it). To understand how an organization might structure an office hierarchy in SmartOffice, consider the following example.
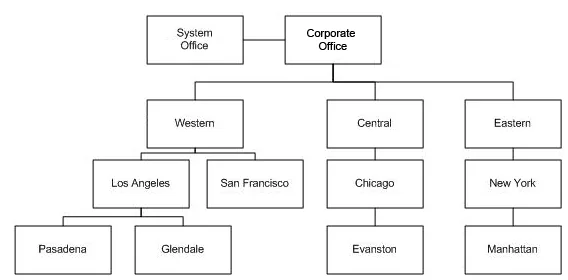
- System office: The System office is not actually a part of any office hierarchy; rather, one or more hierarchies are created and stored in the System office. The System office also plays a special role in data flow and visibility, because certain types of data created in this office are automatically visible to every other office, regardless of which hierarchy those offices belong to.
- Corporate office: Sometimes referred to as the "home office," this office typically represents the organization's headquarters.
- Regional offices: In this example, there are three regional offices below the Corporate office: Western, Central and Eastern.
- Local offices: Under each regional office in the example, there are several offices corresponding to major metropolitan areas (e.g., Los Angeles, Chicago). Several of these metropolitan offices, in turn, contain smaller field offices (Pasadena, Evanston, etc.).
Data Flow and Visibility
To understand how data flows in an office hierarchy, it's important to understand how SmartOffice classifies data in office hierarchies. There are two broad data categories: contact data and system data.
Contact Data
In office hierarchies, "contact" data refers to SmartOffice contacts, businesses, advisors, agencies and other contact-type records (e.g., candidates, leads). It also encompasses records that are linked directly to contacts, such as:
- Activities
- Documents
- Investment accounts and positions
- Letters
- Opportunities
- Pending cases
- Policies
- Presale activities/proposals
- SmartPad entries
Contact data flows upward in an office hierarchy. This means that contact data created in lower offices can be accessed by users in higher offices in the hierarchy (if these users have Enterprise View rights).
Example Contact Data Flow
In the example office hierarchy above, a user in the Western office can view contacts, advisors, pending cases, policies and other "contact" data created in the Los Angeles, San Francisco, Pasadena and Glendale offices. However, that same user cannot see contact data residing in the Corporate office, nor can the user see contact data in the Central and Eastern offices and their child offices.
System Data
"System" data is SmartOffice data that is not linked to contact records. This category includes:
- Call scripts
- Carriers
- Commission rates
- Contracts
- Correspondence templates
- Custom fields (requires additional setup; see Office Settings - Detail)
- Dynamic Reports
- Events
- Filters
- Home page tabs and dashboards
- Investment securities
- Marketing campaigns
- Opportunity setup (e.g., processes, stages, stage actions)
- Products
- Recruiting positions
System data flows downward in an office hierarchy. In other words, system data created in a higher office can generally be accessed (but not modified) by any user in a lower office in a hierarchy.
System data residing in the System office is visible to all users in all offices in all hierarchies.
Example System Data Flow
Consider one common example of data that is shared throughout an organization: templates for standardized correspondence. Suppose that, in the example hierarchy above, correspondence templates are created in the System, Western and Los Angeles offices. Here is the data flow:
- The templates created in the System office are visible to all users in all offices, regardless of hierarchy.
- The templates created in the Western office are visible to the Western office as well as the Los Angeles, San Francisco, Pasadena and Glendale offices. These templates are not visible to users in the Corporate office, nor are they visible to the Central or Eastern offices (or any of their child offices). However, any letters created using these templates are considered "contact" data and are visible based on the rules of contact data flow.
- The templates created in the Los Angeles office are visible to users in the Los Angeles, Pasadena and Glendale offices only. However, any letters created using these templates are considered "contact" data and are visible based on the rules of contact data flow.
Note: Record privacy applies in office hierarchies. If a record is marked private in the office in which it resides, users in other offices cannot access it.
Identifying Data from Other Offices

when viewed in a list. Pointing to such an item displays the name of the office.

Creating an Office Hierarchy
- Sign in to the System office.
- From the SmartOffice side menu, select Setup > Enterprise Office Hierarchy to open the Search Offices dialog box.
- Click the Search button to display the Office Hierarchy - Enterprise Structure list.
- Select Menu > Add Root Office to open the New Office Hierarchy dialog box.
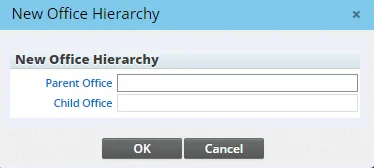
- In the Parent Office field, enter the name of the top-level office in the hierarchy, or click the Parent Office hyperlink to search for and select the top-level office.
- In the Child Office field, enter the name of any office immediately below the top-level office in the hierarchy, or click the Child Office hyperlink to search for and select the appropriate office.
- Click the OK button. The Office Hierarchy - Enterprise Structure list displays the new hierarchy.
- Add the remaining offices under the top-level office:
- Select the top-level office. 2. Select Menu > Add New Child Office to open the New Office Hierarchy dialog box. 3. Confirm that the top-level office is displayed in the Parent Office field. If not, click the Cancel button and try again. 4. In the Child Office field, enter the name of an appropriate office. 5. Click the OK button.
- To establish the third level of the hierarchy, from the Office Hierarchy - Enterprise Structure list, select any second-level office, and then select Menu > Add New Child Office.
- Use the same procedure as before to add the remaining child offices.
- Repeat these steps until all offices have been added to the hierarchy.
Modifying an Office Hierarchy
- Sign in to the System office.
- From the SmartOffice side menu, select Setup > Enterprise Office Hierarchy to open the Search Offices dialog box.
- Click the Search button to display the Office Hierarchy - Enterprise Structure list.
- Locate the hierarchy you want to modify.
- Do any of the following:
- To remove an office from the hierarchy, select that office, and then select Menu > Delete 'Hierarchy' record. If the office is not visible, click the plus sign next to its parent office. Note that this will also remove any offices that are connected to that office as child offices.
- To add an office to the hierarchy, select the office that will be its parent, and then select Menu > Add New Child Office. In the New Office Hierarchy dialog box, confirm that the correct office appears in the Parent Office field. Then enter the new office name in the Child Office field and click the OK button.
Deleting an Office Hierarchy
- Sign in to the System office.
- From the SmartOffice side menu, select Setup > Enterprise Office Hierarchy to open the Search Offices dialog box.
- Click the Search button to display the Office Hierarchy - Enterprise Structure list.
- Locate the hierarchy you want to delete.
- Select the root office of the hierarchy.
- Select Menu > Delete 'Hierarchy' record.