Last updated: 2025-11-30
Pending Cases - Detail Content Link
- Overview
- Status and Dates Section
- Basic Policy Information Section
- All Insurance Types
- Disability (DI)
- Life
- Long Term Care (LTC)
- Annuity
- Benefit Section
- Disability (DI)
- Medical (PPO and Non-PPO)
- LTC (Long Term Care)
- Important Contacts Section
- Current Premium Information Section
- Policy Advisor List Section
- Policy Insured List Section
- Policy Relationship List Section
- Policy Annuitant List Section
Overview
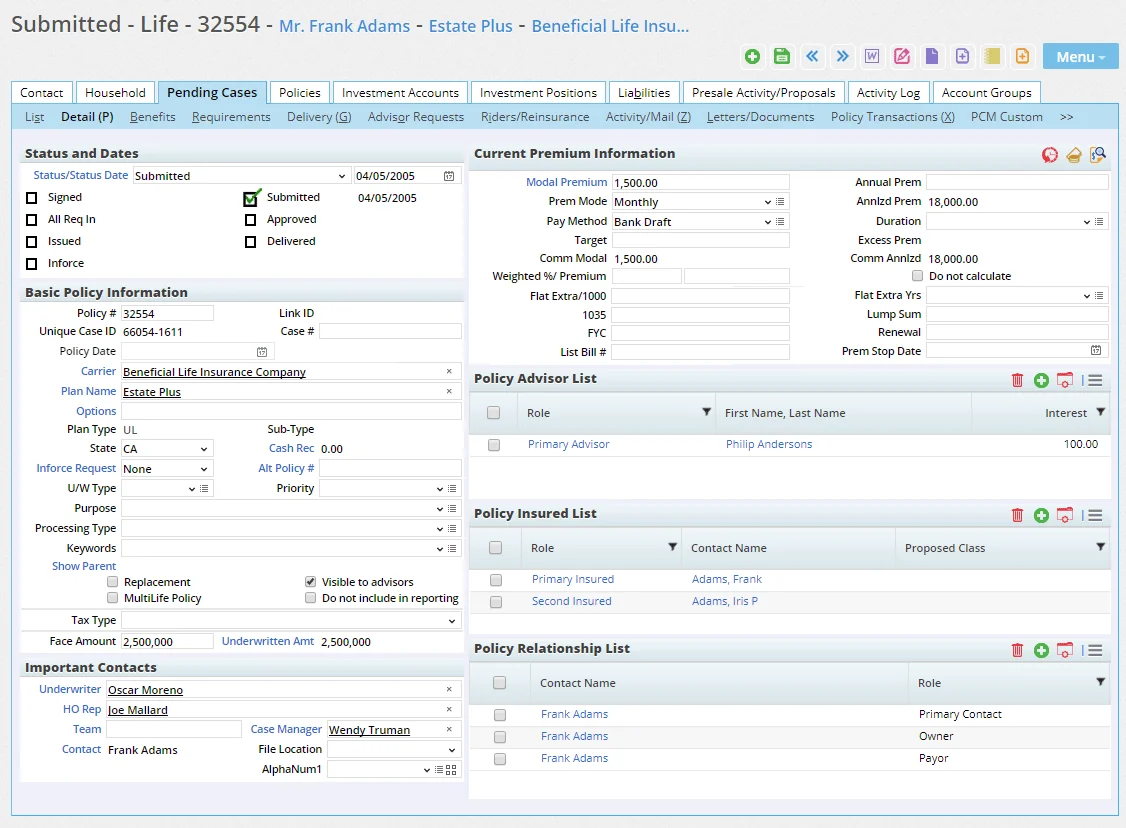
When viewing a pending case, the user can access this content link to review and/or edit policy-specific information such as Policy #, Carrier, Plan Name, Plan Type, Premium and Mode, along with Advisor Information, Important Contacts (Underwriter, HO Rep, Team and Agency Rep) and Policy Relationships.
You can customize this content link to display different content if you have the appropriate user rights (see Page Layout Customization). This topic describes the contents of the SmartOffice default layout.
Status and Dates Section
The Status and Dates section tracks the status, status date and status history. Key statuses and their associated dates are displayed here.
 Watch the Training Class:
Watch the Training Class:
Watch the Training Class:
Watch the Training Class:
When a case is created, the status defaults to that stated in the SmartCaseManager initial workflow in Policy/Case Setup (e.g., Submitted).
The user can change the status of a case by clicking one of the status check boxes.
A case's status can also be changed by selecting a new status from the Status drop-down list. The drop-down list contains the same options as the check boxes, plus additional statuses. When a selection is made in the Status drop-down list, the following occurs:
- If the new status matches one of the seven status check boxes, the appropriate status check box is selected automatically, and the date of the status change appears next to the check box.
- The Status Date field is automatically changed to reflect today's date. The user can change this date before saving changes to the case. (Changes must be saved before the workflow associated with the new case status can begin.)
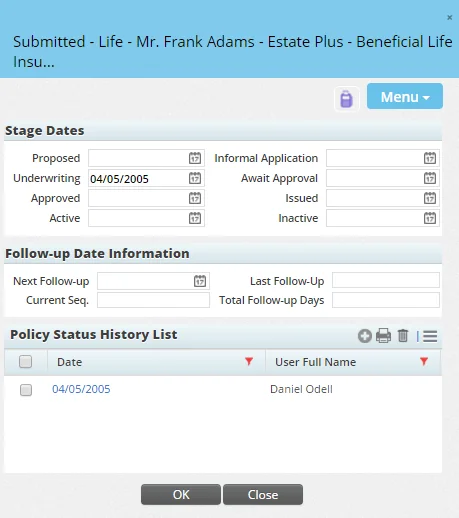
- The associated Stage Date is entered in the Policy Status History List dialog box, which the user can view by clicking the Status/Status Date hyperlink.
The user can also change the dates associated with any status check box, with the following limitations:
- If a check box displays a date prior to today's date, clicking that check box updates the date to today’s date.
- If a check box displays today's date, clicking the check box resets the case's status to its previous status and deletes the status date from the Policy Status History List.
Note: Only today’s date can be deleted in this manner.
For more detailed status information, click the Status/Status Date hyperlink. A dialog box opens to display the case's stage and status date history, as well as any follow-up dates linked to the policy stage.
Note: The Delete button in the Policy Status History List is available only to users who have the Pending Case & Policy Setup Administrator license. See User Setup.
If automatic follow-up settings have been established in the Policy-Based Follow-Ups settings in Policy/Case Setup, SmartOffice automatically fills in the information in the Follow-Up Date Information section. This follow-up information can be edited manually, however.
There are eight pending case stages: Proposed, Informal Application, Underwriting, Await Approval, Approved, Issued, Active and Inactive. Every pending case status is associated with one of these stages (statuses are linked to stages in Policy/Case Setup - Status Setup). When a change in a pending case's status moves the case into a new stage, the date of the change is noted in the appropriate field under Stage Dates.
Additional statuses and associated dates can be added in the Policy Status History List dialog box by clicking the New button. Adding a status in this way does not modify the case's current status, but it does add the status to the Policy Status History List. The Stage Dates section of the dialog box displays the stage changes. Changing a case status automatically adds dates to these fields and automatically overwrites them each time a case is moved into a particular stage.
Some pending case status changes can trigger a status change to a linked presale activity. When a case's status changes to In Underwriting, the associated presale activity's status changes to Application Received. When a pending case's status changes to Inactive, the associated presale activity's status changes to Closed.
Basic Policy Information Section
The Basic Policy Information section of the Detail content link varies depending on the insurance type. Some fields are common to all insurance types, while others display only for specific insurance types.
All Insurance Types
- Visible to Advisors: Clear this option to hide the case from SmartView for Advisors users, iCaseStatus mobile app users and Case Status report recipients.
- Unique Case ID: Each pending case receives a unique case ID number, which SmartOffice creates automatically.
- Policy Date: If the case has gone inforce, this field displays the date on which that occurred.
- Options: If the insurance product linked to this pending case has multiple commission structure options (see Policy/Case Setup - Product Options), the user can click the Options hyperlink to select one.
- Alt Policy #: This field can be useful if the insured has another policy in the system, separate from the current case, containing useful data that users in the office may need to reference. Click the Alternate Policy # hyperlink to search for the policy. The field displays the alternate policy's unique case ID.
- Replacement: Select this option if the application is for a policy intended to replace an inforce policy.
- Cash Received: This field refers to money accepted with the application. This information is stored as a policy transaction. The amount is displayed as a read-only field. To see more Cash Received information, click the Cash Received hyperlink to open the Policy Transaction dialog box.
The Cash Received transaction also displays on the case's Policy Transactions and Delivery content links.
- Inforce Request: To view or modify exchange information, click the Inforce Request hyperlink to open the Exchange Information List dialog box.
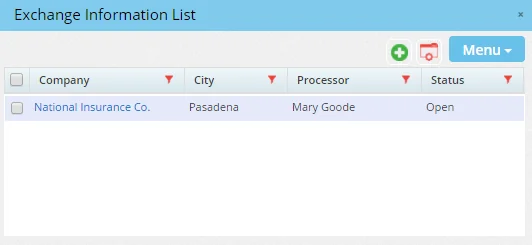
This list tracks the movement of funds. If the owner chooses to close a policy and open a new one, the cash value of the closed policy can be transferred to the new policy.

Click a policy number in the Policy Information section of the dialog box to view detailed information about the exchange. To note the amount along with the date it was received, click the New button in the Policy Information section to open the Detail Policy Information dialog box.
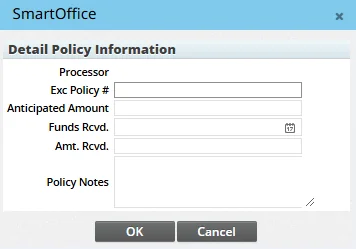
The Processor field automatically reflects the processor's name from the previous dialog box.
- Processing Type: This field allows organizations to identify internal workflows based on application type. It is intended for informational and reporting purposes.
- Show Parent: If the case is linked to a multi-life case, clicking this hyperlink opens the parent pending case. If the case is not linked to a multi-life case, the message "No parent case is associated with this record" displays.
- CTMRecalculation: Select this option to flag the pending case for recalculation of expected commissions the next time the user manually calculates commissions or uses mass commission projection. SmartOffice automatically selects this option when the inforce data feed or Direct Download and Replace process changes one or more key aspects of the case, such as the advisor, carrier or modal premium. SmartOffice also selects this option automatically when the commission rate of the case is changed. Once calculations are successfully completed, this option is automatically cleared. If calculations fail, SmartOffice selects this option automatically. For more information about commission calculations, see SmartCommission.
- Benefit for Reports: For long-term care policies, the value in this field appears in PDF reports such as the Policy Summary.
Disability (DI)
- Occup. Rate: The designation assigned to the client based on the client's occupation.
Life
- Underwritten Amt: Click this hyperlink to recalculate the underwritten amount for the case. When the Underwritten Amount dialog box opens, click the OK button to accept the calculation displayed, or click the Close button to reject it.
Long Term Care (LTC)
- Coverage Selection: The type of coverage carried by the client.
- Benefit Length: The amount of time the benefit will pay out.
- Tax Type: If the tax type is Qualified, the policy is not taxed. If it is Non-Qualified, the policy is taxed.
Annuity
- Tax Type: If the tax type is Qualified, the policy is not taxed. If it is Non-Qualified, the policy is taxed.
Benefit Section
This section of the Detail content link displays only for certain insurance types. The information presented varies depending on the insurance type.
Disability (DI)

- Benefit Amount: The most money the client can receive per accident/illness.
- Benefit Period: How long the benefit will pay out.
- Elimination: The number of days the client has to be injured or ill before the benefit will pay out.
- Rating: The table rating for determining any additional premium.
Medical (PPO and Non-PPO)
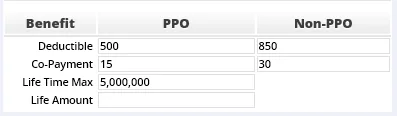
- Deductible: The amount the client has to pay before the policy will begin covering costs.
- Co-Payment: The amount of out-of-pocket money the client will pay per doctor visit.
- Life Time Max: The maximum amount the insurance company will pay in a lifetime.
LTC (Long Term Care)
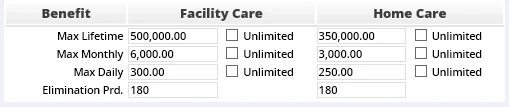
- Max Lifetime: The maximum amount the policy will pay for the care of the client in a lifetime.
- Max Monthly: The maximum amount the policy will pay for the care of the client in a month.
- Max Daily: The maximum amount the policy will pay for the care of the client in a day.
- Elimination Period: The number of days before a policy will begin paying benefits once the insured is eligible to receive them.
Important Contacts Section
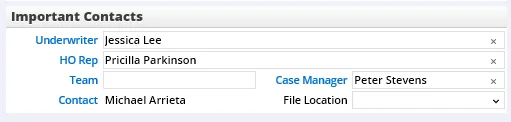
The Important Contacts section of the Detail content link displays the case's underwriter, home office representative, team, case manager and primary contact.
The contacts available for selection in the Underwriter and HO Rep fields are specified on the carrier's HO Reps/Underwriters content link. The File Location drop-down list specifies the unit within the organization that has been assigned to handle the case.
Clicking the Contact hyperlink opens the Contact Information dialog box.
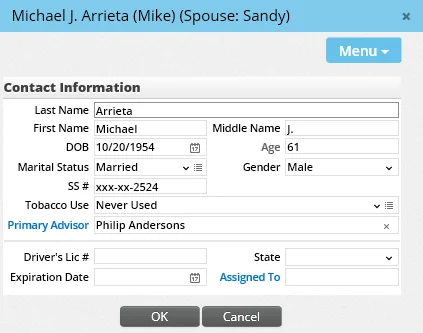
Note: To access full contact information, click the contact's name in the heading at the top of the page instead.
Current Premium Information Section
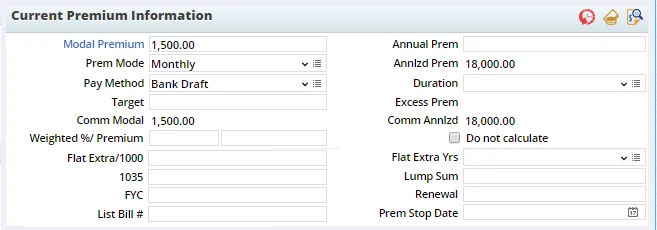
The Current Premium Information section contains details about proposed premium costs and payments. To view or modify premium breakdown information, click the Modal Premium hyperlink.
For detailed information about the fields and calculations in this section, see Life Policy Calculations. Note the buttons in the title bar of the Current Premium Information section:
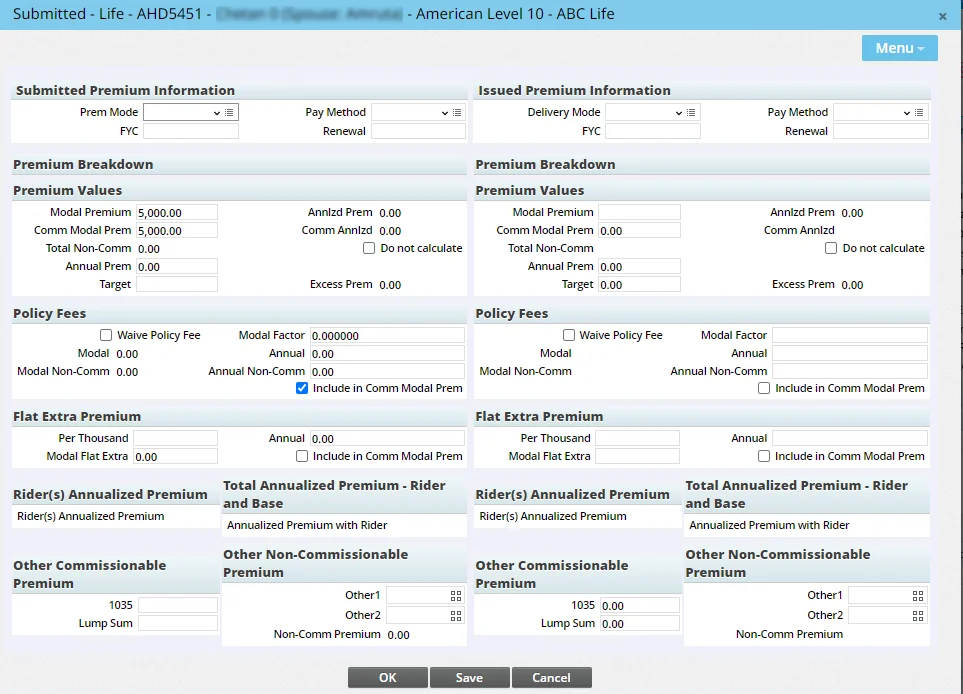
- Show History: The Show History button
 displays the case's premium breakdown at the time of submission alongside the premium breakdown in effect when the case reached an issued stage.
- Future Payment: The Future Payment button
 opens an editable spreadsheet that can be used to record future premium payments for a policy whose modal premium changes over time. The SmartCommissions module uses this information to calculate accurate commission projections for such policies.
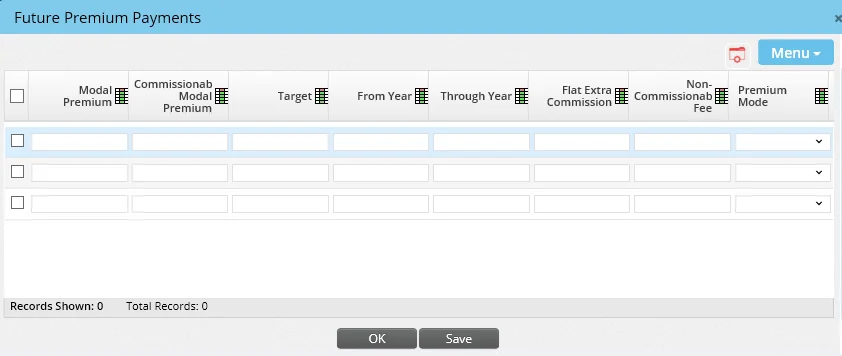
To add a row to the spreadsheet, select Menu > Add New List Row.
- Payment History: The Payment History button
 opens a log of all past premium changes.
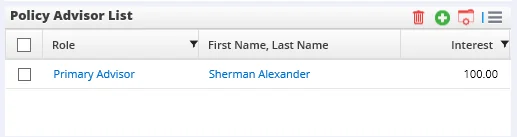
Policy Advisor List Section
 and select New 'Policy Agent' Record to open the Policy Advisor Information dialog box.
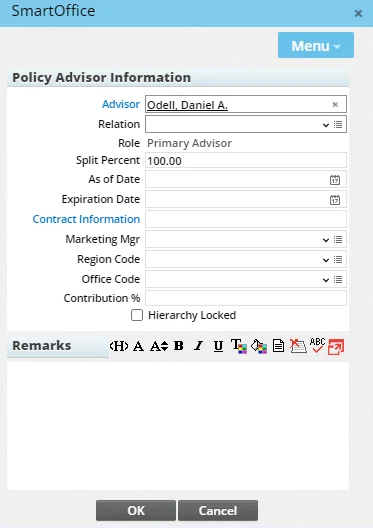
If a case has only one primary advisor, that advisor cannot be deleted.
and choose Show Old Advisors. To hide them again, select > Hide Old Advisors.
In addition, SmartCommissions users should note that an advisor cannot be deleted from the list if the advisor has linked commission payable records for the policy. This restriction applies even when an advisor is assigned an Old or Reassigned role.
Note: The advisor roles available for selection in the Role drop-down list are defined by the administrator (see Advisor Role Exclusion Setup).
For more Policy Advisor List information, see SmartPolicies - Basic Information Content Link.
Policy Insured List Section
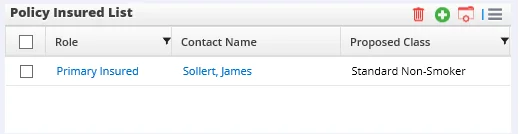
The Policy Insured List section of the Detail content link displays the primary insured and the other insured contacts for the policy. Adding an Insured Contact
in the Policy Insured List and select New 'Policy Insured/Relationship' Record to open the Policy Relationship dialog box.
Adding a Second Insured A second insured can be added from the Policy Insured List for cases linked to a second insured product.
- Click the Options button in the Policy Insured List and select New 'Policy Insured/Relationship' Record to open the Policy Relationship dialog box.
- Enter the requested information, making sure to select Second Insured from the Role drop-down list.
- Click the OK button.
Only one second insured can be added to the Policy Insured List. Any additional contacts added to this section will be listed as Co-Insured. Viewing an Insured Contact
To view details about an existing insured contact, click the contact's name in the Policy Insured List. Adding Impairment Information for an Insured Contact
Adding impairment information for a contact results in the following:
- The Has Impairment option is selected in the Policy Relationship dialog box when the user views details about the insured contact.
- The Has Impairment column in the Policy Insured List displays a "yes" designation for that contact. (This column does not display by default and must be added to the Policy Insured List. See List Layout Customization.)
- The icon for the Impairments command in the Options menu of the Policy Insured List changes to a red triangle with an exclamation mark.
- The impairment information displays in all future policies and cases created for that contact.
To add impairment information for an insured contact:
- Tag a contact in the Policy Insured List.
- Click the Options button in the Policy Insured List and select Impairments to open the Impairments dialog box.
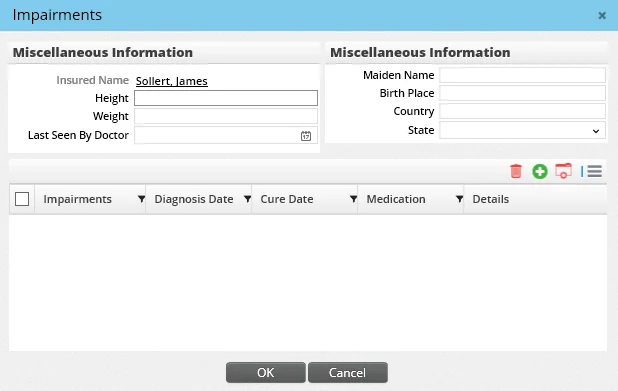
- Complete the miscellaneous information fields.
- Add impairments by clicking the Options button and selecting New 'Impairments' Record.
- and click the OK button.
Policy Relationship List Section
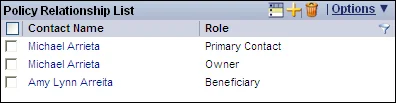
This section of the Detail content link defines the Owner, Payor, Beneficiary, Beneficiary 2, Co-Owner, Co-Payor, Contingent Beneficiary, Loss Payee, Collateral Assignee, Ot her, Trustee, Account Manager, Commission Specialist, Internal Underwriter, Licensing/Contracting Manager, Marketing Manager, OSJ, Relationship Manager, Sales Rep and/or Absolute Assignee for the policy.
SmartOffice may create some entries in the Policy Relationship List automatically when the pending case is created, based on entries in the primary advisor's Policy Contacts list (located on the advisor's Key Relations content link).
To add a policy relationship:
- Click the New button in the Policy Relationship List to open the Policy Relationship dialog box.
- Complete the fields:
- - Contact: The person with a relationship to the case.
- Address: The address associated with the case, which may not necessarily be the contact's primary address. Click the Address hyperlink to select an address to populate this field.
- Relation: The relationship the contact has with the policy's primary insured. - Role: The contact's relationship to the case.
- As Of: The date when the contact became associated with the case.
- Expiration Date: The date when the contact's association with the case ends.
- Percentage: How much the contact is related to the case. For example, the percentage specified for a beneficiary determines the percentage of the benefit the associated contact will receive.
- Click the OK button.
Policy Annuitant List Section
The Policy Annuitant List section of the Detail content link defines the Annuitant/Joint Annuitant Contact for the Annuity insurance type. Note: This section is available only for Annuity pending cases.
To add an annuitant:
- Click the New button in the Policy Annuitant List to open the Policy Relationship dialog box.

- Complete the fields, selecting the appropriate annuitant type from the Role drop-down list.
- Click the OK button.
