Last updated: 2025-11-30
SmartCalendar - Activity Detail
- Overview
- Activity Tab
- Participants Section
- User Participants Section
- Detail Section
- Description Section
- Options Section
- Response Section
- Scheduling Tab
- Recurring Activities Tab
- Documents Tab
- Opportunity Action Items Tab
- Custom Tab
- Activity Notes Buttons
- Calendar Button
Overview
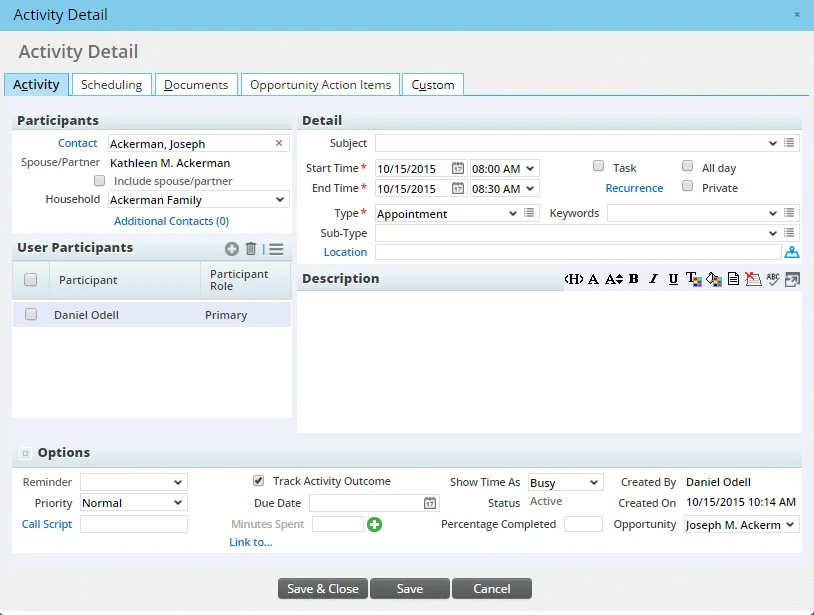
When the user creates, views or modifies an activity in SmartCalendar, the Activity Detail dialog box displays the subject, time, date, participants and other information about an activity.
The Activity Detail dialog contains several tabs across the top that the user can click to access additional information about the activity:
- Activity
- Scheduling
- Recurring Activities (visible only if the event recurs)
- Documents
- Opportunity Action Items (visible only to users who have a SmartOpportunities license and only if the activity is linked to an opportunity)
In addition, the button bar in the upper-right corner gives the user access to useful commands. The following sections describe these tabs and buttons in detail.
Activity Tab
Participants Section
- Contact: This field contains the name of the contact to which the meeting pertains. To view details about the contact, click the contact's name. Linking a contact to the activity is not required, but doing so makes other features available for the activity, like activity outcome tracking.
- Spouse/Partner: If the contact has a spouse/partner specified in SmartOffice, that information is displayed in this field. Select the Include Spouse/Partner option to include that person in the activity.
- Household: The Household drop-down list displays the name of the household to which the contact belongs. When a contact belongs to more than a single household, the Household drop-down list includes all of the households. This field is not available when the contact does not belong to a household.
- Additional Contacts: Click this hyperlink to add contacts to the activity. This action opens the Add'l Contact(s) dialog box.
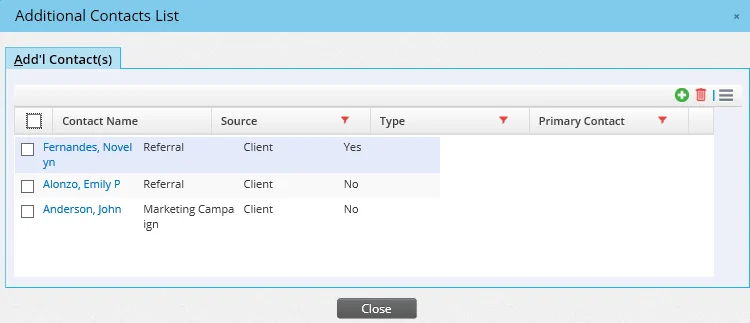
 and select New 'Additional Contact(s)' record to open the Search Contacts and Businesses dialog box. Enter the search parameters and click the Search button to open the Contact List or Business List. Contacts can then be added from that list.
When additional contacts are added to a recurring activity, the contacts are added to all future occurrences of that activity.
- Notify contacts when activity is created/changed: This option is available only to users of SmartOffice's enterprise Exchange sync solution. When this option is selected, activity participants receive e-mail notifications when the activity is created, changed or deleted in SmartOffice. Clear this option to disable those notifications.
User Participants Section
The User Participants list displays the names of all users in the office who are participants in the activity. All activities have at least one primary participant and can have one or more secondary participants.
The default participant or participants for a new activity are determined by the user’s settings. See User Preferences - Activity Options.
The activity creator can change the primary participant and designate additional participants. Any user whose status is either Active or Temporary Password can be added as a participant. A primary participant can be deleted from the Participants list, as long as there is at least one other participant remaining on the list. The columns in the User Participants list can be customized by selecting Options > List Options > Customize List Layout. See List Layout Customization.
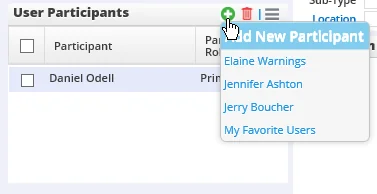
Adding Participants to an Activity
in the User Participants toolbar and select Add New Participant.
- Do one of the following:
- Click the Add New Participant button in the User Participants section toolbar.
- In the Available Users dialog box, select one or more participants and then click the OK button.
If the user has created a list of favorite users, any of those users can be added quickly to the participants list by pointing to the Add New Participant button to display a menu of favorite users.
Adding Participants from Other Offices to an Activity
- Click the Options button in the User Participants section and select Add Additional Participants from Other Offices.
- In the Search Users dialog box, enter the exact Office Name and User Name.
Note: It is important that the exact Office Name and User Name be entered.
- Click the OK button to display the List of Users dialog box.
- Tag the appropriate user and then click the OK button.
Deleting a Participant
- Tag a participant in the User Participant List.
- Click the Options menu and select Delete 'Participant' record.
Changing the Primary Participant
To designate another user as the primary participant, the activity creator must first add secondary participants using the steps described above. After adding participants:
- In the User Participants section, tag the user who will be the new primary participant.
- Click the Options hyperlink in the User Participants section toolbar and select Mark User as the Primary Participant of this Activity. The selected user’s name displays in bold to indicate that he or she is now the primary participant.
Detail Section
- Subject: The Subject field provides space for entering a brief description of the activity's purpose. If the user uses certain subject lines repeatedly when creating activities, the field can be customized to store those subject lines for quick use in the future.
- Start Time and End Time: These fields are available only for calendar activities, not for tasks or all-day events. Enter dates manually by typing them into the date fields or by clicking the Pick Date buttons. By default, dates are displayed in the MM/DD/YYYY format (you can change the format in User Preferences - Basic Info). To calculate the end time of an activity automatically, select one of the preset time ranges (1 hour, 1.5 hours, etc.) from the End Time drop-down list. You can also manually enter the end time by typing it directly into the field. Both the default start time for new appointments and the default activity duration can be set in User Preferences - Activity Options.
- Task and All Day: These options determine the activity category: calendar activity, task or all-day activity. When both options are cleared, the activity becomes a timed activity and is displayed in the corresponding time slot in the Calendar Day and Calendar Week views. When the Task option is selected, the Start Time and End Time fields become unavailable (making it an untimed activity), and the activity is displayed under the Tasks section in the Calendar Day and Calendar Week views. Selecting the All Day option makes the activity an all-day event that displays in the Calendar Day and Calendar Week views under the All Day Events section. If you are creating a recurring activity, the Task and All Day options are available for selection, but you cannot change this selection once the new activity is saved.
- Recurrence: Click this hyperlink to create an activity that occurs more than once at regular intervals. You will be presented with a dialog box displaying several recurrence options.
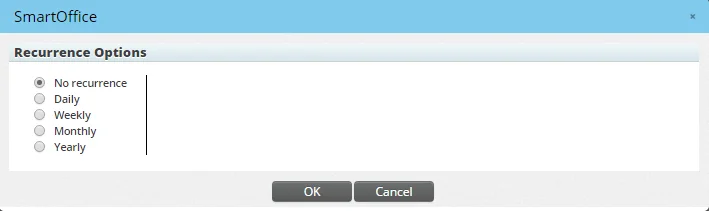
By default, the No Recurrence option is selected. When you select the Daily, Weekly, Monthly or Yearly option, new options and fields appear, including fields for entering start and end dates and for entering the number of times that the activity will recur before ending. The maximum number of recurrences allowed for an activity is 365. Once a recurrence pattern for an activity is created and saved, it cannot be modified.
From the Calendar Day and Calendar Week views, you can open an activity and view its recurrence pattern by clicking the View Recurring Activities Pattern button on any calendar activity or all-day event. For tasks, the button is available in the Recurrence Options column (if that column is present in the Task List).
 Watch the Training Class:
- Private: Select this option to privatize the activity, limiting the number of users who can see it in SmartOffice. For more information, see Record Privatization.
- Type and Sub-type: Use these drop-down lists to select the activity type and sub-type (see About Activities for descriptions of the various types and sub-types). Classifying activities by the appropriate type and sub-type is useful for reporting purposes. The sub-types available depend on the activity type selected. If you have the user rights to create custom types and sub-types, you can customize this drop-down list to add other types and sub-types.
- Keywords: This field specifies words that might be useful for activity searches. Type a keyword directly into the field or select an existing keyword from the drop-down list. You can store frequently used keywords in this field for future activities by customizing the drop-down list.
- Location: This field lets you specify the physical location where the activity will occur. You can enter the location manually or by clicking the Location hyperlink to open the list of available addresses for that particular contact. The Location field displays the full address along with an indicator for the Address type: \[B\] for business, \[R\] for residence or \[O\] for all other types. Click the Show Map for this Address button next to the Location field to display the location in Google Maps™.
Description Section
The Description section provides a space to enter a detailed reason or objective for the activity. The field accepts HTML-formatted text, which makes it possible to use different fonts, colors and other formatting. To add formatting, use the buttons that display along the top of the Description field.
Options Section
- Reminder: Use this drop-down list to set a reminder for the activity. Reminders, which can be set for all activity types, display in a dialog box with an audio cue (the audio cue can be disabled in User Preferences - Calendar Options).
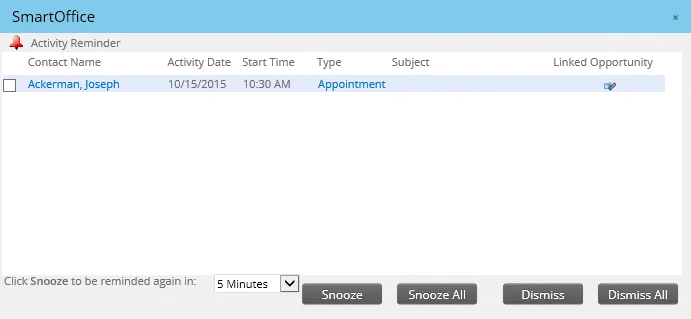
In the reminder dialog box, you can view the details of an activity by clicking the hyperlink in the Type column to open the Activity dialog box. You can view the contact’s details by clicking the contact’s name. The reminder dialog box also contains the following buttons:
- Snooze/Snooze All: Select one or more activities, and then click the Snooze button to close the Reminder dialog box. The dialog box will appear again after the time interval specified in the drop-down list. The available snooze intervals range from five minutes to two weeks. To snooze reminders for all listed activities without having to select them first, click the Snooze All button. Reminders for all of the listed activities will display again after the specified snooze time interval.
- Dismiss/Dismiss All: Selecting one or more activities and clicking the Dismiss button prevents reminders for those activities from displaying again. To dismiss reminders for all listed activities without having to tag them first, click the Dismiss All button.
When you create an activity that includes multiple participants, reminders for the activity are set according to each participant's own default reminder settings, not the setting you specified. You can set your default reminder times for new activities in User Preferences - Activity Options.
- Normal: An activity without any priority over other activities. All activities have a default priority of Normal when they are created.
- High: An activity that needs to be addressed immediately. High-priority activities display a red exclamation mark in the various calendar views.
- Low: An activity that can be addressed with less urgency compared to other activities. Low-priority activities display a blue downward-pointing arrow in the various calendar views.
- Priority: You can prioritize an activity based on its importance as follows:
- Call script: For Call-type activities, you can click this hyperlink to select a telemarketing script that you can follow during the call. A dialog box opens to present a list of available scripts.
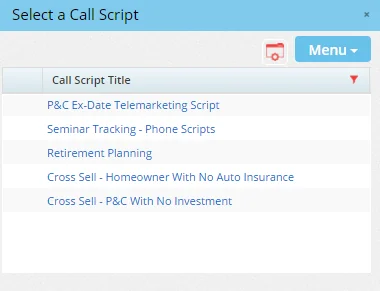
For more information, see Call Scripts.
- View Policy/Opportunity/Investment Account/Investment Position: This hyperlink is available only when you have access to the SmartPolicies, SmartOpportunities or SmartInvestments modules and the activity has been linked to a policy, opportunity, investment account or investment position using the Link To hyperlink. Click the View hyperlink to view details of the linked record. For more information, see Integration with Other SmartOffice Modules.
- Track Activity Outcome: When this option is selected, changing the activity's status to Done automatically opens the Activity Outcome Wizard. This option is available only when a contact is linked to the activity in the Participants section and is not available for recurring or Personal-type activities. You can specify whether the Track Activity Outcome option is selected by default for new activities in User Preferences - Activity Options.
- Due Date: This field is useful for tracking activities that are overdue or unfinished. Project-type activities that are not completed by the due date appear in the Overdue Projects list. All other activities not completed by their due dates appear in the Unfinished Activities list. For recurring activities, the due date is the same for all instances of the activity.
- Minutes Spent: This field lets you track the amount of time you spent on the activity.
- Link To: Click this hyperlink to link the activity to a policy, opportunity, investment position or investment account associated with the activity's contact. Note that this hyperlink works only when a contact is linked to the activity. In addition, only one record can be linked to an activity. For more details, see Integration with Other SmartOffice Modules.
- Show Time As: Use this drop-down list to specify your availability while the activity is in progress. Each of the options is indicated by a colored background on the activity as displayed in the Calendar Day, Calendar Week and Calendar Month.
Show Time As Option Description
Busy You will be busy while this activity is taking place.

The background color for Busy is white.
Free You will be free while the activity is taking place.

The background color for Free is light gray.
Out of Office You will not be in the office while the activity is taking place.

The background color for Out of Office is medium yellow.
Tentative The activity might change over time.

The background color for Tentative is light blue.
For calendar activities, the default is Busy. For all-day events, the default is Free. The Show Time As drop-down list is not available for tasks.
- Status: The Status drop-down list features three status options for the activity: Active, Cancelled and Done. Selecting Done starts the Activity Outcome Wizard opens if the Track Activity Outcome is selected. You can also change an activity's status to Done using one of these methods:
- In the Calendar Day, Calendar Week or Calendar Month view, position the mouse pointer over the activity to display the information card, and then select Mark Done.
and select Mark Done.
- From the contact's Activity Log tab, select an activity and click the Mark Done button.
- For Call activities, select the activity and click the Make or Receive Phone Call button.
in the calendar views. You can change an activity's status from Done back to Active or Cancelled, but any actions that were triggered when the activity was initially marked Done will not be reversed.
- Percentage Completed: This field lets you track progress toward completing the activity.
- Opportunity: If you have access to the SmartOpportunities module, this drop-down list lets you link the activity to any opportunity associated with the contact linked to the activity.
Response Section
This section displays at the bottom of the Activity Detail dialog when both of the following are true:
- The activity was scheduled by another user.
- The Enable Activity Response section in Activity Detail option is selected in User Preferences - Activity Options.
Select the appropriate response to accept, decline or mark the activity as tentative. This section also includes a box for entering a comment.

Scheduling Tab
The Scheduling tab lets you check the availability of other users in the office and schedule an activity for a time when all participants are available.
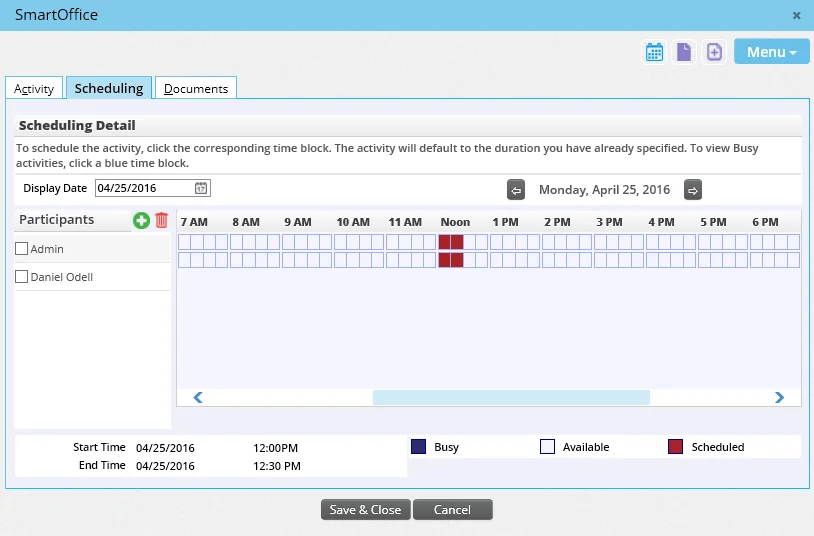
The options in this tab are similar to those available in the Group Scheduling feature. For more advanced options for scheduling meetings with multiple participants, see Mass Task Creation.
Recurring Activities Tab
This tab is available when recurrence options have been selected for the activity. The tab lists all instances of the recurring activity.
Documents Tab
Click this tab to view, post or delete files associated with the activity. To learn how to post files, see Contacts and Businesses - Letters/Documents Content Link.
Opportunity Action Items Tab
This tab appears when you have access to the SmartOpportunities module and the activity is linked to an opportunity. Click the tab to display stage actions for current or previous stages of the opportunity. You can perform stage actions from this tab (including processing activities and letters), eliminating the need to navigate to the SmartOpportunities module to do so.
Custom Tab
On this tab, users can enter values for any custom activity fields that have been created for the office. Users with the appropriate rights can also add, modify or delete activity custom fields as well. To learn more about working with custom fields in SmartOffice, see Contacts and Businesses - Custom Content Link.
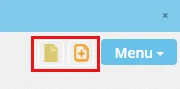
Activity Notes Buttons
The buttons for viewing and creating activity notes are located next to the Menu button in the Activity Detail dialog. Note: These buttons are available only after an activity has been saved at least once.
Click the View Activity Notes button to view notes related to the activity.
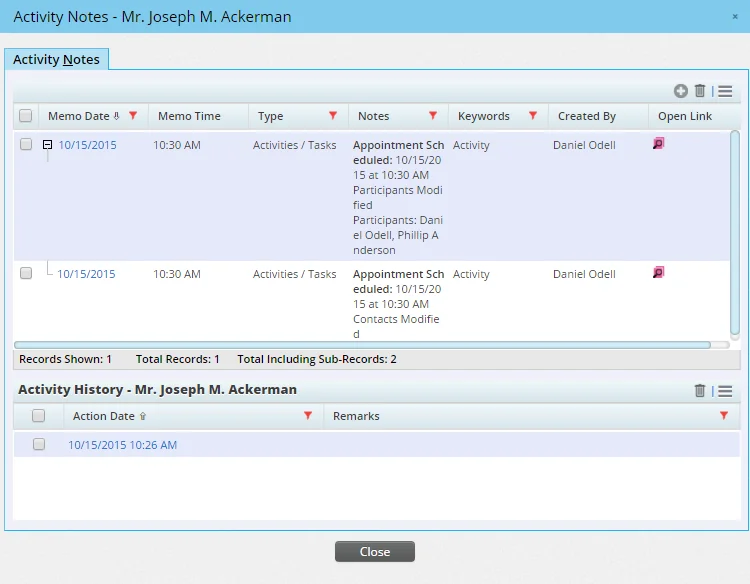
To enter general notes about the activity, click the New Activity Note button and enter your notes in the New Activity Note dialog box.

Select the Send this note as an Alert to other User(s) option if you want to notify other users when the note is saved. A dialog box opens, listing all users in the office. Select the users to notify and then click the OK button.
Notes entered here also display in the associated contact's SmartPad.
The dialog box also displays activity history records, which are generated when the activity's Track Activity Outcome option is enabled. Activity history entries are created when users perform certain actions in SmartOffice. The following table lists these actions and the corresponding entries they create in an activity's history. Note that the code "AOW" indicates actions performed in the Activity Outcome Wizard.
Action Activity History Entry
An activity is created. Activity Created
User makes an outgoing call using automated phone dialer or Manual Dial option. Dial Made
An activity is marked as Discontinued. Activity Discontinued
User clicks the Make/Receive a Phone Call button, opening the Phone Call dialog box. User selects the Incoming Call option and then clicks the OK button.
Incoming Call User clicks the Make/Receive a Phone Call button, opening the Phone Call dialog box. User selects the Outgoing Call option and then the OK button.
Outgoing Call The activity's status is updated to Active, Cancelled or Done.
Activity status changed to Active Activity Cancelled
Mark Done - \[Outcome\] \[Outcome\]
AOW: Enter Scheduled Call, from non-activity link Enter Scheduled Call
AOW: Enter Scheduled Call, from Contact Made Enter Scheduled Call
AOW: Schedule Call for Follow-Up, from Appointment Completed Schedule Call for Follow-Up
AOW: Enter or Schedule Call, from Appointment Not Completed Enter or Schedule Call
AOW: Reschedule Call, from Contact Not Made Reschedule Call
AOW: Enter Scheduled Appointment, from non-activity link Enter Scheduled Appointment
AOW: Enter Scheduled Appointment, from Contact Made Enter Scheduled Appointment
AOW: Enter Scheduled Appointment, from Appointment Completed Enter Scheduled Appointment
AOW: Enter Rescheduled Appointment, from Appointment Not completed Enter Rescheduled Appointment
AOW: Reschedule Appointment, from Appointment Not Completed Reschedule Appointment
AOW: Fact Finder Completed/Updated, from Contact Made, Appointment Completed Fact Finder Completed/Updated
AOW: Case Opened, from non-Activity link, Contact Made, Appointment Completed CO - Case Opened
AOW: Case Closed, from non-activity link Case Closed
AOW: Closing Interview, from Appointment Completed Closing Interview
AOW: Sale Made, from non-Activity link, Contact Made, Appointment Completed SOLD = Sale Made
AOW: Rejected, from non-activity link, Contact Made, Contact Not Made, Appointment Completed, Appointment Not Completed DF - Reject Prospect
AOW: Inactivated, from non-activity linked, Contact Made, Contact Not Made, Appointment Completed, Appointment Not Completed Quiet File/Inactivate Client
AOW: Enter Obtained Referrals, from Contact Made, Appointment Completed Enter Obtained Referrals
AOW: Contact Made Contact Made
AOW: Contact Not Made Contact Not Made
AOW: Appointment Completed Appointment Completed
AOW: Appointment Not Completed Appointment Not Completed
AOW: Obtained Permission to Keep in Touch from Contact Made and Appointment Completed Six Months from Today
AOW: Obtained Permission to Keep in Touch with Specific Date, from Contact Made and Appointment Completed Specific Date
AOW: Obtained Permission to Keep in Touch with Birthday, from Contact Made and Appointment Completed Birthday
AOW: Obtained Permission to Keep in Touch with Review Date, from Contact Made and Appointment Completed Review Date
AOW: Leave to Automatic Follow-Up, from non-activity link A - Leave to Automatic Follow-Up
AOW: Other, from non-Activity link, Contact Made, Contact Not Made, Appointment Completed, and Appointment Not completed Other
Tip: You can also view and manage SmartOffice activity notes and activity history records directly from Microsoft Outlook using the Microsoft Plug-in for SmartOffice. Learn more.
Calendar Button

The Calendar button lets you view your calendar without having to first close the Activity Detail dialog.
