Last updated: 2025-11-30
User Accounts - Detail Content Link
- Overview
- User's General Information
- User Type
- SmartOffice Access Hours
- Calendar Access Options
- Custom Fields
- Outgoing E-mail (SMTP) Settings
- Additional Features
- Copying the User Account
- Resetting the User's Password
- Setting the Current User Account as the Default for Signing In
Overview
The Detail content link in User Accounts lists the user's general information, user type and calendar access options. Change the user's type, make the user responsible for the Print Queue and control the user's ability to create and view the activities of other users from this content link.
The following sections describe the options available.
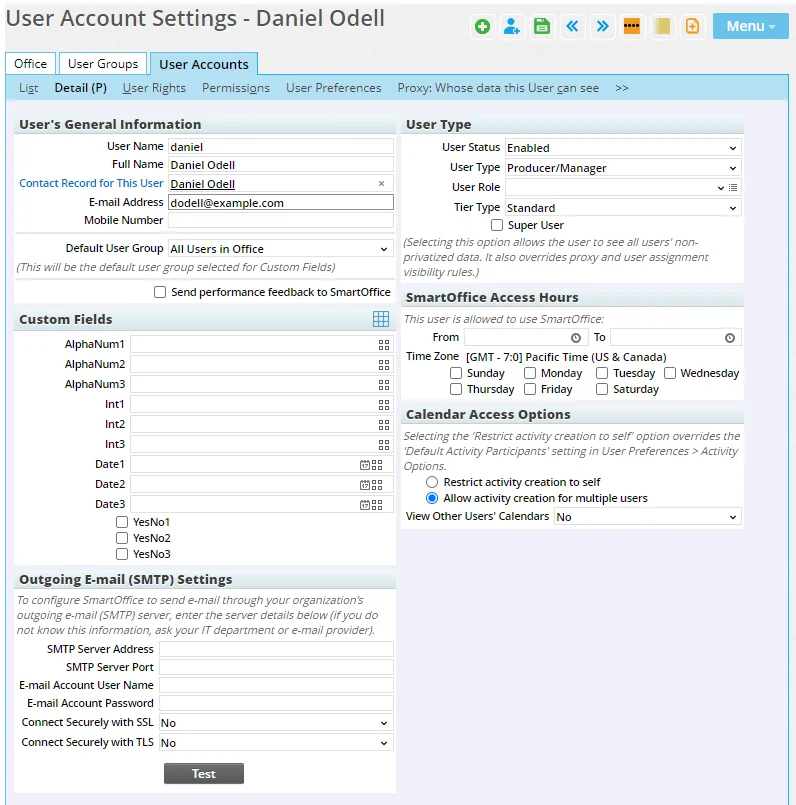
User's General Information
- User Name: The user name is specified when the user is created. It is the permanent sign-in ID for the user and should be 2 to 256 alphanumeric characters in length.
- Full Name: The user's full name, useful for distinguishing between user accounts.
- Contact Record for this User: Click this hyperlink to link the user account to an existing SmartOffice contact record. If no contact record exists for the user, create a contact first. Linking a user account to a contact record is critical to taking full advantage of user-related merge codes (e.g., name, title, address, phone numbers, etc.) available for writing letters. If this user is an advisor, link the corresponding advisor record to enable agent-specific merge codes.
- E-mail Address: Enter an e-mail address where the user will receive important messages, such as password/sign-in information. This address is also the From/Reply To address for outgoing e-mail messages from the user. The maximum length is 256 characters.
- Default User Group: This drop-down list includes the name of every user group the user belongs to. Changing the user's default user group changes the custom fields that the user sees by default when viewing records in SmartOffice. It also changes the custom fields that are available for the user to add as columns to list layouts (including Dynamic Report list layouts). This is an advanced option and should be set to All Users in the Office until the user is comfortable creating user groups and custom fields.
- Responsible for Printer Queue: This option displays if the user's office has the Printer Queue license. If this user is responsible for printing for the office, select this option and then select a printer from the SmartOffice Printer Queue drop-down list that displays. When other users in the office select Print on Printer Queue as a letter output option, the print job is sent to the Job Queue of this user, who is alerted that there is a job in the queue awaiting processing. This feature is especially useful for remote or traveling employees who do not have access to a printer or to letterhead.
- Send Performance Feedback to SmartOffice: This option sends data to the SmartOffice team to gauge performance of the system and determine needed improvements.
User Type
- User Status: There are three user statuses in SmartOffice: Enabled, Disabled and Temporary Password. The status is set to Temporary Password when a user is created or when a user's password is reset. The status changes to Enabled once the user has signed in. Users cannot be deleted from SmartOffice, because their notes, activities and other records would also be deleted. If an employee has left the company or is no longer accessing SmartOffice, change the user's status to Disabled. Disabled users cannot sign in to SmartOffice.
Note: A user cannot change his or her own account status.
- User Type: This type is used internally to identify whether the user is a producer/manager, staff member or wholesaler. Select Producer/Manager for all advisors to ensure that advisor merge codes are used for letters.
- User Role: Assigning a user role to a user account enables the administrator to more easily share home page tabs with specific users. All users who are assigned a role can view home page tabs that have been assigned to that role. An administrator with the Drop-Down Choice Customization user right can create user roles by clicking the Customize Choice button on the drop-down list. For example, a Sales role could be created so that home page tabs that should be visible only to sales staff can be assigned to that role.
- Tier Type: The tier type determines the SmartOffice features the user can access. For more information about tiers, see Office Settings - Tier Licenses.
- AdvisorVu Type: This drop-down list displays only if the user account is a SmartView for Advisors account. The drop-down indicates the account type, which determines the types of SmartOffice data the advisor can see. For more information about these account types, see SmartView for Advisors - User Accounts.
- Super User: A user designated as a Super User bypasses all proxies and user assignments in SmartOffice and can see everyone's data regardless of assignment, except for private records to which the user has not been granted access. For more information, see Office Security///introduction) and Record Privatization. Note that users who have Enterprise View turned on have Super User capabilities regardless of whether this setting is enabled.
SmartOffice Access Hours
The user can be restricted to using SmartOffice only during certain hours of the day. To set up such a restriction, click the Pick Date buttons on the From and To fields to select the appropriate times.
Note: Configuring office access hours prevents any updates from being made to the user's time zone settings in User Preferences - Time Zone.
Calendar Access Options
Calendar view and access options determine whether the user can:
- Create activities that include other users as participants.
- View the calendars of other users in the office (available only to users with administrator rights).
Select one of the following options:
- Restrict activity creation to self: When this option is selected, the user can create activities that include only him/herself as a participant. This restriction overrides the Default Activity Participants preference specified for all users in the office (see Office Settings).
- Allow activity creation for multiple users: This option enables the user to create activities that include other users as participants (this is the default setting for new users created in SmartOffice).
Select one of the following options from the View other Users' Calendars drop-down list:
- No: This option prevents the user from viewing other users’ calendars. The Show Other Users' Calendars hyperlink does not display next to the user's name in the various calendar views.
- Yes: This option enables the user to view the calendars of all users whose status is either Enabled or Temporary Password. The user cannot view the activities of Disabled users.
- Yes (All Statuses): This option enables the user to view the calendar of other users regardless of user account status. This includes users with a status of Disabled.
Custom Fields
If additional fields are needed to store information about the user, the administrator can use the custom fields in this section. Use the appropriate field type for the data to be entered (alphanumeric, integer, date or yes/no).
 to enter a new name for the field. For more information about custom fields, see Contacts and Businesses - Custom Content Link.
Outgoing E-mail (SMTP) Settings
Note: This section appears only if the user has the User-Level SMTP Setup user right enabled.
Individual user accounts can have their own outgoing e-mail settings that override any outgoing e-mail settings configured on the office Detail content link. This capability can help in some situations where e-mails sent from SmartOffice (e.g., automatically e-mailed Dynamic Reports and advisor commission statements) are ending up in recipients' junk e-mail folders.
Before configuring user account-level SMTP settings, note the following:
- Some e-mails sent by SmartOffice, such as those sent by e-mail automations, are always sent using the office-level outgoing e-mail settings, regardless of the settings specified for the user..
- If the user-level settings are configured to use a Microsoft 365 server, automatically e-mailed Dynamic Reports will always be sent from the user's Microsoft 365 e-mail address, regardless of which From address is specified in the report settings.
Note: Because of a Yahoo! network restriction, yahoo.com e-mail accounts cannot be configured in the Outgoing E-mail (SMTP) Settings section. The settings in this section are as follows:
- SMTP Server Address: The address of the SMTP server. This can be an IP address like 192.0.2.0 or a domain name like smtp.example.com.
- SMTP Server Port: This is the number of the port on the SMTP server that accepts connection requests for transmitting outgoing e-mail. Port 587 is standard, but your server might use a different port.
- E-mail Account User Name: Enter the user name of the account that SmartOffice will use to connect to the SMTP server and send e-mail. Often, the user name is the same as the user's e-mail address (including the @ symbol and domain name).
Outgoing e-mail from SmartOffice will be sent through this account, but the From line in those messages will display the e-mail address associated with the user's SmartOffice user account. An exception applies when a Microsoft 365 account is configured for outgoing e-mail; in that case, sent messages will always display the user's Microsoft 365 e-mail address in the From line. This is due to a limitation of Microsoft 365 that requires the From address on all outgoing e-mail messages to be the e-mail address associated with the Microsoft 365 user account that is sending the mail.
- E-mail Account Password: Enter the password for the e-mail account specified in the E-mail Account User Name field.
- Connect Securely with SSL: Select this option if the SMTP server has SSL (Secure Socket Layer) enabled. This option encrypts the connection between SmartOffice and the SMTP server.
- Connect Securely with TLS Encryption: Select this option if the SMTP server has TLS (Transport Layer Security) enabled. This option encrypts the connection between SmartOffice and the SMTP server.
After entering the settings, select the Test button to send a test e-mail message and verify that the settings are working properly.
Additional Features
These additional features can be accessed from the Menu button on this content link.
Copying the User Account
This feature is available by selecting Menu > Create a Copy of This User Account. For more information, see Creating User Accounts.
Resetting the User's Password
This feature is available by selecting Menu > Reset Password. For more information, see User Accounts - Passwords.
Setting the Current User Account as the Default for Signing In
Note: This capability is available only in certain enterprise environments.
In some multi-office enterprise deployments where users access SmartOffice through a custom portal using single sign-on (SSO), certain users (typically system administrators) can switch to any user account in any office using the Setup > Switch User command in the side menu.
These users need the ability to specify which office/user account they want to access by default when they enter SmartOffice through their organization's portal. Selecting Menu > Set Automatic Switch User Login tells SmartOffice to sign the user in to the current office/user account by default.
