Last updated: 2025-09-19
Home Page and Dashboards
- Overview
- Requirements
- Navigating to the Home Page
- Working with Tabs
- Creating a Tab
- Adding Content to a Tab
- Changing and Deleting Tab Content
- Renaming and Deleting Tabs
- Sharing Tabs
- Working with Dashboards
- Creating Dashboards
- Managing Dashboards
Overview
The customizable SmartOffice home page contains multiple tabs that enable users to organize key information for easy access.
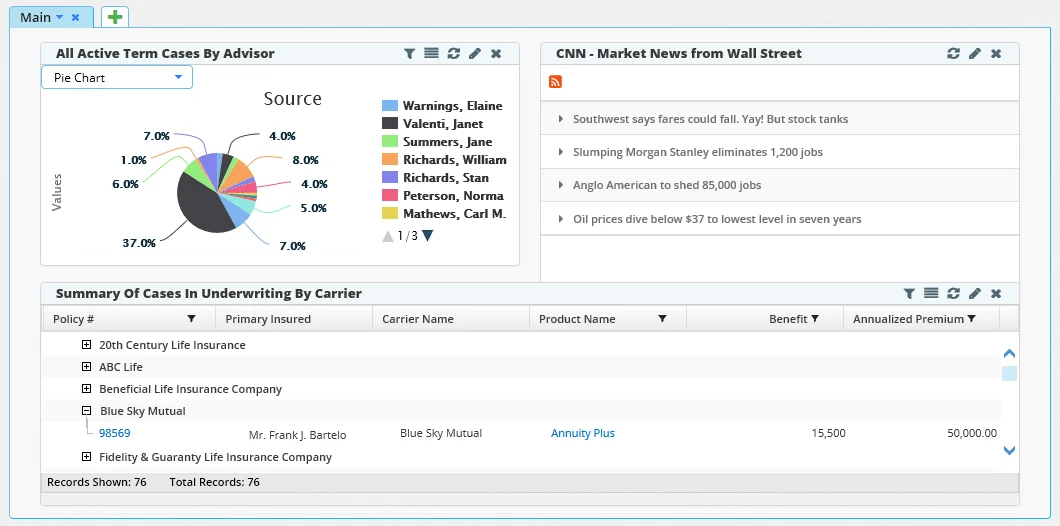
The tabs on the home page contain one or more "portlets," which are boxes that can contain:
- Dynamic Reports and charts based on data in SmartOffice
- Really Simple Syndication (RSS) news feeds
- External websites or images
- Investment data
Portlets can be grouped into collections called "dashboards" that can be selected to quickly fill a tab with useful content.

Requirements
All SmartOffice users can create tabs for themselves and add content to those tabs.
Users who have the Dashboard(s) Administrator user right enabled on the User Accounts - User Rights content link can also create and maintain tabs viewable by all users in the office.
Navigating to the Home Page
You can access the home page using any of these methods:
- Click the Home button
 at the top of any page.
 - Click the profile menu, and then click the Home button
 .
.
The home page is normally displayed by default when the user signs in to SmartOffice. However, this behavior can be changed in User Preferences - Basic Info by selecting an option other than Dashboards from the Default location at sign-in (SOPRO) drop-down list.
Working with Tabs
Creating a Tab
Note: There is no limit to the number of tabs that the user can create on the home page. However, to ensure acceptable load times, avoid creating more than six tabs.
- Navigate to the home page.
- Click the Add Tab icon
 to open the Create New Tab dialog box.
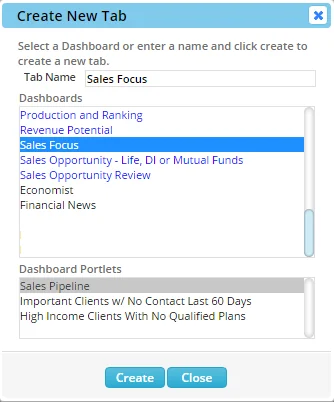
- Do one of the following:
- To create a blank tab and add content later, enter a name for the tab.
- To create a tab containing dashboard content, select a dashboard from the list. Selecting a dashboard displays the portlets that are included in that dashboard.
- Click the Create button.
Adding Content to a Tab
When you create a blank tab, the Add Portlet to Current Tab dialog box opens automatically.
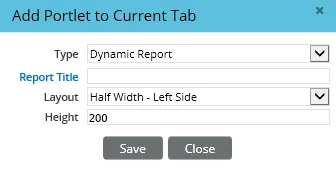
To open the dialog box manually from any tab (whether the tab is blank or not), select Add Content from the tab menu.
In the Add Portlet to Current Tab dialog box, select a content type from the Type drop-down list and then complete the rest of the options in the dialog box. The fields and options for each content type are described in the following sections.
Note: There is no limit to the number of portlets you can add to a tab. However, to ensure acceptable load times, avoid adding more than six portlets per tab.
Dynamic Reports
You can display frequently used Dynamic Reports on the home page. These reports run automatically when the home page displays.
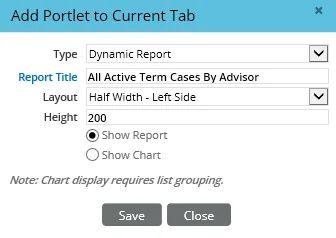
- Report Title: Click this hyperlink to search for and select a Dynamic Report.
- Layout: Specify the position and size of the portlet within the tab.
- Height: Specify the height of the portlet in pixels. The default is 200 pixels.
Once a report is selected, the following options appear:
- Show Report: This option displays the report in the standard list format.
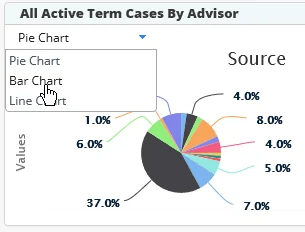
- Show Chart: This option displays the report as a chart or as a gauge showing progress toward a goal (see Charts and Gauges). For charts, the Dynamic Report must have a grouping option selected; for gauges, the Dynamic Report must have a column configured as a goal column (for more information about these settings, see Dynamic Reports - Report Setup). Once the portlet displays on the tab, you can click the chart's drop-down list to select among the different chart formats.
Tip: You can also add a Dynamic Report to the home page directly from a list of Dynamic Reports or from the report results list. For more information, see Dynamic Reports - Adding a Report to the Home Page.
Note: To prevent performance issues when reports contains a lot of results, SmartOffice displays up to 50 results when the home page initially loads. To display more results, use the list navigation controls at the bottom of the report portlet. For more information about list navigation controls, see Lists - Working with Records.
RSS Feeds
RSS refers to feeds that many websites publish to notify you of updated content, such as news headlines. You can select one of the many RSS feeds already configured in SmartOffice or add another RSS feed.
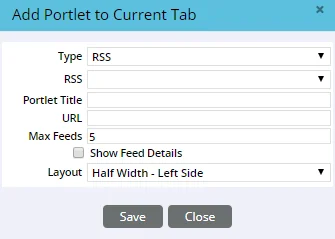
- RSS: Select an option from this drop-down list to display one of the pre-configured feeds. To add a feed that is not in the list of options, leave this field blank.
- Portlet Title: Enter a name for the RSS feed. This name will be displayed on the portlet when it is added to the tab. This field is automatically filled in if you choose a pre-configured feed from the RSS drop-down list.
- URL: Enter the URL for the RSS feed. This field is automatically filled in if you choose a pre-configured feed from the RSS drop-down list.
- Max Feeds: Specify the maximum number of updates to display for this feed. Because some RSS feeds contain many updates, this option can help keep the feed manageable.
- Show Feed Details: If you select this option, the feed displays both headlines and details (if details are available in the feed). If this option is not selected, only headlines display.
- Layout: Specify the position and width of the portlet within the tab.
HTML (Web Sites)
An HTML-type portlets allows you to display an external website (e.g., your organization's intranet site) within a SmartOffice tab.
Caution: Add only websites that you trust not to compromise your client data or hardware. Any data security breach or loss, software or hardware damage, or other negative consequences resulting from use of this feature is the user's responsibility.
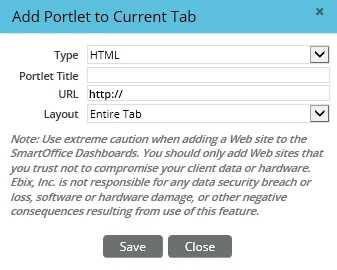
- Portlet Title: Enter a name for the website. This name will be displayed on the portlet when it is added to the tab.
- URL: Enter the URL of the website, including the http:// or https:// portion.
- Layout: Specify the position and size of the portlet within the tab.
Images
An Image-type portlet can display an image that is posted on the Web.
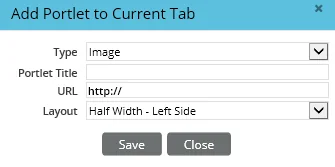
- Portlet Title: Enter a name for the image to be displayed on the portlet.
- URL: Enter the URL of the image to be displayed on the portlet, including the http:// or https:// portion.
- Layout: Specify the position and size of the portlet within the tab.
Widgets
Widget portlets are custom-developed portlets that some organizations create for their users (to see the Widget option, you must have the Widget User license; see User Accounts - User Rights Content Link).
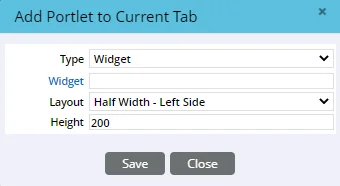
- Widget: Click this hyperlink to search for and select a widget portlet.
- Layout: Specify the position and size of the widget portlet within the tab.
- Height: Specify the height of the portlet in pixels. The default is 200 pixels.
Changing and Deleting Tab Content
Each portlet on a home page tab contains buttons for managing its content and appearance.
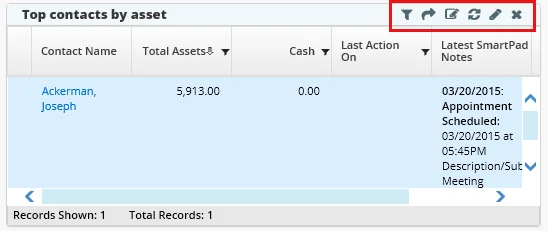
The following table describes these buttons.
| Image from base_home_page_button_change_filter.png | (Dynamic Report portlets only) The Change Filter button lets you make temporary changes to the report's filters. |
|---|---|
| Image from base_home_page_button_go_to_list.png | (Dynamic Report portlets only) The Go to List button displays the report as a regular SmartOffice list, with all available buttons and menu options. |
| Image from base_home_page_button_edit_report.png | (Dynamic Report portlets only) The Edit Report button opens the Dynamic Report Setup wizard, where you can make permanent changes to the report (if you have edit rights for the report). |
| Image from ref.gif | The Refresh Portlet button updates the portlet with the latest content. |
| Image from mo.gif | The Modify Portlet button lets you change the portlet's content, layout, size, title and other settings. Note that you cannot edit an existing portlet's type; you must create a new portlet instead. |
| Image from rem.gif | The Remove Portlet button deletes the portlet from the tab. |
You can also reposition portlets on a tab in one of two ways:
- Click the portlet's Modify Portlet button and select a new option from the Layout drop-down list.
- Click and drag the portlet's title bar to a different position on the tab.
Renaming and Deleting Tabs
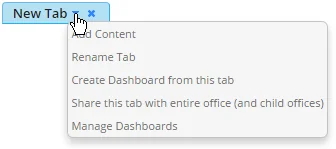
To change the name of an existing tab:
- From the tab's menu, select Rename Tab.
- In the Rename Current Tab dialog box, type the new name.

- Click the Rename button.
To completely delete a tab click the small "x" icon to the right of the tab menu button.
Sharing Tabs
If you have the Dashboard(s) Administrator user right enabled, you can share tabs so that they appear on the home pages of all users in your office. If your office is part of an office hierarchy, shared tabs will also appear on the home pages of users in child offices. Shared tabs cannot be modified or deleted by other users.
To share a tab, select the Share this tab with entire office (and child offices) option from the tab menu.
To make a shared tab appear first when users sign in to SmartOffice:
- Click the shared tab to display it.
- Open the tab menu and select Force Focus on Next Login.
Note: To see the shared tab at sign-in, users must have the Dashboard choice selected from the Default location at sign-in (SOPRO) drop-down list in User Preferences - Basic Info.
Working with Dashboards
If you have the Dashboard(s) Administrator user right enabled, you can group portlets into collections called dashboards. Dashboards are a quick way to fill a home page tab with useful content.
When you create or import a dashboard, it is available to all users in your office. If your office is part of an office hierarchy, the dashboard is also available to all users in child offices (unless you restrict it to users in your office only; see Managing Dashboards).
Video not available: Data Integrity Dashboard
Creating Dashboards
- Create a tab and add content to it.
- Select Create Dashboard from this tab from the tab menu.
SmartOffice creates a dashboard with the same name as the tab. Tip: In addition to creating a dashboard from scratch, you can import a dashboard that you obtained from another SmartOffice user. See the next section for details.
Managing Dashboards
To make changes to dashboards:
- From any tab, select Manage Dashboards from the tab menu.
- In the Manage Dashboard dialog box, select a dashboard from the Dashboards list.
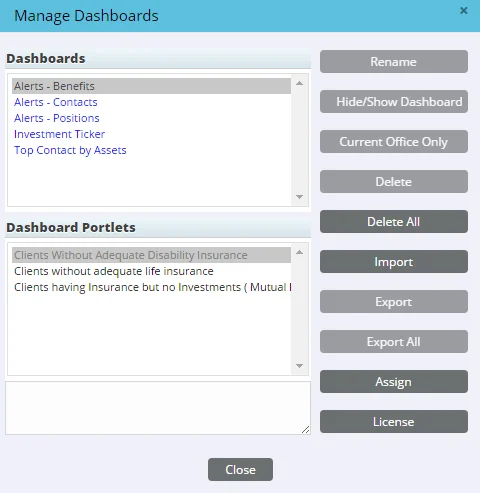
Note: Dashboards listed in blue were created in other offices (i.e., in the System office or in a parent office in an office hierarchy). Some dashboard management features are available only when you are signed in to the office in which a dashboard was created. In addition, if the tab was shared by another user, its dashboards do not appear in this list.
- Click any of the following buttons:
- Rename: Changes the dashboard's name. Note that this does not change the dashboard name for any users who have already added the dashboard to their home pages.
- Hide/Show Dashboard: Specifies whether the dashboard should display as an option when users in your office (and users in child offices, if your office is part of an office hierarchy) add content to tabs. Hidden dashboards display the word "hidden" after their names in the Dashboards list. To make a hidden dashboard visible again, select it and click the Hide/Show Dashboard button. Note that this button is disabled for any dashboard that is available only in the current office (see next option).
- Current Office Only: Specifies whether the dashboard should be available only to users in the current office and not users in child offices (if your office is part of an office hierarchy). Dashboards that are restricted to the current office display the words "current office" after their names in the Dashboards list. To make a dashboard available to child offices again, select it and click the Current Office Only button. Note that child-office users who have already added the dashboard to their home pages will continue to see the dashboard.
- Delete: Deletes the selected dashboard so that it is no longer available for selection. Note that this button does not delete a dashboard for any users who have already added the dashboard to their home pages. A dashboard can be deleted only by the user who created it or, in offices with office security_-_introduction.htm) enabled, by a Super User_-_super_users.htm). You must be signed in to the office in which the dashboard was created in order to delete it.
- Delete All: Mass deletes all dashboards that were created in the office you are currently signed in to. Note that this button does not delete dashboards for any users who have already added the dashboards to their home pages.
- Import: Imports a dashboard that has been exported to an XML file using the Export or Export All button. (When an imported dashboard contains a Dynamic Report, the report's Only Modifiable By Me option is enabled by default. For more information, see Dynamic Reports - Report Setup.) Once imported, a dashboard becomes available to other users in the office when they create home page tabs.
Video not available: Data Integrity Dashboard
- Export: Exports the selected dashboard to an XML file. The Export button is useful for backing up dashboards or sharing them with users in other offices who do not otherwise have access to them. An exported dashboard can be imported using the Import button.
- Export All: Exports all dashboards to a single XML file.
- Assign: Assigns the selected dashboard to specific users in your office (or in child offices, if your office belongs to an office hierarchy and you have Enterprise View turned on). Clicking the button opens a dialog box that lists the users who can access the dashboard. The list is initially blank. To add users to the list, select Menu > Add. If user roles have been assigned to user accounts (see User Accounts - Detail Content Link), you can assign the dashboard to a user role, and all users with that role will see the dashboard. To add users by role, select Menu > Add by User Role. A dashboard can be assigned only by the user who created it or, in offices with office security_-_introduction.htm) enabled, by a Super User_-_super_users.htm).
Video not available: Data Integrity Dashboard
- License: Makes the selected dashboard available only to users who have specific SmartOffice licenses. Clicking this button opens a dialog box listing the same licenses found on the User Accounts - User Rights content link. Select the appropriate licenses and then click the Associate button.
- When finished, click the Close button.