Last updated: 2025-09-19
Contacts and Businesses - Creating and Deleting Contacts and Businesses
- Overview
- Creating Contacts and Businesses
- Using the Add New Button
- From the Side Menu
- From the Contact/Business List
- From an Existing Contact/Business (Copying a Contact/Business)
- Using Microsoft Outlook
- Deleting Contacts and Businesses
Overview
There are several ways to create contacts and businesses in SmartOffice. This section describes the most common methods and also describes how to remove contacts from the database.

Creating Contacts and Businesses
Using the Add New Button
- Click the Add New button and select Contact or Business.
- Complete the fields in the dialog box that opens. For help with these fields, see Viewing and Editing Contacts and Businesses.
- Click the Save & Close button.
Note: To save the record and immediately create another record, click the Save & New button instead.
If office security is enabled and the office is not configured to automatically assign the signed-in user to the new contact (see Office Settings - SmartPad/New Contact/E-mail Posting), SmartOffice displays a list of users in the office. Select one or more users to assign to the new contact, and then select OK (or select Close to not assign any users to the contact; note that not assigning any users will make the contact visible to all users in the office).This selection determines which users in the office will have access to the contact.
If any user assigned to the new contact also belongs to one or more user groups, SmartOffice will also ask whether any of those user groups should be assigned to the contact.. Select one or more user groups to assign to the new contact, and then select OK (or select Close to not assign any user groups to the contact). To disable this prompt, select the Do not show user group list while creating a record option at the bottom of the dialog box before selecting OK. (To re-enable this prompt, go to User Preferences - Basic Info and select the Show user group list while creating a record option.)
From the Side Menu
- From the SmartOffice side menu, select People & Companies and then choose Contacts/Businesses from the expanded menu to open the search dialog box.
- Select either the Contacts or Businesses option to reveal the New button.
- Click the New button.
- Complete the fields in the dialog box that opens. For help with these fields, see Viewing and Editing Contacts and Businesses.
- Click the Save & Close button.
Note: To save the record and immediately create another record, click the Save & New button instead.
If office security is enabled and the office is not configured to automatically assign the signed-in user to the new contact (see Office Settings - SmartPad/New Contact/E-mail Posting), SmartOffice displays a list of users in the office. Select one or more users to assign to the new contact, and then select OK (or select Close to not assign any users to the contact; note that not assigning any users will make the contact visible to all users in the office).This selection determines which users in the office will have access to the contact.
If any user assigned to the new contact also belongs to one or more user groups, SmartOffice will also ask whether any of those user groups should be assigned to the contact.. Select one or more user groups to assign to the new contact, and then select OK (or select Close to not assign any user groups to the contact).
From the Contact/Business List
- While viewing the Contact/Business List, click the Menu button.
- Select one of the following options:
- New 'Contact/Business' record: Enables the user to enter minimal contact information quickly. This option is useful for entering basic information from a business card, for example.
- New (Comprehensive) 'Contact/Business' record: Enables the user to enter more extensive contact information. The dialog box that opens contains several buttons for adding additional contacts (e.g., the contact's family members) household, professional key relation, opportunity and SmartPad data.
- Complete the fields in the dialog box that opens. For help with these fields, see Viewing and Editing Contacts and Businesses.
- Click the Save & Close button.
Note: To save the record and immediately create another record, click the Save & New button instead.
If office security is enabled and the office is not configured to automatically assign the signed-in user to the new contact (see Office Settings - SmartPad/New Contact/E-mail Posting), SmartOffice displays a list of users in the office. Select one or more users to assign to the new contact, and then select OK (or select Close to not assign any users to the contact; note that not assigning any users will make the contact visible to all users in the office).This selection determines which users in the office will have access to the contact.
If any user assigned to the new contact also belongs to one or more user groups, SmartOffice will also ask whether any of those user groups should be assigned to the contact. Select one or more user groups to assign to the new contact, and then select OK (or select Close to not assign any user groups to the contact).
From an Existing Contact/Business (Copying a Contact/Business)
A quick way to create a contact that is similar to an existing contact is to use SmartOffice's copy feature.
- From the Contact/Business List, tag a contact/business or open a contact/business record.
- Select Menu > Advanced Options > Create a Copy of 'Contact/Business' Record.
After the copy operation is complete, the new record opens. The record is identical to the original, except that the word "Copy" is added to the name. Make any changes to the record and then select Menu > Save.
Using Microsoft Outlook
Users who have the Microsoft Plug-in for SmartOffice installed on their computers can also create SmartOffice contacts directly from Microsoft Outlook contact records. Learn more.
Deleting Contacts and Businesses
- Open a contact/business, or tag one or more contacts/businesses in the Contact/Business List.
Note: Only users with the Mass Deletion user right can delete multiple records at once.
- Click the Menu button and select the appropriate delete option:
- Delete 'Contact' record
- Delete 'Business' record
- Delete 'Contact/Business' record
- When the confirmation message displays, click the Yes button.
- If any of the contacts/businesses has other records linked to it (e.g., policies, investments, households), SmartOffice warns the user that those linked records will also be deleted.
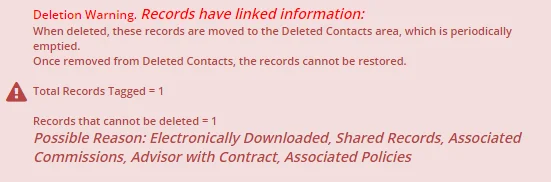
This saves the user from having to delete those linked records separately. Click the Yes button to confirm the deletion. Deleted contacts are moved to the Deleted Records area of SmartOffice, from which they can be restored or permanently deleted.
In some cases, a contact/business cannot be deleted. This may occur if:
- The record was electronically downloaded.
- The record is shared with another office.
- The record has commissions associated with it.
- The record is an advisor with a contract.
- The record is linked to a user account.