Last updated: 2025-09-19
Contacts and Businesses - SmartPad
- Overview
- SmartPad Setup
- Enabling/Disabling User Access to the SmartPad
- SmartPad Posting Options
- Compliance Features
- Opening the SmartPad
- For a Single Contact/Business
- For Multiple Contacts/Businesses (Consolidated SmartPad)
- For the Signed-in SmartOffice User
- For Other SmartOffice Users
- SmartPad Viewing Options
- Using the SmartPad
- Viewing/Editing an Entry
- Creating an Entry
- Deleting an Entry
- Attaching a File to an Entry
- Copying an Entry to Another SmartPad
- Appending an Entry to an Existing Entry
- Searching the SmartPad
- Archiving Entries
- Managing E-mail from the SmartPad
- Importing SmartPad Entries
- Exporting SmartPad Entries
- SmartPad Audit Trail and Changes Tab
- Setup
- Usage
- Reporting and Filtering
- Tracked Fields
Overview
One of SmartOffice's most important contact management tools, the SmartPad is a record of actions involving a particular contact or business. It records notes, meetings, activity outcomes, correspondence and other data to create a chronology that users can access to quickly review a client's history. SmartOffice also maintains a SmartPad for each SmartOffice user account.
Note: Although the information in this section describes SmartPad usage for contacts and businesses, the user can also access the SmartPad from other record types, such as advisors and agencies, policies, pending cases, investment accounts, etc. When the user accesses the SmartPad from a policy, case, or similar record, SmartOffice displays the SmartPad notes for the record's primary contact.

Some SmartPad entries are created by SmartOffice automatically for important actions (e.g., calendar activities scheduled, letters sent, phone calls dialed, messages sent). Other SmartPad entries are added manually by users in the office.
SmartPad Setup
Enabling/Disabling User Access to the SmartPad
To enable or prevent a user's access to the SmartPad, select or clear the SmartPad user right for that user's account. For more information, see User Accounts - User Rights.
SmartPad Posting Options
To configure the types of actions that SmartOffice automatically posts to the SmartPad, a user with administrator rights can access the SmartPad/New Contact/E-mail Posting content link in Office Settings.
Compliance Features
If the Protect Communication History feature is enabled for the office, SmartOffice places restrictions on the user's ability to modify or delete SmartPad entries. These restrictions are noted in the following sections.
Opening the SmartPad
The steps for opening the SmartPad differ depending on whether the user wants to view entries for a single contact/business, for multiple contacts/businesses or for a SmartOffice user account.
Tip: A shortcut to opening the SmartPad is to press the F7 key. Learn more about keyboard shortcuts in SmartOffice.
For a Single Contact/Business
To view the SmartPad for a single contact or business:
- Open the contact/business record or select a contact/business from any list.
- Select Menu > View SmartPad Notes to open the SmartPad Notes dialog box.
For Multiple Contacts/Businesses (Consolidated SmartPad)
SmartOffice features a consolidated SmartPad feature that displays all entries for multiple contacts/businesses in a single dialog box.
- Tag two or more contacts/businesses in any list.
- Select Menu > View SmartPad Notes to open the Consolidated SmartPad Notes dialog box.
For the Signed-in SmartOffice User
From the SmartOffice side menu, select Utilities and then choose User SmartPad from the expanded menu.
For Other SmartOffice Users
Note: Only a user with administrator rights can view other SmartOffice users' SmartPads.
- Conduct a user account search.
- In the list of search results, tag a user account.
- Select Menu > View SmartPad Notes.
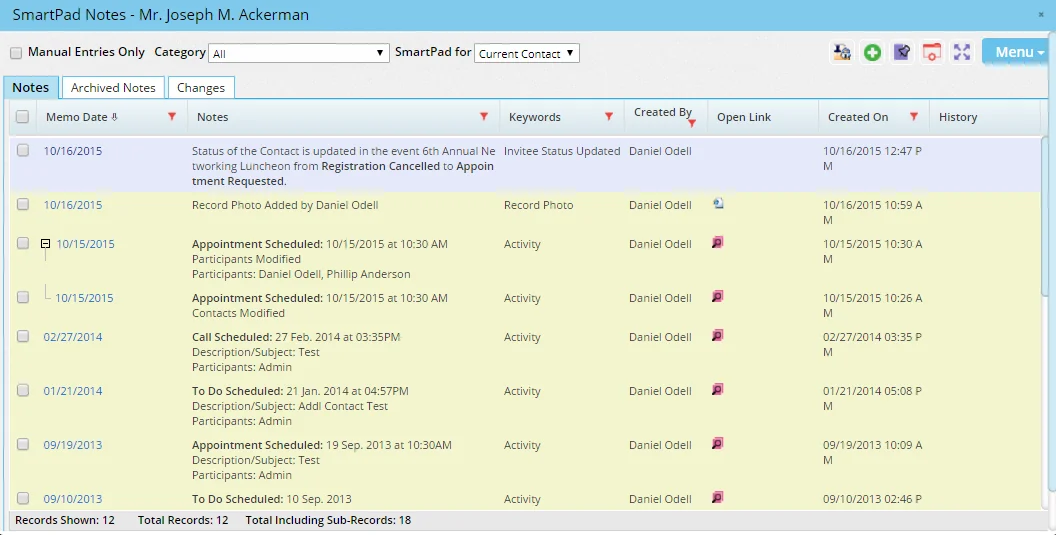
SmartPad Viewing Options
The types of entries displayed in the SmartPad—and the manner in which they are displayed—can be changed to enable the user to find entries more easily. Follow these tips:
- Icon: This column displays icons that help the user identify SmartPad entry types at a glance.
- History: This column displays an icon anytime a SmartPad entry is modified. Click the icon to view previous versions of the entry. If Protect Communication History is enabled for the office, all previous versions of an entry are displayed in the history along with the current version. Otherwise, only the original and current versions are displayed in the history.
- Limit entries displayed by type: Use the Category drop-down list to display only those SmartPad entries of a specific type, e.g., Activities/Tasks, E-mail, Letters, Notes, etc. (This drop-down list is not available for user SmartPads.)
- Change the list layout: Users with the appropriate user rights can customize the SmartPad's row and column layout. For more information, see List Layout Customization. Useful columns that can be added to the layout include:
- Hide system-generated entries: Select the Show Manual Entries Only option at the top of the SmartPad dialog box to display only those entries created manually by users in the office. Entries created automatically by SmartOffice are hidden.
- View household entries: For contact SmartPads, use the SmartPad for drop-down list to view SmartPad entries for any households associated with the contact. For business records, this drop-down list displays only when key relations' notes are viewed using the View drop-down list (see the next item).
- Switch between different display modes for businesses: While viewing a business' SmartPad, use the View drop-down list to display SmartPad entries for the business only, the business's key relations only, the business and the primary contact, or the business and all key relations. This drop-down list is not available when viewing the SmartPads of multiple businesses at once (i.e., the Consolidated SmartPad Notes dialog box). The default setting for this drop-down list can be set on the User Preferences - Basic Info content link.
In addition, the SmartPad can be printed and filtered just like any other SmartOffice list. For more information, see Lists.
Using the SmartPad
Viewing/Editing an Entry
Note: If Protect Communication History is enabled for the office, the user may not be able to edit existing SmartPad notes.
To view and/or edit an entry in the SmartPad, click the first-column hyperlink for that entry (by default, this is the hyperlink in the Memo Date column). The SmartPad Note dialog box opens to display the note and related details.
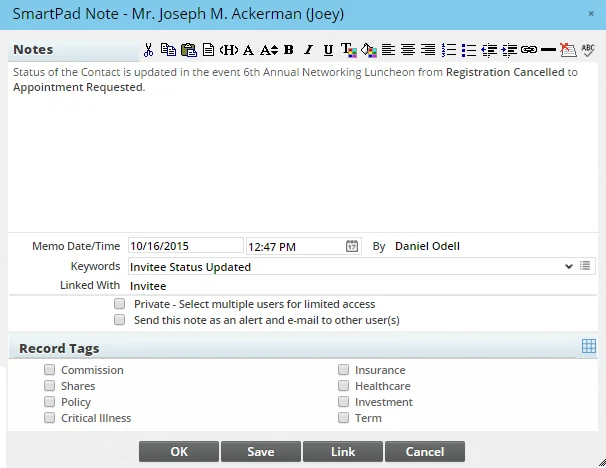
Make any necessary changes to the note. Some of the available options are:
- Private
- Select multiple users for limited access: Select this option to make the entry visible only to certain users in the office. When the entry is saved, a dialog box opens to enable the user to set privacy options. For more information, see Record Privatization.
- Send this note as an alert and e-mail to other user(s): Select this option to have SmartOffice alert other users in the office that the entry was created. When the entry is saved, a dialog box opens to enable the user to select the appropriate users and/or user groups. For more information about alerts, see Alert Center.
- Record Tags: Select any record tags that should be applied to the note. For more information, see Record Tags.
- Link: Click this button to link the SmartPad entry with an opportunity, policy, investment position and/or investment account. In the dialog box that opens, select the records that the entry should be linked to. To view the linked record later from the SmartPad dialog box, click the icon in the Open Link column.
When finished, click the OK button to save any changes and close the note, or click the Save button to save changes and continue editing the note.
When a SmartPad note is edited, SmartOffice keeps a record of previous versions. These previous versions can be viewed using the History column (see SmartPad Viewing Options).
Creating an Entry
To create a SmartPad entry when the SmartPad is open, select Menu > New 'SmartPad Notes' record to open the SmartPad Note dialog box. If the user creates an entry in this way from the Consolidated SmartPad Notes dialog box, the new entry will be posted to the SmartPad of each contact/business.
The user does not have to open the SmartPad to create an entry. Instead, the user can create an entry directly from most lists as follows:
- From any list, open a contact/business record, or tag one or more records in the list.
- Select Menu > New SmartPad Note.
- Edit the entry.
Tip: The Quick Note feature enables you to create an entry more quickly, without having to open a record first. Learn more.
Deleting an Entry
Tip: To remove an entry from the SmartPad without deleting it permanently, archive the entry instead.
Note: If the Protect Communication History feature is enabled for the office or if you do not have the appropriate Delete permission, you cannot delete SmartPad entries.
- Open the SmartPad.
- Tag one or more entries.
- Select Menu > Delete 'SmartPad Notes' record.
- Click the Yes button to confirm the deletion.
Users with administrator rights can recover deleted SmartPad entries from the Deleted Records area of the system.
Attaching a File to an Entry
Video not available: Uploading Files to the SmartPad
Files saved in common formats such as .pdf and .doc can be attached to SmartPad entries. The Microsoft Plug-in for SmartOffice must be installed for this feature to work.
- Open the SmartPad.
- Tag one or more entries.
- Select Menu > Upload/Link File to open the Select Files to Post dialog box.
- Locate the file, select it and then click the Open button to open the posting dialog box.
- (Optional) Enter a description, category, keyword and any other information and options as appropriate. For more information about these options, see Document Posting Options in the Microsoft Plug-in for SmartOffice Help.
- Click the Post button.
To view a file attached to a SmartPad entry, click the document's icon in the Open Link column. The file can also be viewed from the contact's Letters/Documents content link.
Copying an Entry to Another SmartPad
Video not available: Uploading Files to the SmartPad
- Open the SmartPad of the contact of business containing the note.
- Tag one or more entries.
Note: Only Note and E-mail SmartPad entries can be copied. Other types, such as Activities/Tasks, cannot be copied. To quickly display only those entry types, select Notes or E-mail from the Category drop-down list at the top of the SmartPad.
- Select Menu > Copy Tagged Notes to Other Contact(s) to open the Search Contacts and Businesses dialog box.
- Search for and select the appropriate contacts/businesses.
Appending an Entry to an Existing Entry
Video not available: Uploading Files to the SmartPad
When creating a SmartPad entry that expands on or is related to an existing entry, the user can append the new entry to the existing one.
- Open the SmartPad.
- Tag an entry.
- Select Menu > Append to Current Note to open the New SmartPad Note dialog box.
- Create the entry.
In the SmartPad, entries that have appended entries display with a plus (\+) or minus (–) symbol. Clicking that symbol shows or hides the appended entries.
Tip: To quickly show or hide all appended entries in the SmartPad, select Menu > List Options > Collapse All or Menu > List Options > Expand All.
Searching the SmartPad
- Open the SmartPad.
- To search for non-archived notes, make sure you are viewing the Notes tab. To search archived notes, make sure you are viewing the Archived Notes tab. Learn more about archiving SmartPad entries.
- Select Menu > Search Notes (or Menu > Search Archive Notes) to open the search dialog box.
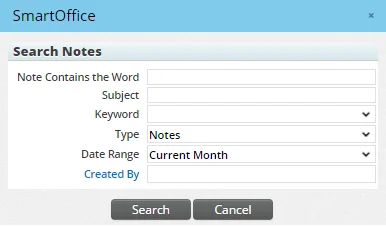
- Note Contains the Word: Enter a word (or partial word) to find entries containing that word in the Notes field.
- Subject: If you are searching for e-mail entries, enter a word (or partial word) to find entries containing that word in the e-mail subject field. This field is available for searching non-archived notes only.
- Keyword: Enter a word (or partial word) to find entries containing that word in the Keyword field.
- Type: The search defaults to SmartPad notes, but you can change this to look for other types of SmartPad entries, or select All to search all types of entries.
- Date Range: The date range defaults to notes created within the current month, but you can change this to limit your results to a different date range, or select All to search all dates.
- Created By: To limit your results to SmartPad entries created by a particular user, click the Created By link to open a list of users in the office. Then click the name of the user.
- Enter the appropriate search criteria to narrow down your results:
- Click the Search button.
Tip: The SmartPad can also be searched from the SmartOffice Search section. Select the Notes (last 30 days) option from the Search drop-down list.
Video not available: Uploading Files to the SmartPad
Archiving Entries
To remove an entry from the main SmartPad view without deleting it, use the archive feature. Archiving SmartPad entries helps the SmartPad to open more quickly.
Note: Enterprise customers can configure automatic archiving of SmartOffice entries. For more information, see Office Settings - SmartPad/New Contact/E-mail Posting.
- Open the SmartPad.
- Tag one or more entries.
- Select Menu > Archive Note(s).
- When the confirmation message displays, click the Yes button.
To view archived entries, open the SmartPad and click the Archived Notes tab. From that tab, the user can restore an entry to the main SmartPad view by selecting the entry and then selecting Menu > Restore Note(s).
Archived notes can also be displayed in Dynamic Reports through the SmartPad – Archived Notes report category in the SmartPad report family.
Managing E-mail from the SmartPad
If sent e-mail messages have been posted to the SmartPad, the user can perform several basic e-mail tasks directly from the SmartPad.
- Open the SmartPad.
- Tag an e-mail entry.
Tip: To quickly display only e-mail messages in the SmartPad, select E-mail from the Category drop-down list at the top of the SmartPad.
- Click the Menu button and select one of the following options:
- Forward E-mail
- Reply to E-mail
- Reply All to E-mail
- If your browser asks for permission to open the SOProLauncher app, select Open SOProLauncher. If prompted to download an .sopro configuration file, save and open the file.
- If prompted, sign in to the Microsoft Plug-in for SmartOffice (this normally happens automatically).
Importing SmartPad Entries
SmartOffice entries can be imported into SmartOffice from an external file. For more information, see Data Import.
Exporting SmartPad Entries
SmartPad entries can be exported to Excel and other file formats. The steps for doing so are the same as those for exporting records from any SmartOffice list (see Printing or Exporting a List). The difference is that users can export a maximum of 300 SmartPad entries at one time.
Note: Enterprise customers can adjust the SmartPad export limit for all offices on a server. Edit the server config.xml file to change the value of the \
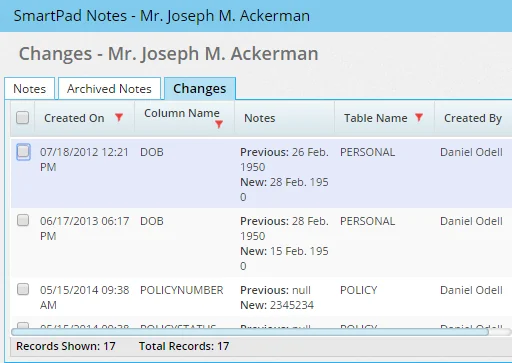
SmartPad Audit Trail and Changes Tab
The Audit Trail creates an entry in the SmartPad every time data is added, deleted or modified in important fields in certain types of SmartOffice records.
Note: Tracking of field changes applies to existing records only. Field values in newly created records are not considered "changes" by Audit Trail and are not tracked.
Video not available: Uploading Files to the SmartPad
Setup
To enable Audit Trail, an administrator with the ability to modify office settings must select the Enable SmartPad Changes option on the Detail content link in Office Settings.
Usage
Accessing the Changes Tab
To view the entries created by Audit Trail, select the Changes tab in the SmartPad.
Tip: Enterprise customers can hide the Changes tab from their users by setting the value of the \
The Changes tab is available on the contact, business, advisor, agency, household, carrier and user SmartPads. In addition, the tab is available in the following record notes:
- Policy Notes
- Pending Case Notes
Note: Changes to policy subaccount record fields do not appear in the Changes tab of the Policy Notes, but they do appear in the Changes tab of the linked contact's SmartPad.
Searching Audit Trail Entries
To search Audit Trail entries by table and field/column, select Utilities > SmartPad Changes from the SmartOffice side menu to open the SmartPad Change Search dialog box.
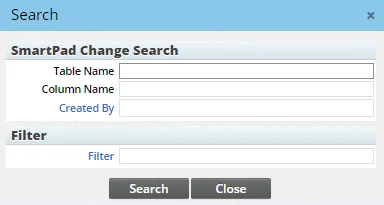
After entering the search criteria, click the Search button to display the results in the SmartPad Change List.
Reporting and Filtering
Enabling the Audit Trail also enables the SmartPad Changes filter and Dynamic Report families, enabling users to create filters and reports based on Audit Trail data.
Tracked Fields
The following table lists the fields that Audit Trail tracks.
| Location | Fields/Columns |
|---|---|
| Contacts/Advisors | |
| Personal Content Link | Last Name |
| First Name | |
| Middle | |
| Referred By | |
| Suffix | |
| Greeting | |
| Type | |
| Sub-Type | |
| Primary Advisor | |
| Phone Number | |
| Address (all fields) | |
| E-mail (type and address) | |
| Company | |
| Job Title | |
| Birth Date | |
| SS \# | |
| Gender | |
| Office Code (advisors only) | |
| Case Manager (advisors only) | |
| Supervisor (advisors only) | |
| Broker/Dealer (advisors only) | |
| Marketing Mgr (advisors only) | |
| Region Code (advisors only) | |
| Status (advisors only) | |
| Code (advisors only) | |
| Remarks (advisors only) | |
| Add'l Personal/Add'l Detail Content Link | Total Income |
| Citizenship | |
| Tobacco Use | |
| Preferred Communication | |
| Net Worth | |
| User Assignment | |
| Remarks (advisors only) | |
| Custom Content Link | All Fields |
| Goals Content Link (Advisors) | Goal Met |
| Contact Lists | Record Type |
| Advisor Lists | Agency ID |
| Businesses/Agencies | |
| Detail Content Link | Business Name |
| Primary Contact | |
| Referred By | |
| Primary Advisor | |
| Income | |
| Phone Number | |
| Address (all fields) | |
| E-mail (type and address) | |
| Tax ID | |
| Add'l Detail Content Link | User Assignment |
| Goals (Agency) | Goal Met |
| Households | |
| Detail Content Link | Household Name |
| Household Head | |
| Address | |
| Income/Range | |
| Net Worth | |
| Policies | |
| Basic Information Content Link | Policy \# |
| Carrier | |
| Plan Name | |
| State | |
| Status/Date | |
| Policy Date | |
| Issue Age | |
| Annual Prem | |
| Pay Method | |
| Target Amount | |
| Comm Modal | |
| Comm Annlzd | |
| Prem To Date | |
| Paid to Date | |
| Prem Mode | |
| Modal Premium | |
| Annlzd Prem | |
| Benefits Content Link | Basic Face Amount |
| Death Benefit Option | |
| Add'l Death Benefit | |
| Basic Face Amount | |
| Basic Cash Value | |
| Rider Death Benefit | |
| Net Death Benefit/Total Death Benefit | |
| Target/MEC Premium | |
| Initial Period | |
| Years Guaranteed | |
| Convertible Age | |
| Convertible Face Amount | |
| Final Conversion Date | |
| Gross Account Value/Gross Cash Value | |
| Surrender Charge | |
| Loan Amount | |
| Loan Int Amount | |
| Current Interest Rate | |
| Net Cash Surrender Value | |
| Last Prem Paid Amount | |
| Last Prem Paid Date | |
| Amount/Date Required | |
| Target Amount | |
| Policy Subaccount Record | Product Name |
| Shares | |
| Current Value | |
| Policy Transaction Record | Date |
| Amount | |
| Policy Custom Content Link | All Fields |
| Additional Info. | AlphaNum19 |
| AlphaNum20 | |
| Date3 | |
| YesNo7 | |
| Other | Holding Type |
| Product ID | |
| Carrier ID | |
| Data Provider | |
| Pending Cases | |
| PCM Custom Content Link | All Fields |
| Detail Content Link | Case \# |
| Inforce Request | |
| Team | |
| Target | |
| Case Manager | |
| Underwriting Requirement Record | Requirement(s) |
| Status | |
| Status Date | |
| Policy \# | |
| Delivery Requirement Record | Requirement(s) |
| Status | |
| Required Of | |
| Follow-Up | |
| Open Link | |
| Advisor Request Record | Request Type |
| Status | |
| Rider/Reinsurance Record | Ordered |
| Delivery Method | |
| Received Date | |
| Other | Data Provider |
| Carriers | |
| Detail Content Link | Name |
| Primary Contact | |
| Status | |
| Age Calculation | |
| Products | |
| Detail Content Link | Insurance Type |
| Product Name | |
| Type | |
| Carrier | |
| Presale Activities/Proposals | |
| Detail Content Link | Action/Date |
| Follow-Up | |
| Created On | |
| Commissions | |
| Commission Hierarchy | Advisor |
| Hierarchy Level | |
| House Rate | |
| Carrier Rate | |
| User Accounts | |
| Detail Content Link | User Name |
| Full Name | |
| Contact Record for This User | |
| E-mail Address | |
| Default User Group | |
| User Type | |
| User Preferences Content Link > Basic Info Sub-Content Link | Default Area Code |
| Default Country Code | |
| Default location at Login |