Last updated: 2025-09-19
SmartRecruiting - Recruiting Process
- Overview
- Reviewing Stages, Interviews and Actions
- Viewing Interview and Action Details
- Linking an Interview or Action to an Activity
- Unlinking an Interview or Action from an Activity
- Sending E-mail with Attachments to a Candidate
- Completing an Interview or Action
- Completing a Stage
- Entering the Results of Precontract Activities and Milestones
- Licensing Preparation
- Precontract Curriculum
- Licensing, Certification and Appointments
- Hiring a Candidate
- Rejecting a Candidate
Overview
Once SmartRecruiting setup is complete and candidates have been created, SmartRecruiting can be used to track candidates through the various stages of the hiring process.
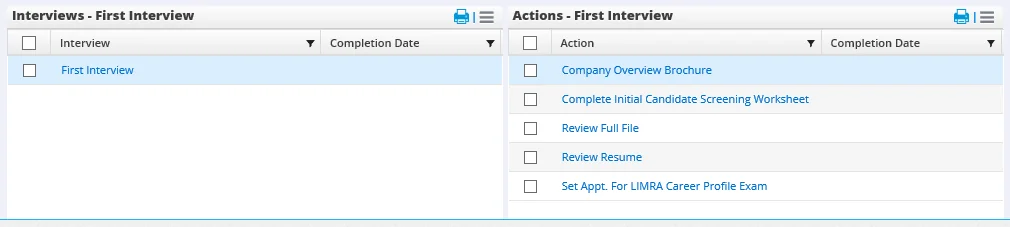
Reviewing Stages, Interviews and Actions
To view a candidate's progress through the recruiting process as well as the interviews and actions associated with each stage:
- Search for the candidate.
- If more than one matching candidate is listed, tag the candidate or open the candidate's record.
- Click the Interview/Actions content link.
- In the Stages list, tag or select the row of any stage. The Interviews and Actions lists refresh to display data relevant to the selected stage.
Note: Make sure to tag or select the stage row. Do not click the stage's name, as this merely displays information about the stage itself.
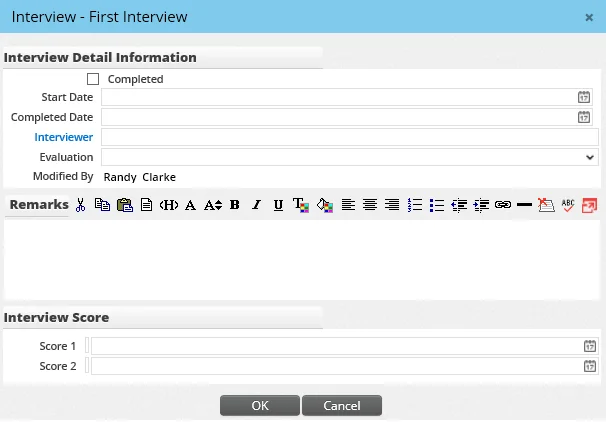
Viewing Interview and Action Details
- On a candidate's Interview/Actions content link, tag or select the row of any stage.
- In the Interviews or Actions list, click the name of an interview or action.
The Interview or Action detail dialog box opens.
For information about completing the interview or action, see Completing Interviews and Actions.
Linking an Interview or Action to an Activity
SmartRecruiting can be used in conjunction with SmartCalendar. The user can link interviews and actions to calendar activities. In this way, recruiters can do much of their work directly from the calendar.
To link an interview or action to a calendar activity:
- From a candidate's Interview/Actions content link, tag or select a stage row in the Stages list to display the stage's interviews and actions.
- Tag an interview or action and then click the Options button
 and select Link/Unlink Activity for Tagged Interview/Action. If a linked activity does not exist for the selected interview or action, the Activity Detail dialog opens
 - Enter the time, date and other activity details. See Activity Dialog Box for details.
Unlinking an Interview or Action from an Activity
- From a candidate's Interview/Actions content link, tag or select a stage row in the Stages list to display the stage's interviews and actions.
- Tag an interview or action and then click the Options button and select Link/Unlink Activity for Tagged Interview/Action. The system displays a confirmation message.
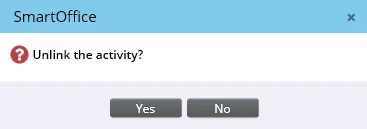
- Click the Yes button.
Sending E-mail with Attachments to a Candidate
When an action has one or more documents linked to it (see Recruiting Process), a recruiter can send these documents to the candidate by e-mail.
- Open a candidate's Interview/Actions content link.
- From the Actions list, select the action.
- Click the Options button and select Send Mail.
- In the dialog box that opens, type the e-mail message and click the Send button.
Completing an Interview or Action
- From a candidate's Interview/Actions content link, open an interview or action.
- Select the Completed option. The Start Date and Completed Date fields display the current date by default. To enter a different date, click the Pick Date button.
- To specify the user who conducted the interview or who was assigned the action, click the Interviewer or Assigned To hyperlink and select the appropriate user from the dialog box that opens.
- Rate the candidate's performance during this interview or action (above average, average, etc.) by selecting an option from the Evaluation drop-down list.
- Enter any remarks in the Remarks field.
- If the organization uses a scoring system, enter the candidate's score in the Score section.
- For actions, click the New 'Document' record button in the Document List to attach any necessary documents.
- Click the OK button.
If the interview or action is linked to an activity, the activity is marked Done in the calendar.
Tip: An action or interview that is linked to a calendar activity can be completed directly from the calendar. Mark the linked activity Done from the calendar. This opens the Interview or Action dialog box and prompts the user to go through the completion process. For information about marking calendar activities Done, see Activity Detail dialog.
Completing a Stage
Once all interviews and actions within a stage have been completed, the stage itself can then be completed.
- Open the candidate's Interview/Actions content link.
- In the Stages section, click the name of the stage to open the Stage dialog box.
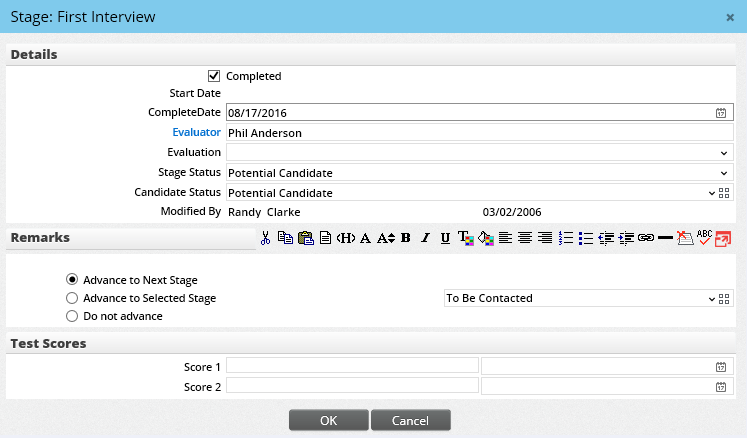
- Select the Completed option. By default, the system automatically enters the current date in the Completed Date field. To enter a different date, click the Pick Date button.
- To specify the user who performed the evaluation, click the Evaluator hyperlink and select the user from the dialog box that opens.
- Rate the candidate's overall performance during the stage (above average, average, etc.) by selecting an option from the Evaluation drop-down list.
- The status that the candidate was in during the stage is displayed in the Stage Status field. If necessary, change the status to more accurately reflect what the candidate's status was during the stage.
- The candidate's status in the overall recruiting process is displayed in the Candidate Status field. If the status has changed because the stage has been completed, select the new status from the Candidate Status drop-down list.
- Select one of these options:
- - Advance to Next Stage: This is the default option. Select this option to advance the candidate to the next stage in the sequence. - Advance to Selected Stage: Select this option to specify a stage to which the candidate should be advanced. Select the stage from the adjacent drop-down list. - Do Not Advance: This option keeps the candidate in the current, closed stage.
- If testing was involved and the scores have not already been entered, enter them in the Score fields. In the field adjacent to each score field, click the Pick Date button to specify the testing date.
- Click the OK button.
Entering the Results of Precontract Activities and Milestones
License preparation periods and precontract curricula can be tracked from beginning to end in their respective lists on the Precontract content link.
Licensing Preparation
Once a license preparation period is finished, the user can enter the start and finish dates (both dates must be entered at the same time) for each preparation that applies to the candidate.
- Open the candidate's Precontract content link.
- In the Licensing Preparation Periods section, click a license to open the License Preparation dialog box.
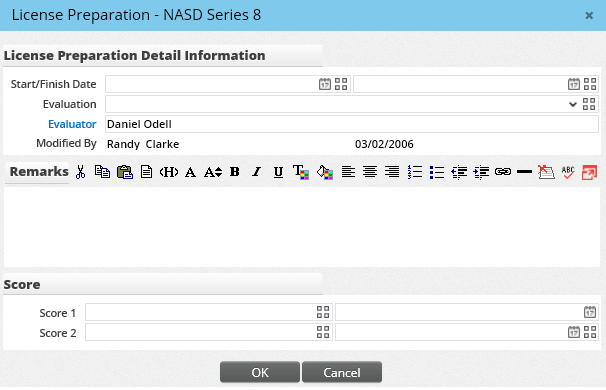
- Enter the start and finish dates by clicking the Pick Date buttons next to the appropriate fields.
- Enter an evaluation, evaluator, test scores and test dates if necessary.
- Click the OK button.
Precontract Curriculum
Once a curriculum period is finished, the user can enter the start and finish dates (both dates must be entered at the same time) for each curriculum that applies to the candidate.
- Open the candidate's Precontract content link.
- In the Precontract Curriculum section, click a curriculum to open the Curriculum dialog box.
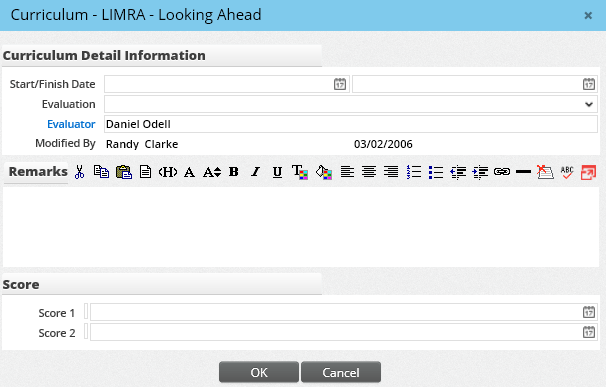
- Enter the start and finish dates by clicking the Pick Date buttons next to the appropriate fields.
- If tests were involved, enter the test scores in the Score fields.
- Click the OK button.
Licensing, Certification and Appointments
Overall completion of licensing, certification and appointment milestones can be recorded in the Precontract List section.
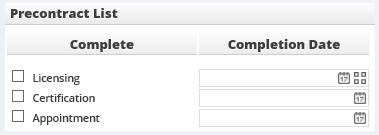
- Open the candidate's Precontract content link.
- In the Precontract List section, select the Complete option for the appropriate row.
- By default, the system automatically enters the current date in the Completion Date field. To enter a different date, click the Pick Date button.
- Click the Save button.
Hiring a Candidate
To hire or contract a candidate:
- Open the candidate record or tag the record in the Candidate/Recruit List.
- Do one of the following:
- Select Menu > Hire.
- From an open candidate record, select the Hired/Contracted option from the Status menu.
- If any required interviews or actions have not been completed, the Rapid Completion of Requirements dialog box opens.
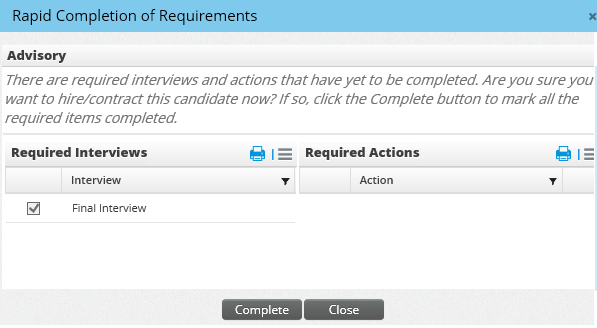
The dialog box lists incomplete interviews and actions and asks the user whether those items should be completed automatically. Click the Complete button to complete the items and hire the candidate.
When a candidate is hired, the status of the corresponding advisor record automatically changes from Candidate to Active. If the position's Type When Hired setting in SmartRecruiting Setup is Manager or Staff, a contact record is created once the candidate is hired.
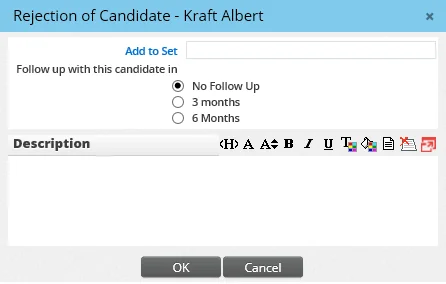
Rejecting a Candidate
When a candidate no longer fulfills the requirements of a position or the needs of a recruiter, the candidate's status can be changed to Rejected. To reject a candidate:
- Open the candidate record or tag the record in the Candidate/Recruit List.
- Do one of the following:
- Select Menu > Reject.
- In an open candidate record, select the Rejected option from the Status menu in the Status Information section.
- In the Rejection of Candidate dialog box, specify whether the candidate should be added to a set or whether a follow-up is required.
Note the following regarding rejected candidates:
- Rejected candidates are not automatically deleted. The user can view rejected candidates from the Candidate/Recruits List by selecting the Rejected Prospect/Inactive option from the List View drop-down list.
- Like active candidates, rejected candidates can be included in SmartRecruiting reports.