Last updated: 2025-11-30
Office Settings - Detail
- Overview
- General Information Section
- Storage Allocation Options (in MB) Section
- Custom Fields Section
- Modules Used for Custom Tab Copy
- Custom Tab Office Subscriptions
- Office SLO Section
- Send Options - Form Letters Section
- Outgoing E-mail (SMTP) Settings
- FTP Settings - Dynamic Reports Section
- Leads Web Options Section
- SmartResource Office Subscriptions Section
- Export Method Section
- Custom Logo/Branding

Overview
The Detail content link in Office Settings contains basic information about the office, including contact information, status and storage information. This content link is selected by default when Office Settings are opened.
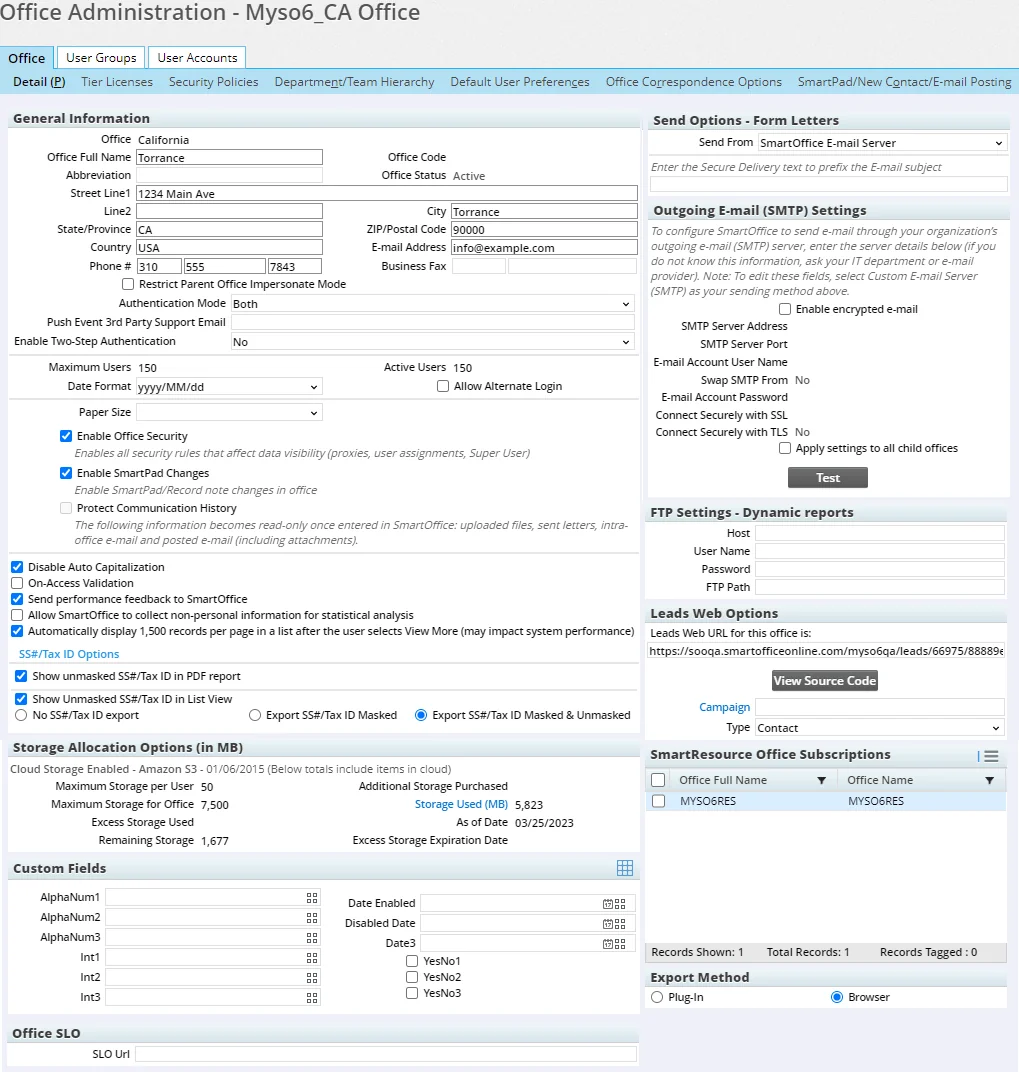
General Information Section
- Office: The Office field is read-only for the local office administrator and is editable only by a System office administrator.
- Office Full Name: The full name of the office.
- Abbreviation: Office name abbreviation.
- Office Status: Indicates whether the office is active, disabled, or in one of several maintenance modes (read-only, no sign-in allowed, etc.). This field cannot be edited by office administrators.
Note: Enterprise customers can change an office's status from the System office. An office linked to one more active child offices in an enterprise office hierarchy cannot be disabled until those child offices are unlinked.
- Street Line1, Line2, City, State/Province, ZIP/Postal Code, Country: Main mailing address of the office.
- E-mail Address: The e-mail address of the office's admin user.
- Phone #: The main office phone number.
- Business Fax: The main office fax number.
- Restrict Parent Office Impersonate Mode: Impersonation applies only when an office hierarchy is established between two or more offices and Enterprise View is used. When this option is selected, the parent office cannot impersonate users in this office (i.e., the child office). This option can be changed only by an administrator who belongs to this office. Clear this option to allow parent offices access to the Dynamic Report, filter, vendor, security master and product information of this office. This option is cleared by default for newly created child offices.
- Enable Two-Step Authentication: Two-step authentication helps strengthen user account security by requiring SmartOffice Pro users to enter a one-time password (OTP), or code, in addition to their regular credentials when signing in. The code is delivered to a user's e-mail address after the user enters his or her office name, user name and password. Select OTP to enable two-step authentication for all users in the office, or select No to disable it for all users. Note that users can enable or disable two-step authentication for their own user accounts in User Preferences - 2-Step Authentication; changing the two-step authentication setting at the office level overwrites users' preferences, but users can enable or disable two-step authentication for their own accounts at any time, regardless of the office-level setting.
- Authentication Mode: This setting is important for ensuring that certain third-party integrations work properly with SmartOffice. Consult the documentation for a specific integration to determine whether this option needs to be changed. Otherwise, leave the default option selected.
- Maximum Users: Indicates the number of user licenses available in the office. This field is not editable; the value is determined by the number of licenses assigned and in use.
- Active Users: Indicates the number of users who are active within the office. This field is not editable; the value is determined by the number of licenses assigned and in use.
- Date Format: The default date format for the office. Users can override this setting by selecting a different date format in User Preferences.
- Allow Alternate Login: This field is not editable. This option is available only for offices that have created customized applications to work with SmartOffice. For more information on this feature, please contact a SmartOffice sales representative.
- Paper Size: This drop-down list enables the administrator to select the standard paper size used by the organization (Letter or A4) so that printouts of SmartOffice lists are optimized for that paper size.
- Enable Office Security: To restrict certain users in the office from viewing specific records, select this option. To enable all users in the office to view all records without restriction, clear this option. For more information, see Office Security///introduction).
- Enable SmartPad Changes: When this option is selected, the Changes tab in the SmartPad maintains a record of all changes made to important fields in a contact record and to certain linked records, such as policies. For more information, see Contacts and Businesses - SmartPad.
- Protect Communication History: This option is intended to help an organization achieve regulatory compliance. When this option is selected, the following information becomes read-only once entered in SmartOffice: uploaded files, sent letters, intra-office e-mail, posted e-mail and e-mail attachments. If the accompanying Lock Notes after 24 hours option is also selected, SmartPad notes become read-only 24 hours after they are created; otherwise, SmartPad notes are not locked. See Protect Communication History.
- On Access Validation: Select this option to have SmartOffice automatically validate policy and investment data under certain circumstances. If this option is cleared, validation must always be performed manually. For more information, see Data Validation.
- Automatically display 1,500 records per page in a list after the user selects View More (may impact system performance): This option affects the behavior of the View More hyperlink that users can select when navigating lists of records (see Lists - Navigation). When this option is enabled, selecting View More on a list automatically displays up to 1,500 records on every subsequent page of the list. When this option is disabled, every subsequent page of a list reverts to displaying the default 50 records, and the user must manually select View More again to view up to 1,500 records. Note that enabling this option may make lists load more slowly.
- Show unmasked SS#/Tax ID in PDF report: Selecting this option displays unmasked Social Security/tax ID numbers in PDF reports that display that information. To keep those numbers partially masked for greater security, leave this option cleared.
- Show Unmasked SS# in List View: If selected, this option makes the SS # and Tax ID columns available for use in SmartOffice lists. The SS # column displays full Social Security numbers for individuals, while the Tax ID column displays full Tax IDs for businesses. Clear this option to make only the SS # Masked and Tax ID Masked columns available for use in lists. Masked columns enhance privacy by hiding the first few digits of Social Security numbers and Tax IDs.
- No SS# Export: When this option is selected, the SS #, SS # Masked, Tax ID and Tax ID Masked columns are not included in exported lists even when those columns are present in SmartOffice.
- Export SS# Masked: When this option is selected, the SS # Masked and Tax ID Masked columns are included in exported lists when those columns are present in SmartOffice, but the SS# and Tax ID columns are not exported even if they are present.
- Export SS# Masked & Unmasked: When this option is selected, the SS #, SS # Masked, Tax ID and Tax ID Masked columns are all included in exported lists when they are present in SmartOffice.
Storage Allocation Options (in MB) Section
storage
Note: The information contained in these fields is for informational purposes only. It can be modified by the user.
- Maximum Storage per User: Indicates the maximum allowed disk space per user.
- Maximum Storage for Office: This is the Maximum Storage per User value multiplied by the Maximum Users value specified under General Information.
- Excess Storage Used: Indicates the excess storage space currently used by the office.
- Remaining Storage: Indicates how much total storage space is still available for use in the office.
- Additional Storage Purchased: Indicates any storage purchased in addition to what is included with the SmartOffice subscription (to purchase additional storage, contact SmartOffice Sales at (800) 777-9188).
- Storage Used (MB): Indicates the total storage space currently being used in the office. To see details of your storage usage, select the Storage Used (MB) hyperlink to open the Office Storage Usage dialog box.
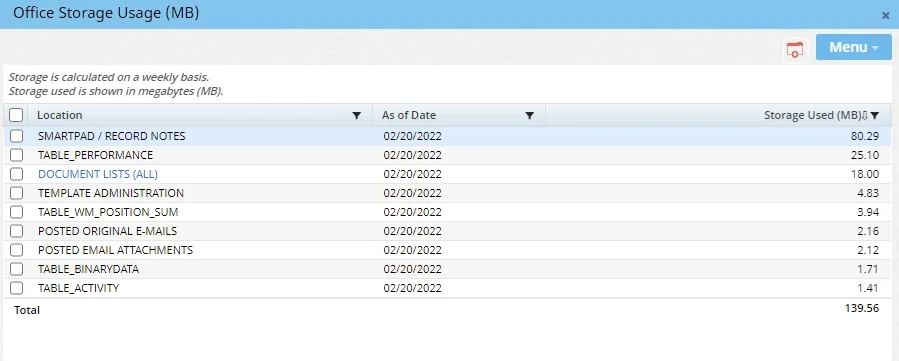
This dialog box displays the types of data in your SmartOffice database, such as notes and documents, and the total amount of storage used by each. To see a report specifically listing all documents stored in the office, select the DOCUMENT LISTS (ALL) hyperlink. The documents report can be filtered and sorted like any other Dynamic Report (for more information, see Working with Report Results) and can be used to see which documents are taking up the most storage space.
Note that SmartPad notes and documents cannot be deleted from the Office Storage Usage dialog box or the documents report. They must be deleted from the individual records they are linked to.
- As of Date: The date when storage statistics were last calculated for the office. The amount is calculated monthly.
- Excess Storage Expiration Date: Indicates the renewal date for any additional storage space purchased. If that storage is not renewed by this date, the office becomes read-only.
Custom Fields Section
If additional fields are needed to store information about the office, the administrator can use the custom fields in this section. Use the appropriate field type for the data to be entered (alphanumeric, integer, date or yes/no).
 to enter a new name for the field.
Modules Used for Custom Tab Copy
Note: This section is visible only to certain enterprise customers. The office must have the Custom Field Sharing license (which can be assigned from the System office) and must be a parent office in an enterprise office hierarchy.
This section is related to the custom field sharing feature of SmartOffice. For more information, see Custom Field Sharing.
Custom Tab Office Subscriptions
Note: This section is visible only to certain enterprise customers. The office must have the Custom Field Sharing license (which can be assigned from the System office) and must be a parent office in an enterprise office hierarchy.
This section is related to the custom field sharing feature of SmartOffice. For more information, see Custom Field Sharing.
Office SLO Section
The administrator can specify a web address that users will be automatically redirected to when they sign out of SmartOffice. Type the address into the SLO URL field in this section.
Send Options - Form Letters Section
Send from: Select the method that should be used to send e-mail generated from SmartOffice. This includes manually generated e-mail (such as form letters and individual e-mail messages) as well as automatically generated e-mail (such as e-mailed Dynamic Reports and pending case status reports).
- SmartOffice E-mail Server: This option routes all SmartOffice-generated e-mail through SmartOffice’s e-mail server. This is the easiest option for organizations that do not plan to use SmartOffice to send mass e-mail (i.e., large numbers of e-mails in a short time period). This option is not a reliable method for mass e-mail because many e-mail services such as Gmail will mark such mailings as spam and prevent them from reaching your recipients. For a more reliable method of sending mass e-mail through SmartOffice, set up SmartOffice to use Amazon Simple Email Service.
- Custom E-mail Server (SMTP): This option routes all e-mail generated by SmartOffice through an external SMTP e-mail server, typically the same server your organization uses for sending non-SmartOffice e-mail. This option is ideal for organizations that need to store sent e-mail on their own servers to facilitate an SMTP trail for compliance purposes. When this option is selected, the fields in the Outgoing E-mail (SMTP) Settings section become editable and must be filled in.
- Outlook/Lotus Notes: This option sends certain SmartOffice-generated e-mail (form letters and individual e-mail messages) through the user's Outlook or Lotus Notes application (the Microsoft Plug-in for SmartOffice must be installed). However, automatically generated e-mail (such as e-mailed Dynamic Reports and pending case status reports) are not sent through Outlook or Lotus Notes; they must be sent through an SMTP server. For this reason, it is recommended that the administrator first select the Custom E-mail Server (SMTP) option, configure an SMTP server and account in the E-mail (SMTP) Settings section, and then select the Outlook/Lotus Notes option. Be aware that using the Outlook/Lotus Notes option automatically creates a copy of every message a user sends in that user's Outlook/Lotus Notes sent-mail folder. Depending on the volume of manually generated e-mail, users may not wish to fill their sent-mail folders with these messages.
Enter the Secure Delivery text to prefix the E-mail subject: In this field, enter the text that will automatically be inserted into e-mail subject lines when users select the Send Secure option in the Options step of the Correspondence Wizard. The text will be inserted into subject lines surrounded by brackets (e.g., \[Secure message\]). This field is useful for organizations that send SmartOffice e-mail through a server that is configured to automatically encrypt outgoing messages containing specific text in the subject line.
Outgoing E-mail (SMTP) Settings
If your organization will use its own outgoing (SMTP) e-mail server to send e-mail generated from SmartOffice, use this section to enter the server details and to test whether a valid connection can be made. If you are unsure about any of these settings, consult your organization's IT department or your e-mail provider.
Note: To edit these fields, you must select the Custom E-mail Server (SMTP) option in the Send Options - Form Letters section and then select Menu > Save.
- SMTP Server Address: The address of the SMTP server. This can be an IP address like 192.0.2.0 or a domain name like smtp.example.com.
- SMTP Server Port: This is the number of the port on the SMTP server that accepts connection requests for transmitting outgoing e-mail. Port 587 is standard, but your server might use a different port.
- E-mail Account User Name: Determine which e-mail account in your organization will be used for sending e-mail from SmartOffice and enter the user name of that account here. Outgoing e-mail from SmartOffice will be sent through this account, but any message sent by a SmartOffice user will display that user's e-mail address in the From line (note that some e-mail services like Microsoft 365 do not allow the From line to be changed in this way; see the Swap SMTP From option for a workaround).
- Swap SMTP From: Some e-mail services like Microsoft 365 require the From address on all outgoing e-mail messages to match the e-mail address associated with the Microsoft 365 user account that is sending the mail. In SmartOffice, this requirement creates an issue with messages sent by users, because any replies to those messages will be sent to the e-mail account configured for the office instead of the e-mail account of the actual sender. When the Swap SMTP From option is selected, the From address in outgoing messages is still the Microsoft 365 user account address specified in the E-mail Account User Name field, but the Reply-To address is changed to that of the SmartOffice user who actually sent the message. In this way, if a recipient replies to the e-mail message, the reply is delivered to the message sender.
- E-mail Account Password: Enter the password for the e-mail account specified in the E-mail Account User Name field.
- Connect Securely with SSL: Select this option if the SMTP server has SSL (Secure Socket Layer) enabled. This option encrypts the connection between SmartOffice and the SMTP server.
- Connect Securely with TLS: Select this option if the SMTP server has TLS (Transport Layer Security) enabled. This option encrypts the connection between SmartOffice and the SMTP server.
- Apply settings to all child offices: For organizations with office hierarchies, the administrator can select this option to replicate these SMTP settings in all child offices in the hierarchy.
After entering the settings, click the Test button to send a test e-mail message and verify that the settings are working properly.
Note: Because of a Yahoo! network restriction, yahoo.com e-mail accounts cannot be configured in the SMTP Settings section. Users who try to enter a yahoo.com address are prompted to use a different address.
FTP Settings - Dynamic Reports Section
In this section, the administrator can specify the default FTP server settings that appear when a user sets up automatic report FTP uploads in the Automatic Report E-mailing section of the Dynamic Report Setup wizard. The user can accept these default settings or edit them when creating e-mail rules during report setup. For more information, see Dynamic Reports - Report Setup.
Leads Web Options Section
Note: This section is for offices using the SmartLeads module. To display this section, select Menu > Enable Leads Web.
- Leads Web URL for this office is: This field displays the URL to an online form that prospective clients can fill out to request information about products and services. The submitted information is then converted into a lead in SmartOffice.
- View Source Code: Click this button to view the HTML source code of the Leads Web form. The button makes it easier for web developers to obtain the source code if they want to customize the form.
- Campaign: Click this hyperlink to associate leads submitted through the Leads Web form with a campaign. In the Search Campaigns dialog box that opens, the user can either search for an existing marketing campaign or create a new campaign.
- Type: This drop-down list enables the user to specify whether leads gathered through the Leads Web form are classified as advisor, contact or business leads in SmartOffice.
For more information about Leads Web, see Creating, Importing and Collecting Leads.
SmartResource Office Subscriptions Section
See SmartResource for Carrier-Plan Data.
Export Method Section
Note: Enterprise customers can control whether the Export Method section is visible to their offices by modifying the server config.xml file to set the
The settings in this section specify how users in the office export data from SmartOffice in Excel format, including running analytic (Excel) reports/reports///introduction). The available options are:
- Plug-in: If this option is selected, data exports in Excel format will be available only to Windows users who have the Microsoft Plug-in for SmartOffice installed on their workstations. The advantage of this method is that users can download the export file immediately, no matter how many rows of data the file contains.
- Browser: This is the default method. It allows users to export data in Excel format directly through their web browsers. Because this method doesn't require the Windows-only Microsoft Plug-in for SmartOffice, it works on a greater range of devices. However, exports containing more than 1,500 rows of data are not available immediately. These exports go to the Job Queue for processing to minimize any impact on system performance, and users receive an alert when the export file is available for download.
Tip: Enterprise customers can customize the row limit in the server config.xml file by editing the value of the
Note: If a user accesses SmartOffice Pro on a non-Windows device, SmartOffice Pro automatically uses the browser method for export, regardless of the option selected here.
Custom Logo/Branding
Organizations that want to brand SmartOffice with their own corporate identity can replace the default SmartOffice logo in the upper-left corner of each page. For more information, see SmartOffice Branding.