Last updated: 2025-09-19
Page Layout Customization
- Overview
- Requirements
- Supported Record Types
- Searching for Page Layout Templates
- From a Supported Record Type
- From the Side Menu
- From a User Account
- Applying a Page Layout
- From a Template List
- From a SmartOffice Record
- Restoring a Default Page Layout
- Creating a Page Layout Template
- Creating a New Template
- Copying an Existing Template
- Deleting a Page Layout Template
- Viewing and Editing a Page Layout Template
- Exporting and Importing Page Layout Templates
- Exporting a Template
- Importing a Template
- Other Template Management Features
- Displaying a List of Users Who Have Applied a Template
- Displaying a List of Templates Applied by a User
Overview
For contacts and certain other types of SmartOffice records, page layout customization lets you customize the default arrangement of fields on the page to better suit your needs.
To customize a page layout, you apply a page layout template. You can create your own templates or apply templates created by other users in the office (or by users in other offices, if your office belongs to an office hierarchy).
When creating a template, you can define which fields appear and how those fields are grouped and arranged on the page.
Video not available: Page Layout Customization
Requirements
To customize page layouts, you must have one of the following user rights:
- Page Layout Customization
- Office: This user right lets you apply customized page layouts to your own user account as well as other user accounts in the office. The other user accounts do not need to have page layout customization rights.
- Page Layout Customization
- User: This user right lets you apply customized page layouts only to your own user account.
Supported Record Types
The following table summarizes the SmartOffice record types that support page layout customization, as well as the specific pages that you can customize for each record type.
Note: The table refers to content links in SmartOffice Pro records. If you are unfamiliar with the concept of content links, see Navigation - Tabs and Content Links.
| Record Type | Customizable Pages |
|---|---|
| Advisor/Producer | - Personal Content Link - Add'l Detail Content Link |
| Agency/Firm | - Detail Content Link - Add'l Detail Content Link |
| Business | - Detail Content Link - Add'l Detail Content Link |
| Candidate | - Personal Content Link - Add'l Personal Content Link |
| Carrier | - Detail Content Link - Misc Information Content Link |
| Contact | - Personal Content Link - Add'l Personal Content Link |
| Group Policy | - Detail Content Link |
| Household | - Detail Content Link |
| Investment Account | - Account Detail Content Link |
| Investment Position | - Position Detail Content Link |
| Opportunity | - Detail Content Link |
| Pending Case | - Detail Content Link |
| Policy | - Basic Information Content Link |
| Presale Activity/Proposal | - Detail Content Link |
Note: Changing the page layout of a record changes the layout for all records of the same type.
Searching for Page Layout Templates
From a Supported Record Type
- Open a record type for which you want to see available page layout templates. For example, to search for available contact page layout template, open any contact record.
- Select Menu > Page Layouts to open the Custom Template Detail dialog box.
- Do one of the following:
- Click the Template drop-down list and select a template. To further limit the choices in the Template drop-down list to favorite templates only (see Editing a Page Layout Template), select the Show My Favorites option next to the drop-down list.
- Click the List tab to open the Custom Template Summary list. Templates that are highlighted in blue reside in other offices. To further limit the choices in the list to favorite templates only (see Editing a Page Layout Template), select the Show My Favorites at the top of the list.
From the Side Menu
- In the SmartOffice side menu, select Setup > Custom Template to open the Search Custom Template dialog box.
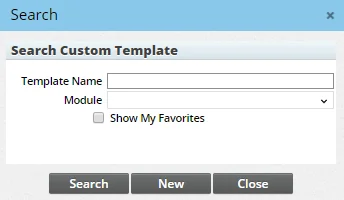
- Do one of the following:
- To see a list of all templates, leave the fields blank.
- To narrow down the results, enter a template name and/or select a SmartOffice module. To further limit results to favorite templates only (see Editing a Page Layout Template), select the Show My Favorites option.
- Click the Search button to display the Custom Template Summary list. Templates that are highlighted in blue reside in other offices.
From a User Account
Note: This method requires administrator user rights.
- Go to the User Accounts - Page Layouts content link.
- Select the Options button
 , and then select Template List to open the template search dialog box.
 - Search for the template as described in the previous section.
Applying a Page Layout
Note: These instructions assume that you or other SmartOffice users have already created one or more custom page layout templates.
From a Template List
Note: This method requires administrator user rights.
- Perform a template search.
- When the search results appear in the Custom Template Summary list, select the template you want to apply.
- Select Menu > Apply Template to open a list of SmartOffice users and user groups (note that empty user groups do not appear in the list).
Note: On record types that support custom page layouts on more than one content link (see Supported Record Types), such as the contact Personal and Add'l Personal content links, the Apply Template command affects only the main content link (e.g., the contact Personal content link).
- Select one or more users or groups, and then select OK.
From a SmartOffice Record
- Open a record of the appropriate type. For example, to apply a layout template for contact records, open any contact record.
- If the record type supports custom page layouts on more than one content link (see Supported Record Types), navigate to the content link whose layout you want to apply the template to.
- Select Menu > Page Layouts to open the Custom Template Detail dialog box.
- Do one of the following:
- Click the Template drop-down list and select a template. To further limit the choices in the Template drop-down list to favorite templates only (see Editing a Page Layout Template), select the Show My Favorites option next to the drop-down list.
- Click the List tab to open the Custom Template Summary list. Templates that are highlighted in blue reside in other offices. To further limit the choices in the list to favorite templates only (see Editing a Page Layout Template), select the Show My Favorites at the top of the list. Then select a template and click the Detail content link.
- Click the Apply button (if the template was created by another user) or the Save and Apply button.
- If the Save Layout Content dialog box opens (this is determined by your user rights), select whether you want to apply the template to your own user account or to other user accounts in your office or other offices.
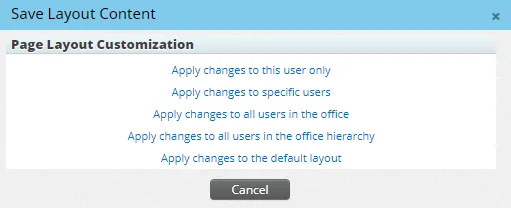
The available options are:
- Apply changes to this user only: The layout will be applied only to the user's own account.
- Apply changes to specific users: The layout will be applied to specific users and/or user groups. Selecting this option opens a list of users in the office who have not customized their page layout for the current record type, as well as any user groups containing such users. Select the appropriate users and/or user groups, and then select OK. If you selected one or more user groups, the layout is applied only to those group members who have not customized their page layout.
- Apply changes to all users in the office: The layout will be applied to all users in the office, replacing any custom layouts that users have applied themselves for the selected record type. The layout will also become the new default for the office.
- Apply changes to all users in the office hierarchy: The layout will be applied to all users in the current office and in any linked child offices, replacing any layouts that users have customized themselves for the selected record type. The layout will also become the new default for the office,
- Apply changes to the default layout: The layout will be applied to all users and/or user groups who have not yet applied their own custom page layouts for the current record type. Selecting this option displays a list of these users, as well as any user groups containing such users. Select Continue to apply the changes. If you selected one or more user groups, the layout is applied all members of the group.
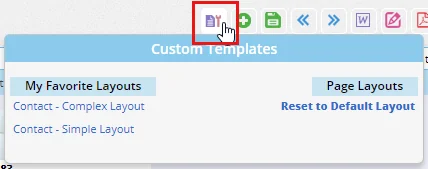
 * to your Custom Button Bar. Then, point to the button and select a page layout from the menu that appears. The menu lists templates you have marked as favorites (see Editing a Page Layout Template) and all other templates available for the record type you are viewing.
Restoring a Default Page Layout
- Open a record of the appropriate type. For example, to restore the default page layout for contact records, open any contact record.
Note: If you receive an error when you try to open the record, the current page layout template may be corrupted. In that case, you (or another user with administrator rights) can go to User Accounts - Page Layouts to reset your template to the default.
- If the record type supports custom page layouts on more than one content link (see Supported Record Types), navigate to the content link whose layout you want to restore.
- Select Menu > Page Layouts to open the Custom Template Detail dialog box.
- Click the Reset to Default button at the bottom to open the reset dialog box.
- Click the appropriate button:
- - SmartOffice Defaults: This button resets the layout for this record type to the default SmartOffice layout. - Office Defaults: If a user with the Page Layout Customization – Office user right previously applied a page layout to all user accounts in the office for this record type, clicking this button applies that layout.
Creating a Page Layout Template
Note: When you create a page layout template, the template is available for use by other users in the office. If your office is part of a SmartOffice enterprise office hierarchy, the template is also available for use in child offices.
Creating a New Template
- Do one of the following:
- Open a record of the appropriate type (e.g., to create a contact page layout, open any contact record). Then select Menu > Page Layouts to open the custom template Detail content link.
- From the side menu, select Setup > Custom Template to open the Search Custom Template dialog box, and then click the New button. Specify the template name and record type when prompted, and then click the Create button to open the custom template Detail content link.
- Perform a template search, and then select Menu > New 'Custom Template' Record from the Custom Template Summary list. Name the template when prompted, and then click the Create button to open the custom template Detail content link.
Copying an Existing Template
Copying a page layout template is useful when:
- You want to create a template with a layout similar to that of an existing template. In this case, you can save time by creating a copy and then editing that copy.
- You want to edit a template that is read-only because it was created in a parent office or by a user who selected the Only Modifiable by Me option (see Editing a Page Layout Template).
Note: When custom fields with drop-down lists (e.g., Lookup fields) are included in a template, any custom choices defined for those fields are included when the template is copied.
- Do one of the following:
- Open a record of the appropriate type (e.g., to copy a contact page layout, open any contact record). Select Menu > Page Layouts to open the Custom Template Detail dialog box, and then select Menu > Copy Template.
- Perform a template search, and then select Menu > Copy Template from the Custom Template Summary list. The template copy is added to the template list. Select the template copy, and then click the Detail content link.
Deleting a Page Layout Template
Warning: A page layout template can be deleted even if it is currently in use, but this can result in data loss. For example, when a template contains a custom field and data is entered in that field for one or more contacts, deleting the template also deletes the data entered in that custom field at the contact level.
- Perform a template search from a supported record type or from the side menu.
- Select a template, and then select Menu > Delete 'Custom Template' Record.
Viewing and Editing a Page Layout Template
Note: You can edit page layout templates created by other users in the same office. However, if the template's creator selected the Only Modifiable by Me option or if the template resides in another office, the template will be read-only.
- Perform a template search.
- Select a template, and then click the Detail content link.
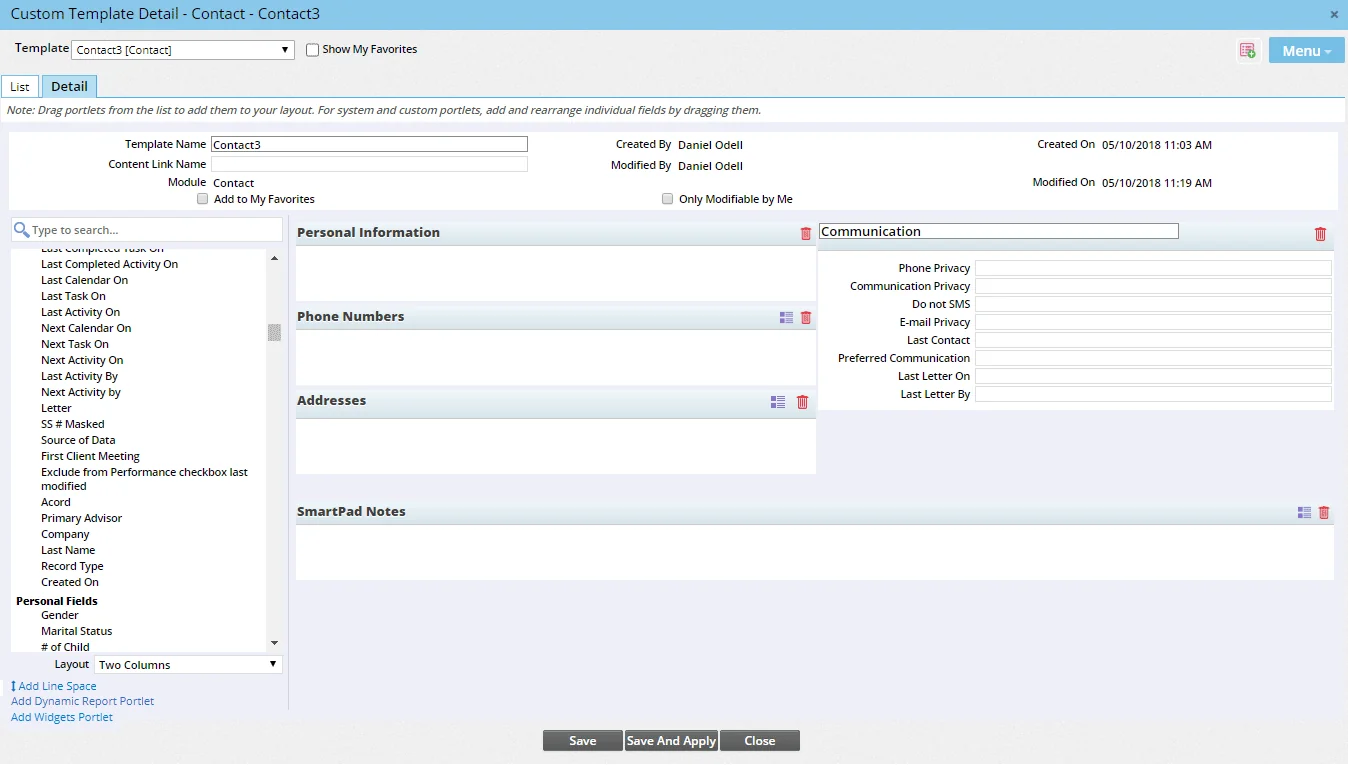
- Use the Layout drop-down list in the lower-left corner to specify a two-column, three-column or four-column layout.
- Add portlets to the layout. A portlet is a box containing one or more fields. Several different types of portlets are available:
- Predefined portlets: These are standard SmartOffice portlets that contain a predefined set of fields. In the list on the left, predefined portlets appear under portlet categories (e.g., Contact
- Portlet). To add a predefined portlet to your layout, drag it from the list, and then select the Save button to see the fields in that portlet. Tip: To find portlets quickly in the list, use the search box.
- Custom portlets: These are portlets containing SmartOffice fields that you define. To create a custom portlet, select Menu > Add New Group (you must save the template at least once before this command becomes available). Then type a name for the portlet and click the OK button.
- Dynamic Report portlets: To add a Dynamic Report portlet to the layout, click the Add Dynamic Report Portlet link in the lower-left corner. A search dialog box opens, allowing you to search for the report you want to add. When the portlet appears in your layout, drag it to the appropriate position.
- Widget portlets: Widgets are custom-developed portlets available in some offices. To add a widget portlet to the layout, select the Add Widgets Portlet link in the lower-left corner (this link is available only if you have the Widget User license; see User Accounts - User Rights Content Link). A search dialog box opens, allowing you to search for widget portlets available in your office. When the portlet appears in your layout, drag it to the appropriate position.
- Enter basic details about the new template using these fields and options:
- Template Name: This is the name that appears in template search results and other areas of the system. The name cannot contain special characters such as colons, underscores, double-hyphens and ampersands.
- Content Link Name: If you want the content link's name to change when you apply the template to a record, enter the new name in the Content Link Name field. Learn more about content links.
- Add to My Favorites: Select this option to make the template easier to find later when you search for page layout templates. For more information, see Favorite Records.
- Only Modifiable by Me: Select this option to prevent other users in the office from editing the template. This option is available only if you are the template creator. Note that any user who has the Administrator: User Rights & Creation/Licenses/Groups user right can modify or delete the template regardless of whether you select this option.
- Build your layout. Here is a list of things you can do:
- Add fields to portlets: Drag individual fields into a predefined or custom portlet from the list on the left. Individual fields are listed under field categories in the list (e.g., Contact Fields, Personal Fields). A field can be added to a custom page layout only once (i.e., a page layout cannot contain multiple instances of the same field). Tip: To find fields quickly in the list, use the search box. Note: Some predefined portlets do not support adding fields.
- Add horizontal space between fields: Locate the Add Line Space item in the lower-left corner (under the list of available fields) and drag it into a portlet above or below a field. The words “Line Space” appear in the layout to show where the space has been inserted. Reposition the space by dragging it to a new location, or remove it by selecting its x button. - Remove fields from portlets: Remove individual fields from predefined or custom portlets by dragging the fields back to the list on the left or by clicking the x button in those fields. Note: Some predefined portlets do not support removing fields. - Rearrange fields: Change the order of fields in a portlet by dragging the fields to their new positions. Note: Some predefined portlets currently do not allow their fields to be rearranged. - Adjust field widths: To reduce a field's width, click the left-arrow button
 next the field. To increase its width, click the right-arrow button
  . Note: Not all fields support this feature. If you do not see the width button for a field, try saving the layout to see if it appears; if it does not, the field's width cannot be adjusted. - Restore default fields: For predefined portlets, restore all of the fields to their system defaults by clicking the portlet's Restore Portlet to System Default button
  .
. - Rearrange portlets: Drag portlets to reposition them in the layout. - Delete portlets: Click any portlet's Delete Portlets button
 .
.
- Adjust portlet dimensions: Click a portlet's layout button
 to adjust width and height. Note: Some portlets do not allow width and/or height adjustment. - Rename portlets: You can rename a custom portlet by deleting the existing name and typing a new name. - Undo changes: To undo a single change, select Menu > Undo Last Unsaved Change (select this command repeatedly undoes a series of unsaved changes one by one). To undo all changes since you last saved the template, select Menu > Undo All Unsaved Changes.
- When finished, do one of the following:
- To save your changes without immediately applying the new template, click the Save button at the bottom of the page or select Menu > Save.
- To save the new layout and apply it immediately, click the Save and Apply button at the bottom of the page (this button is available only when you access the layout editing page from a contact or other specific record).
Tip: To quickly open another template for editing, click the Template drop-down list in the upper-left corner and select another template. You can select templates for any record type from the drop-down list.
Exporting and Importing Page Layout Templates
You can export a page layout template from your office for import into another office.
Note: When a page layout template contains custom fields with drop-down lists (e.g., Lookup fields), any custom choices defined for those fields are included when you export the template. If those choices already exist in the office when the template is imported, the template choices are added to the existing choices.
Exporting a Template
- Perform a template search.
- Select a template, and then select Menu > Export Template.
- When prompted, save the .xml file to a location on the local computer, such as the desktop.
Once the .xml file is saved, you can send it (through e-mail or some other means) to a person in the other office for import into that office.
Importing a Template
These instructions assume that the user has an exported page layout template saved to his or her local computer.
- Perform a template search.
- Select Menu > Import Template.
- Click the Choose file button to locate and select the exported .xml file.
- Click the OK button.
Other Template Management Features
Displaying a List of Users Who Have Applied a Template
- Perform a template search from a supported record or from the side menu.
- In the Custom Template Summary list, select a template.
- Click the Template Users content link.
Tip: Another way to see a list of users who have applied a page layout template is to customize the Custom Template Summary list to add the All Template Users column. Learn more about customizing list layouts.
Displaying a List of Templates Applied by a User
See User Accounts - Page Layouts Content Link.