Last updated: 2025-11-21
Advisors/Agencies - Other Advisor and Agency Management Features
- Assigning Users to Advisors and Agencies
- Privatizing Advisors and Agencies
- Mass Modifying Advisors and Agencies
- Adding Advisors and Agencies to a Set
- Creating Tasks for Multiple Advisors/Agencies at Once
- Displaying Advisor Policy Statistics
- Reassigning Contacts from One Advisor to Another
- Viewing the Advisor or Contract Hierarchy
- Advisor Hierarchy
- Contract Hierarchy
- Assigning Contacts to the Current Advisor
- Mass Assigning a Primary Advisor to Multiple Contacts
- Mass Assigning an Advisor to Multiple Pending Cases
- Viewing an Advisor's Broker-Dealer/FINRA Information
- Switching to SmartView Case Status View
- Product Marketing
- Creating a Product Marketing Record
- Deleting a Product Marketing Record
- Creating Product Marketing Reports
Assigning Users to Advisors and Agencies
Users in the office can be assigned to specific advisor and agency records. Assigning records in this way hides them from non-assigned users. For more information, see Office Security .
Privatizing Advisors and Agencies
A user can designate certain advisors/agencies as private so that no one except that user can access them. For more information, see Record Privatization.
Mass Modifying Advisors and Agencies
With Mass Modify, the user can change a specific field in many advisor and agency records at once. This feature can be used, for example, to assign multiple advisors to a particular agencies quickly. For more information, see Lists - Mass Modify.
Adding Advisors and Agencies to a Set
Sets can be used to group advisors and agencies regardless of whether they have traits in common. Sets are useful for tasks such as sending correspondence to groups of advisors/agencies or limiting searches to a specific group of advisors/agencies. For more information, see Sets.
Creating Tasks for Multiple Advisors/Agencies at Once
To create calendar tasks for multiple advisors/agencies simultaneously, use the Mass Task Creation feature. For more information, refer to the SmartCalendar User Guide.
Displaying Advisor Policy Statistics
To display aggregate premium and benefit information about the policies on which an advisor is the primary advisor:
- Open an advisor record.
- Select Menu > Advisor Policy Statistics to open the Policy Statistics by Producer dialog box.
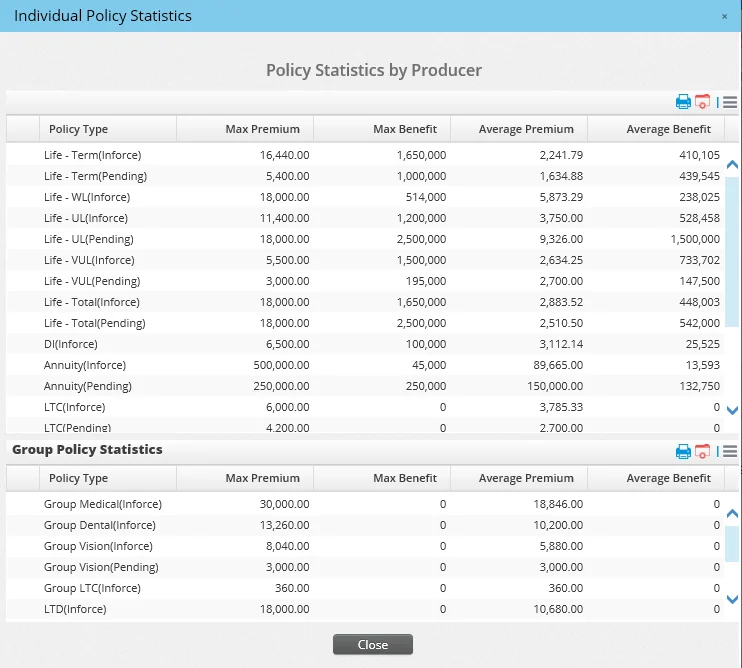
Another way to view more in-depth producer statistics is to enable the Production Dashboard.
Reassigning Contacts from One Advisor to Another
The Advisor Reassignment feature reassigns all of an advisor's contacts and holdings to one or more other advisors. In addition, if any calendar activities involving the reassigned contacts exist, the new advisors are automatically added to those activities as participants.
The holdings that are reassigned include pending cases, policies and investment accounts.
Note: To use this feature, a user must have the Advisor Reassignment - Button user right enabled in User Accounts - User Rights.
To reassign an advisor's contacts and holdings:
- From the Advisor List, select the advisor whose contacts/holdings are to be reassigned.
- Select Menu > Advanced Options > Advisor Reassignment.
- When the confirmation message displays, click the Yes button to display the Record List.
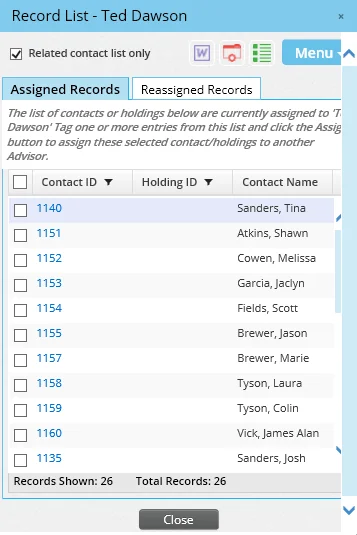
The Record List has two tabs:
- Assigned Records: This tab lists contacts currently assigned to the advisor.
- Reassigned Records: This tab lists contacts that have been reassigned (this list is initially blank). Note: By default, these tabs display the contacts without holding IDs. To reassign individual holdings instead of entire contact accounts, clear the Related contact list only option to display holding IDs.
- On the Assigned Records tab, tag one or more contacts/holdings to be reassigned and then select Menu > Assign tagged contact/holdings to new Advisor to open the Advisor Assignment dialog box.
- Type the name of the new advisor or click the New Advisor hyperlink to select from a list of advisors. To add the contacts to a set of advisors, click the Set hyperlink to select the set.
- (Optional) To reverse any erroneous reassignments, click the Reassigned Records tab, tag the records and then click the Options button
 and select Cancel Assignment.
 - When all reassignments are complete, click the OK button to apply the changes. The Send Letter/Create Call Activity dialog box opens, enabling the user to notify the reassigned contacts of the advisor change.
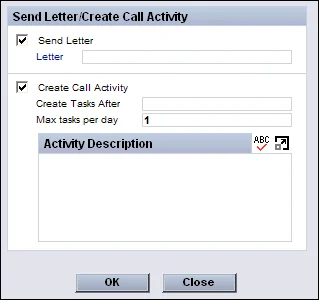
- Select one or both of the following options:
- Send Letter: If choosing to send a letter, type the title of a letter or click the Letter hyperlink to select a letter template. See Template Administration and Correspondence for more information. - Create Call Activity: If choosing to make a call, select the appropriate options to set up a call activity. See Creating Activities for more information.
- Click the OK button.
After reassignment is complete, the following changes occur in each reassigned holding's Policy Advisor List:
- The old advisor's role changes to an "old" role (e.g., Old
- Primary Advisor, Old - Referral Advisor, Old - Servicing Advisor, Old - Writing Advisor) or to a generic role of Reassigned.
- The old advisor's Expiration Date field is updated to the current date.
- The new advisor's As of Date field is updated to the current date.
Viewing the Advisor or Contract Hierarchy
The Advisor Hierarchy and Contract Hierarchy features display advisor/agency and contract relationships in a tree structure. Note: To use this feature, a user must have the Advisor/Contract Hierarchy – Buttons user right enabled in User Accounts - User Rights.
Advisor Hierarchy
To view the advisor or agency hierarchy:
- Select an advisor or agency from the Advisor & Agency List or open an advisor or agency record.
- Select Menu > Advisor Hierarchy.
When used from an advisor record, this command displays both the advisor and agency hierarchies. When used from an agency record, the command displays the agency hierarchies.
The structure of an agency hierarchy is based on the entity specified in the Agency field on the advisor's Personal content link or in the Parent Office field on the agency's Detail content link.
The structure of an advisor hierarchy is based on the entity specified in the Supervisor field on the advisor's Personal content link.
Contract Hierarchy
To view the advisor contract hierarchy:
- Select an advisor from the Advisor List or open an advisor or agency record.
- Select Menu > Contract Hierarchy to open a dialog box that displays advisor contract information and the contract hierarchy.
- Select a contract in the Advisor Contract List by clicking a column that is not a hyperlink (clicking a hyperlink will open the appropriate row of data).
- Select Menu > Reload (or Options > Reload in the Contract Hierarchy section) to display the corresponding hierarchy in the Contract Hierarchy section.
Assigning Contacts to the Current Advisor
If an advisor has a SmartView for Advisors user account, the advisor can be quickly assigned to any contacts and policies on which the user is the primary advisor. This method of user assignment makes those contacts and policies visible to the advisor when office security is enabled.
Note: To use this feature, a user must have the Mass Assignments user right enabled in User Accounts - User Rights.
To assign contacts to the advisor:
- Select an advisor from the Advisor List or go to an advisor's Personal content link.
- Select Menu > Assign Contacts to the Current Advisor.
- When the confirmation message displays, click the Yes button.
After the process is complete, the system informs the user that the contacts have been assigned.
Note: If the advisor does not have a SmartView for Advisors user account, the system informs the user that the advisor does not have a SmartOffice login. In this case, the assignment cannot proceed. Learn how to create a SmartView for Advisors user account..
Mass Assigning a Primary Advisor to Multiple Contacts
Note: To mass assign primary advisors, the user must have the Delete permission for Contact/Business records. For more information, see User Accounts - Permissions Content Link.
To designate the same primary advisor for several contacts at once:
- From the Contact List, tag one or more contacts.
- Select Menu > Advanced Options > Mass Assign Primary Advisor to open the Mass Assign Advisor dialog box.
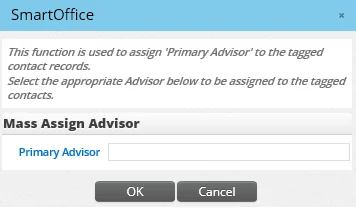
- Click the Primary Advisor hyperlink to search for the advisor.
- Click the OK button.
Mass Assigning an Advisor to Multiple Pending Cases
See Pending Cases - Additional Pending Case Management Features.
Viewing an Advisor's Broker-Dealer/FINRA Information
Note: To use this feature, a user must have the Broker Dealer - Button user right enabled.
SmartOffice can track the broker-dealer and series license information that indicates an advisor's qualifications to sell products involving securities (e.g., variable life policies or variable annuities).
To view this special licensing data (or to add that information), open the advisor record and select Menu > Broker Dealer to open the FINRA dialog box.
In that dialog box, select Menu > New 'Broker Dealer' record to add licensing information.
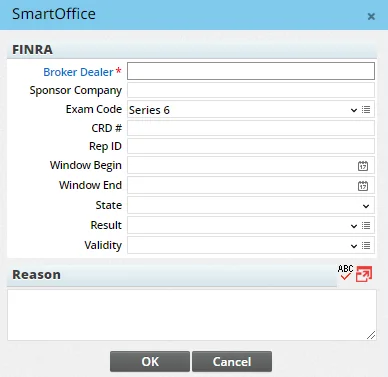
The fields are as follows:
- Broker Dealer: This field is required. Select this hyperlink to search for the SmartOffice advisor or agency record representing the advisor's broker-dealer.
- Sponsor Company: The name of the company (if any) submitting the advisor's application to FINRA and paying the advisor's exam fees.
- Exam Code: The Exam Code drop-down list contains two options: Series 6 and Series 7\. Series 6 is a test that registers an individual to transact a limited set of securities. Series 7 is the General Securities Registered Representative License, required to sell all types of products. Other exam codes can be added to this drop-down list as well (for more information, see Customizing Drop-Down Lists).
- CRD \#: The advisor's FINRA Central Registration Depository number.
- Window Begin: The first date on or after which the advisor can sit for the exam.
- Window End: The last date on which the advisor can sit for the exam (this date is normally 120 days after the Window Begin date),
- State: The state to which the license applies.
- Result: The exam result. Several system choices are available, but a user with the appropriate rights can add custom choices to the drop-down list.
- Validity: The current status of the series license. Several system choices are available, but a user with the appropriate rights can add custom choices to the drop-down list.
When a broker-dealer record is added to an advisor, SmartOffice automatically updates the CRD \# field on the Advisor Personal content link with the number provided in the broker-dealer record.
Switching to SmartView Case Status View
To better support an advisor who signs in to SmartOffice's SmartView for Case Status feature, a case manager can open a view of SmartOffice that appears identical to that available to the advisor.
- Select an advisor from the Advisor List or open an advisor or agency record.
- Select Menu > SmartView for Advisor.
Product Marketing
The Product Marketing feature is intended for users who market insurance products to advisors or agencies. This feature tracks how much of an advisor's or agency's business involves selling a particular carrier's product and/or line of business. With this information, the user can identify advisors or agencies that might be interested in specific products.
Note: To use this feature, a user must have the Product Marketing - Button user right.
Creating a Product Marketing Record
- Open an advisor or agency record.
- Select Menu > Product Marketing to open the Product Marketing list, which displays any previous product marketing records created for this advisor or agency.
- Select Menu > New 'ProdMarketing' Record to open the Product Marketing detail dialog box.
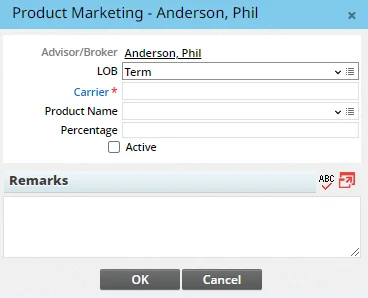
- Complete the fields. For example, to indicate that 25% of an advisor's business is selling a variable life product called ABC Life Plus from ABC Insurance, a user would fill out the fields as folllows:
- LOB: Variable Life (note that a user with the appropriate rights can add choices to this drop-down list; see Customizing Drop-Down Lists)
- Carrier: ABC Insurance (enter the carrier's name directly or click the Carrier hyperlink to perform a carrier search)
- Product Name: ABC Life Plus (to track line of business only, leave this field blank)
- Percentage: 25 (this field accepts decimal values as well, e.g., 25\.5\)
- Select the Active option to indicate that the advisor or agency is actively selling this carrier's product and/or line of business at the specified percentage.
- (Optional) Add any helpful notes in the Remarks section.
- Select the OK button.
Deleting a Product Marketing Record
- Open an advisor or agency record.
- Select Menu > Product Marketing to open the Product Marketing list, which displays any previous product marketing records created for this advisor or agency.
- Select a record, and then select Menu > Delete 'ProdMarketing' Record.
Creating Product Marketing Reports
SmartOffice features a Product Marketing category of Dynamic Reports (in the Other family of reports) that users can create to report on product marketing data present in the system. For more information, see Dynamic Reports.