Last updated: 2025-09-19
User Accounts - Creating User Accounts
Overview
Video not available: Creating and Modifying User Accounts
To create user accounts, begin by making a list containing each person's user name, sign-in name, e-mail address and other relevant information. The User List Worksheet can be used to gather this information.
Note: Only users with the Administrator: User Rights & Creation/Licenses/Groups user right can create user accounts. See User Accounts - User Rights Content Link.
Creating a User Account
The administrator can create user accounts from scratch or by creating a copy of an existing account and then modify it as needed.
From Scratch
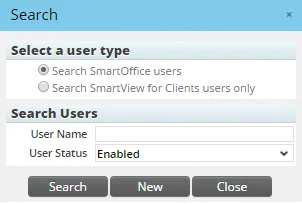
- From the SmartOffice side menu, select Setup > User Accounts to open the Select a User Type dialog box.
- Click the New button to display the New User Addition dialog box.
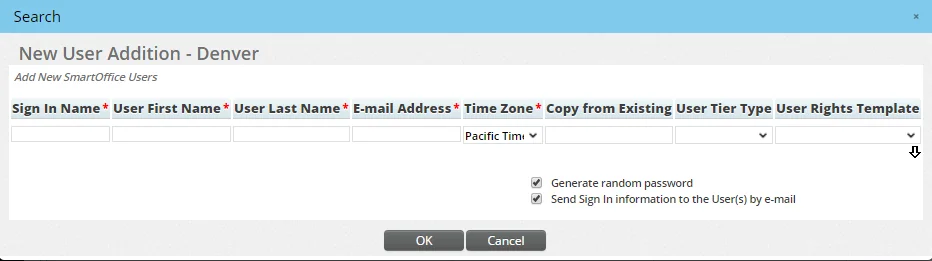
- This is the name the user will enter in the User Name field when signing into SmartOffice.
- Enter a unique sign-in name for the user. Note:
- The user name must be at least two characters and no more than 256 characters.
- Enter the user's first and last names in the appropriate columns.
- Enter the user's e-mail address. The maximum length is 256 characters.
- Select the user's time zone in the Time Zone column.
- Use one of these methods to specify the user rights that the new user will have:
- In the Copy from Existing column, enter an existing user's name (first name and then last name) to copy all of that user's settings into the new account.
- In the User Tier Type column, select the licensing tier that the user will belong to (for more information, see Office Settings - Tier Licenses).
- In the User Rights Template column, select a user rights template from the drop-down list (for more information, see User Accounts - User Rights Templates).
- Use one of these methods to specify the user's SmartOffice password:
- To have SmartOffice create a password for the user, select the Generate random password option.
- To specify the user's password, clear the Generate random password option to reveal the Password column. Then enter the user's password in that column (make sure to follow SmartOffice's password criteria).
- To have SmartOffice send the user e-mail instructions about how to sign in to SmartOffice, select the Send sign-in information to the user(s) by e-mail option.
- To create additional accounts, click the down arrow under the User Rights Template column to reveal additional rows.
- Click the OK button.
Once the accounts are created, the administrator can edit the individual accounts to make user-specific changes.
For additional information related to the preceding steps, watch a video about user account creation.
Copying an Existing User Account
Note: User accounts with a status of Disabled (see User Accounts - Detail Content Link) cannot be copied. Also, SmartView for Advisors and SmartView for Clients user accounts cannot be copied.
- Search for the user account to be copied.
- Tag the account in the list of search results or open the account to view it.
- Select Menu > Create a Copy of This User Account.
- When the confirmation message displays, click the Yes button to open the Copy User - New User dialog box.
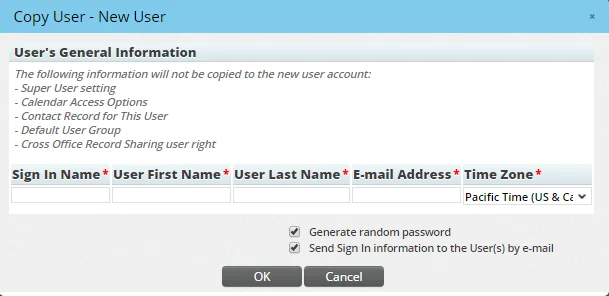
- Complete the fields as described in Creating Accounts - From Scratch. Note that there is no option to select a user rights template because the system copies the tagged user's rights to the new account.
- Click the OK button.