Last updated: 2025-09-19
User Preferences - Basic Info
- Overview
- General Information Section
- Password Security Question Section
- E-mail Posting Count Section
- Default Settings Section
- Mobile Navigation Menu Options Section
- Alert/Notification Settings Outside of SmartOffice Section
- My Favorite User List Section
Overview
Accessible from User Preferences, the Basic Info content link contains the user's name and contact information, a password reminder question (to be displayed if the user forgets his/her password) and miscellaneous options.

General Information Section
These fields are the same as those found on the User Accounts - Detail Content Link. The User Name and E-mail Address fields cannot be edited here; they can be edited only from User Accounts by a user with administrative rights.
Other fields include:
- Contact Record for this User: Click this hyperlink to link the user account to an existing SmartOffice contact record. If no contact record exists for the user, create a contact first. Linking a user account to a contact record is critical to taking full advantage of user-related merge codes (e.g., name, title, address, phone numbers, etc.) available for writing letters. If this user is an advisor, link the corresponding advisor record to enable agent-specific merge codes.
- Corporate Key: The value in this read-only field is sometimes referred to as the "site name" and may be required for setting up certain integrations.
- Default User Group: This drop-down list determines which custom fields the user sees by default in SmartOffice. The All Users in Office choice lets the user see those custom fields that are visible to all SmartOffice users. This is the most common setting.
In advanced SmartOffice configurations, the system can display different custom fields to different user groups. Selecting a user group from this drop-down list displays the custom fields for that user group by default whenever the user views a record's custom fields. In addition, if the user has the Custom Fields - Field Name Modification user right, the user can modify custom fields for the user group.
- Default Opportunity Process: This field is visible only when the user has a SmartOpportunities license. Click the Default Opportunity Process hyperlink to select the opportunity sales process that will be selected by default when the user creates an opportunity. This setting takes precedence over the office-level default opportunity configured in Opportunity Setup.
Password Security Question Section
SmartOffice has a password reminder feature to assist users who forget their passwords.
- Question: Select a security question from the drop-down list and enter an answer. SmartOffice asks this question when the user clicks the Forgot Password hyperlink on the SmartOffice sign-in page. Make sure the question is one whose answer is easy to remember but not easy for others to guess.
- Answer: Enter the answer to the password security question in this field. Do not use asterisks (\*) in the answer.
When the user enters the correct answer in response to the security question, SmartOffice generates a new password and sends it to the e-mail address specified in the E-mail Address field.
E-mail Posting Count Section
(Enterprise customers only) This section lists the number of e-mail messages posted to SmartOffice through the enterprise Exchange Sync by this user. Entries are listed by date.
Default Settings Section
- Default Area Code: The area code that will display by default when the user adds a telephone number to a record.
- Default Country Code: The country code that will display by default when the user adds a telephone number to a record. Enter a 1 in this field for the United States.
- Default Enterprise View Mode: Enterprise View enables a user to view data residing in lower offices in an office hierarchy. If a user has the Enterprise View user right, this drop-down list specifies whether Enterprise View is turned on or off by default when the user signs in to SmartOffice. Select Enterprise to turn on Enterprise View by default on sign-in. Choose Inside Office to turn off Enterprise View by default on sign-in.
- Date Format: The format used to display dates while the user is signed in. If this field is blank, the date format set for the entire office is used.
- Business SmartPad View Settings: The view option for displaying the SmartPads of businesses. The options are:
- Business Only - Key Relations Only (e.g., partners in the business, attorneys, CPAs or other people who are associated with this business) - Business & Primary Contact - Business and All Key Relations.
- Print all PDFs in black and white: Select the Yes option to print PDF files in black and white instead of color.
- Default location at sign-in (SOPRO): Select the page that displays immediately after the user successfully signs in to SmartOffice Pro.
- Default location at sign-in (SO Anywhere): Select the page that displays immediately after the user successfully signs in to SmartOffice Anywhere on a desktop/laptop device.
- Default location at sign-in (SOA Mobile): Select the page that displays immediately after the user successfully signs in to SmartOffice Anywhere on a mobile device.
- Default Phone Type: Select the phone number type (Residence, Business, etc.) that the system should select by default when the user adds phone numbers to contact records. If no choice is selected, the default type is Business.
- Default Address Type: Select the address type (Residence, Business, etc.) that the system should select by default when the user adds addresses to contact records. If no choice is selected, the default type is Business.
- Enable compact view for Menu: When this option is selected, the Menu button displays the user's favorite and recently used commands only, hiding all other commands behind a Show Full Menu hyperlink. This makes the menu more manageable for many users. When this option is cleared, the Menu button displays all available commands and submenus.
- Enable simplified Side Menu option: Selecting this option reduces the number of submenu items that SmartOffice displays initially when the user selects a category in the Navigate tab of the side menu. Only the most commonly used submenu items are displayed, along with a Show More hyperlink that reveals the full submenu. Clearing this option displays all of the submenu items under each category at all times.
- Do not prompt to send referral thank you letter: When the Referred By field is completed while creating a contact, SmartOffice prompts the user to send a thank you letter to the referring contact (provided that the referring contact exists in SmartOffice). Select this option to suppress these prompts.
- Do not show Information Card: The Information Card displays information about contacts and other types of records when the user simply points to those records instead of opening them. When this option is selected, the Information Card does not display.
- Show field help text: Select this option to display help text when the cursor is placed in certain fields.
- Do not show button images in SmartPDA: Select this option to display text instead of button images on SmartPDA. This option improves load times in SmartPDA.
- Do not link opportunity to calendar activity: Select this option to specify that only activities created from opportunity Calendar Activity-type actions should be automatically linked to an opportunity. This option prevents normally created activities from being automatically linked to an open opportunity. For more information, see SmartOpportunities.
- Do not show user list while accepting a lead: Select this option to accept leads without being prompted to assign users to the newly created contacts. For more information, see SmartLeads.
- Display timed activities before untimed activities on SmartPDA: Select this option to display timed activities first in SmartPDA.
- Do not show SmartPad archive dialog: This setting is relevant if the office is configured to automatically archive SmartPad notes (see [Office Settings
- SmartPad/New Contact/E-mail Posting](/help/pro/office/settings/-/smartpad/new/contact/e-mail/posting)). Anytime the user views a list of non-archived SmartPad entries, SmartOffice displays a message to let them know that any entries that would normally display in that list have been auto-archived. The message is intended to prevent any confusion that may occur if the user is not seeing all of the SmartPad entries they expect to see. To prevent this message from displaying, select this option.
- Do not prompt to add record after search: When the user searches for a record that does not exist in the system, SmartOffice normally prompts the user to add the record. Select this option to turn off that prompt and just display a blank search results list.
- Enable new Dynamic Report Setup wizard: Select this option to enable SmartOffice's updated wizard for creating Dynamic Reports. The newer version of the wizard is designed to help users (especially new SmartOffice users) create reports more easily than the classic report wizard. For more information, see Dynamic Reports - Report Setup.
- Show user group list while creating a record: In an office with office security enabled, when a user belonging to one or more user groups creates contact and certain other records, SmartOffice prompts the user to select a user group to assign to the record. Users who do not want to see this prompt can clear this option.
Mobile Navigation Menu Options Section
In this section, the user can specify which buttons appear in the SmartOffice Anywhere navigation menu on mobile devices.

to open the Mobile Menu Bar Options dialog box.
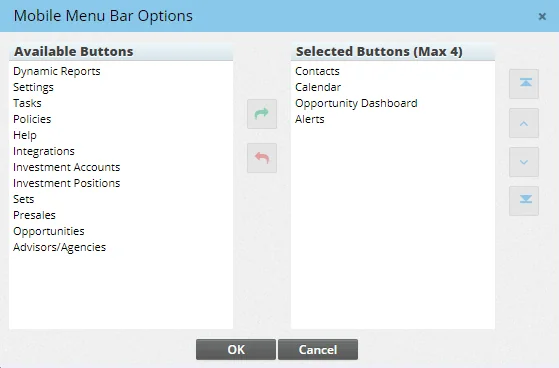
The Selected Buttons list displays the buttons that will appear in the navigation menu (there must be four buttons in this list). The Available Buttons list displays the buttons that will be available in the More menu in SmartOffice Anywhere.
To move a button from one list to the other, select the button, and then click the left-arrow and right-arrow buttons. To change the position of a button in the Selected Buttons list, select the button, and then click the up-arrow and down-arrow buttons.
Alert/Notification Settings Outside of SmartOffice Section
Select the Receive Alert Center Notifications Outside of SmartOffice option and then select the appropriate E-mail or SMS Text Message option to have SmartOffice alerts/notifications sent outside of SmartOffice.
To select the types of alerts to receive, go to User Preferences - Alert Center. Note: To receive activity-related alerts, the user must also enable activity alerts in User Preferences - Activity Options.
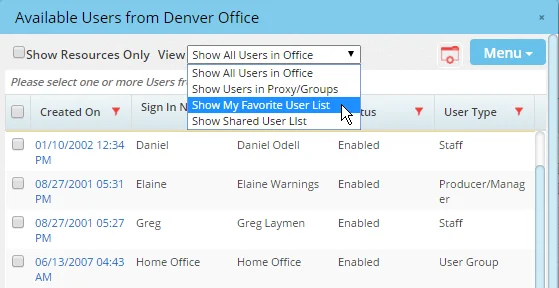
My Favorite User List Section
Users who frequently select other SmartOffice users from a list (e.g., when assigning users to records(/help/pro/office/security/smartsecurity/-/user/assignment) or viewing other users' calendar activities) can create a list of favorite users. The list makes selecting users faster than browsing though all of the users in the office.
 in this section and select New 'Favorite User' record to add users to the list.
After creating a favorites list, the user can select the Show My Favorite Users List option from the View drop-down list anytime the Available Users dialog box opens.