Last updated: 2025-09-19
SmartCommissions - Speed Receipts
- Overview
- Setup
- Updating the Commission Dictionary
- Bringing Transaction Data into Speed Receipts
- Carrier Interface
- Importing Non-Standard Files
- Entering Data Manually (Paper Statements)
- Searching for and Viewing Existing Speed Receipts
- Validating Transactions in Speed Receipts
- Validating All Transactions at Once
- Validating Individual Transactions
- Understanding Transaction Validation Statuses
- Other Transaction Features Available in Speed Receipts
- Adding Speed Receipt and Transaction Notes
- Mass Resetting Validated Transactions
- Mass Modifying Transactions
- Manually Linking a Transaction to a Policy
- Calculating Missing Expected Commissions
- Recalculating Expected Commissions (Current Value Calculation)
- Accepting a Transaction as an Adjustment
- Creating a Calendar Activity Linked to a Transaction
- Special Columns in Speed Receipts
- Quick Match/Reset SRE
- Policy Alert
- Sending Speed Receipt Transactions to Carrier Posting
- Validating Reconciliation Status
- Creating a Carrier Posting
- Linking Transactions to an Existing Carrier Posting
- Updating Posting Status
Overview
In SmartCommissions, the Speed Receipts feature is one method for bringing commission transaction data from carriers into SmartOffice for eventual reconciliation and statement generation.
Commission transactions can be moved into Speed Receipts from:
- Carrier Interface
- Import of non-standard files received from carriers
- Manual data entry (e.g., from paper statements received from carriers)
Once the data is in Speed Receipts, the user validates the transactions by matching them to the corresponding policies and expected commission records in SmartOffice.
After this validation process, the user sends the data to Carrier Posting for reconciliation.
Setup
Before using Speed Receipts, it is recommended that the following setup be performed.
Updating the Commission Dictionary
Each carrier record in SmartOffice has its own Commission Dictionary. The dictionary enables the commission types specified in that carrier's statements to be mapped to the commission types in SmartOffice. This is important for preventing errors later when validating transactions in Speed Receipts.
Note: To update a carrier's dictionary, a user must have access to the office in which the carrier record was created. To update the dictionary for a carrier:
- Search for the carrier.
- Tag the carrier in the list of search results, or open the carrier's Detail content link.
- Select Menu > Advanced Options > Commission Dictionary to open the Commission Dictionary List dialog box.
- Do one of the following:
- To add an entry, select Menu > New 'Commission Dictionary' record.
- To edit an existing entry, click its first-column hyperlink (the premium component code, by default).
The Commission Dictionary Detail dialog box opens.
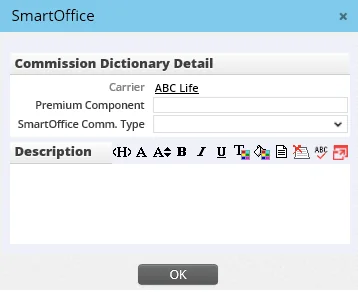
- In the Premium Component field, enter a premium component as it is referred to in the carrier's statements.
- In the SmartOffice Comm. Type field, select the corresponding SmartOffice commission type.
- (Optional) Enter text in the Description field if any further explanation is needed for users.
- Click the OK button.
Tip: Existing Commission Dictionary entries can be modified using the same steps while viewing a speed receipt record. However, new dictionary entries can be added only from the appropriate carrier record.
Bringing Transaction Data into Speed Receipts
When transactions are brought into Speed Receipts, a speed receipt record is created to group those transactions. The following sections describe the various methods that can be used to bring transactions into Speed Receipts.
Carrier Interface
Transactions delivered in the standard ACORD or NAILBA format are initially brought into the system through the Carrier Interface. To learn how to move transactions from the Carrier Interface into Speed Receipts, see Carrier Interface.
Importing Non-Standard Files
Speed Receipts can be used to import data that is not in the standard ACORD or NAILBA format, as long as the data is saved as a comma-separated values (.csv) file.
The first time the user imports such a file, the user creates an "import setup" to map the fields in the import file to the matching fields in SmartOffice. This import setup can be reused in the future to quickly import future files that are saved in the same format.
First-Time Import (Import Setup)
To import a file for the first time:
- From the SmartOffice side menu, select Commission Utilities > Speed Receipts to open the Search Speed Receipts dialog box.
- Click the Search button to display the Speed Receipt List.
- Select Menu > Commission Import for Speed Receipt Entry to open the Import Setup List dialog box.
- Select Menu > New 'Import Setup' record to start the Data Import Wizard.
- In the Name field, enter a name that will help users identify this import setup when they need to import data files of this type in the future.
- Click the Next button.
- From the Setup Connector drop-down list, choose one of the following:
- Local: This option creates a manual commission import setup. Choose this option if you plan to run imports manually using import files stored on your computer or other device.
- SFTP/FTP: (Note that this option is not available in all SmartOffice instances.) This option creates an automated commission import setup. Choose this option to have SmartOffice automatically connect to an SFTP or FTP site on a schedule, download any import files that it finds, and import them.
- If you chose the SFTP/FTP option in the previous step, complete the fields in the Automatic Import Setup section that appears:
- FTP Path: Specify the path to the directory on the SFTP or FTP site that you want SmartOffice to monitor for new import files. Example: /commissions/import
- Host: The address of the SFTP or FTP server. This can be an IP address or domain name. - Port: The number of the port on the SFTP or FTP server that SmartOffice should try to connect to. The standard ports are 22 for SFTP and 20 or 21 for FTP, but the ports for your server may differ depending on your organization's network configuration. - User Name: The user name of the SFTP or FTP account that SmartOffice should use to log in to the server. - Password: The password of the SFTP or FTP account that SmartOffice should use to log in to the server.Once these fields are complete, select the Test Connection button to ensure that SmartOffice is able to connect to the SFTP or FTP site using the information you provided. If you receive an error, review the settings, make any necessary changes, and then test the connection again.
Finally, under Import Frequency, specify how often SmartOffice should check for new files on the SFTP or FTP site. Selecting No Recurrence runs the automatic import only once.
- Click the Choose File button to locate and select the .csv file to import. The other options in this step relate to the formatting of the import file. For more information about these options, see Data Import - Import Process.
- Click the Next button.
- Map the SmartOffice fields displayed to the fields in the import file. For more information about field mapping, see Data Import - Import Process. The more fields that are mapped, the easier it is to correct validation errors later. Depending on the types of commission calculations that the user plans to perform in SmartCommissions, certain fields, such as Commission Amount, may be required. Commission amount and premium are the primary factors used in calculating commissions. Commission amount is the primary factor used specifically in the reconciliation process. At a minimum, mapping the following fields is recommended:
- Commission Amount($)
- Commission Type - Due Date (if this field is not mapped but the Paid-to and Next Due fields are mapped, SmartOffice uses the latter to calculate the due date during validation) - Policy Number - Premium Paid
- After mapping the fields, click the Save & Run Import button.
Subsequent Imports
Manual Imports
To run the same import setup in the future:
- From the SmartOffice side menu, select Commission Utilities > Speed Receipts to open the Search Speed Receipts dialog box.
- Click the Search button to display the Speed Receipt List.
- Select Menu > Commission Import for Speed Receipt Entry to open the Import Setup List dialog box.
- Tag the import setup, and then select Menu > Run Setup.
Automatic Imports
Automatic imports from an SFTP/FTP normally require no further action. SmartOffice will import any .csv file it finds in the SFTP/FTP directory specified in the import setup.
After importing a file successfully from the SFTP or FTP site, SmartOffice renames the file to add a .del extension and ignores the file on subsequent connections.
If SmartOffice encounters an error importing a file from the SFTP or FTP site, SmartOffice renames the file to add an .err extension. SmartOffice then ignores the file on subsequent connections. To try importing the file again, first check the data import history for any errors indicating why the import failed. Then correct the import file and remove the .err extension from the file name. SmartOffice will attempt to import the file again the next time it connects to the SFTP or FTP site.
Modifying an Import Setup
If any changes are required to the import setup, the user can modify the setup. For more information, see Data Import - Import Process.
Entering Data Manually (Paper Statements)
Manual data entry in Speed Receipts is the method to use when commission statements are delivered in paper format.
Note: Manual entry of transactions from paper statements can also be performed directly in Carrier Posting. However, this is not recommended for statements containing more than 100 transactions.
- From the SmartOffice side menu, select Commission Utilities > Speed Receipts to open the Search Speed Receipts dialog box.
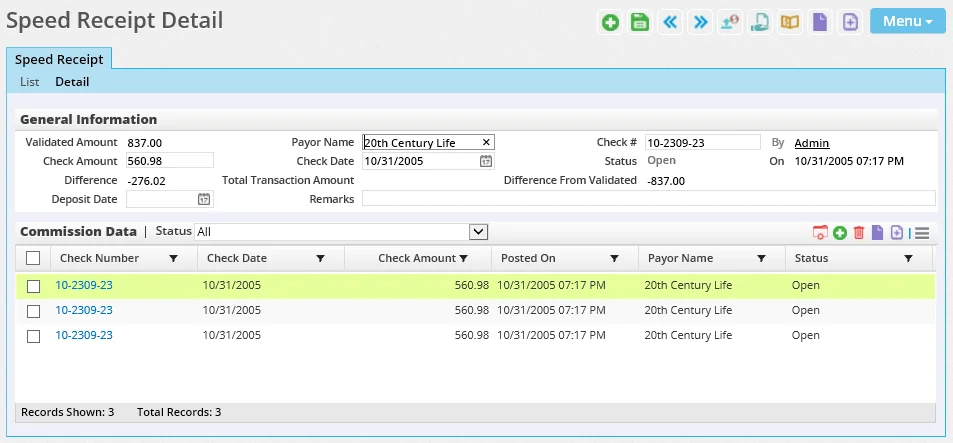
- Click the New button to open the Speed Receipt Detail dialog box.
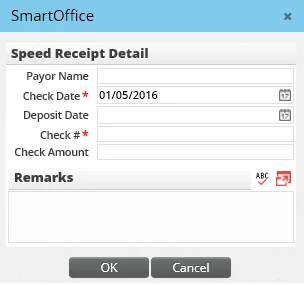
- Complete the Check Date and Check \# fields, which are required. Optionally, complete the Payor Name, Deposit Date and Check Amount fields.
- Enter any comments in the Remarks field if necessary.
- Click the OK button to display the Speed Receipt Detail page.
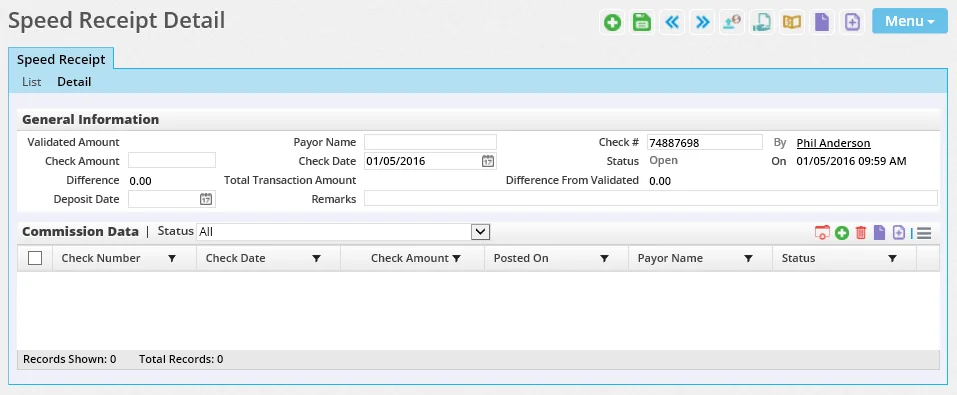
- In the Commission Data section, enter transactions from the statement using either of the following methods:
- Single transaction entry: Click the Options button
 and select New 'Manual Commission Transaction' record to open the Commission Detail dialog box, and then fill in the fields. It is not necessary to complete all of the fields, but, at minimum, complete the Policy Number, Commission Amount and Due Date fields. Then click the OK button.
 - Multiple transaction entry: This method is faster for entering multiple transactions. Click the Options button and select Add New List Row to open a spreadsheet-style dialog box. In that dialog box, select Menu > Add New List Row to begin entering data. Use the TAB key to move quickly from field to field. Pressing TAB at the end of a row automatically creates a new row. To specify which columns are available for data entry, users with the appropriate rights can select Menu > List Options > Customize List Layout (for more information, see List Layout Customization). When finished, click the OK button.
- Once all transactions have been entered, select Menu > Save.
Searching for and Viewing Existing Speed Receipts
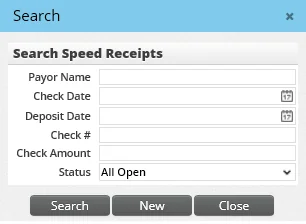
- From the SmartOffice side menu, select Commission Utilities > Speed Receipts to open the Search Speed Receipts dialog box.
- Enter the payor name, check date and any other criteria to narrow the search, or leave the fields blank to fins all speed receipts.
- Click the Search button to display the Speed Receipt List.
- To view a speed receipt's details and transactions, click its first-column hyperlink (the check number, by default), or select the record and click the Detail content link.
Validating Transactions in Speed Receipts
During validation, Speed Receipts tries to match each transaction to an existing policy and expected commission transaction in SmartOffice. If the system find multiple matching policies with the same policy number, it uses the product code to determine the correct match.
SmartCommissions attempts to validate transactions automatically in most situations. However, in certain situations (e.g., when transactions are imported from a CSV file), transactions must be validated manually before they can be moved to Carrier Posting for reconciliation.
Validating All Transactions at Once
With the speed receipt record open, select Menu > Validate all Commission Transactions. It is not necessary to tag any transactions before selecting this menu command.
Validating Individual Transactions
and select Validate Selected Transactions.
Understanding Transaction Validation Statuses
The Error/Validated column in the Commission Data list indicates the validation status of each imported/entered commission transaction. If validation failed for a transaction, an appropriate message displays in that column to help the user troubleshoot the issue. The error messages and recommended solutions are as follows:
- Base Commission Not Defined: One of the calculations the system is trying to perform is based on the base commission received by the house, and this number is blank or 0\.
- Calc Error – Carrier not attached to case: Check the policy record in SmartOffice and make sure an insurance carrier is linked to the policy.
- Calc Error – Insufficient calculation data: Ensure that the imported transaction includes both premium and commission amount information.
- Calc Error – No Advanced Commission Split defined: Go to the policy record in SmartOffice and create advanced commission split data for the policy.
- Calc Error – Policy date not found. Go to the policy record in SmartOffice and make sure the Policy Date field (i.e., the effective date) is defined on the policy Basic Information content link.
button and selecting Create Policy (for more information, see Creating and Deleting Policies).
- Carrier Not Found: No carrier information was found in the transaction. Open the transaction and enter the appropriate carrier.
- Commission Tracking disabled for case: The policy record indicates that it should be excluded from commission tracking. If this is incorrect, open the policy record in SmartOffice and make sure that the Track Comm. option on the policy Basic Information content link is selected.
- Commission type not found: The transaction's commission type is not found in the Commission Dictionary for this carrier. Check the carrier's dictionary to ensure that the commission type is specified.
- Error Due to Status: This means that the matching policy in an Inactive status, such as Lapsed or Closed. This error could also mean that the policy is still in the underwriting stage and needs to be moved to Issued or Inforce.
- Multiple Policies Found: This message displays when multiple policy numbers match a transaction, all of the policies have the Track Comm. option enabled and all of the policies are in an Active status. After the error is corrected, the transaction remains linked to the policy if the user validates again. Firms that track more than one policy using the same policy number may see an excessive number of these errors, but SmartOffice has a mechanism to try to prevent this; when the system finds multiple policies matching a transaction, it tries to match policy effective dates from the imported commission transactions to the policy dates associated with the expected commission records.
- No Advanced Commission Split: This is the same as the Calc Error – No Advanced Commission Split defined error.
- Not Validated: Validation has not been attempted on this transaction. Run validation to resolve this error.
- Policy Number Not Found: The policy number in the transaction did not match a policy number in SmartOffice. If the policy does not exist in SmartOffice, create it by clicking the Options
- Projection Found but out of Date Range: This message means that the system looked at the due date of the entered/imported commission transaction, compared it to the due dates found in the expected commissions for the policy, and found the dates to be outside the variance allowed by the Projection Validity Date Range setting. This setting is defined by the administrator in the Calculation Setup section of Commissions Setup. These transactions can be validated quickly using the buttons in the Quick Match/Reset SRE column (see Special Columns in Speed Receipts).
- Projection Not Found: This message can mean that commission projections have not been generated for the policy or that the Projection Validity Date Range check failed. To correct this error, change the due date of the transaction in Speed Receipts and revalidate it, go to the case record and project commissions, or use Speed Receipts to calculate the missing expected commission records.
- Validated: This message means that the transaction has been matched to a policy and expected commission record. It does not mean that the transaction is reconciled; reconciliation occurs when the transaction is passed into Carrier Posting.
- Validated and Linked: This message means that the transaction has been matched to a policy and expected commission record and that a carrier posting transaction has been created for it. To display a hyperlink to the linked carrier posting, the user can customize the transaction list to add the Carrier Posting Name column.
Other Transaction Features Available in Speed Receipts
Adding Speed Receipt and Transaction Notes
Notes can be attached to the entire speed receipt record or to individual transactions listed in the speed receipt's Commission Data list.
To view notes attached to the speed receipt record, tag the record in the Speed Receipts List, or open the speed receipt, and then select Menu > View Speed Receipt Notes. To create a note, select Menu > New Speed Receipt Note.
and select View Manual Commission Transaction Notes. To create notes, tag one or more transactions, and then click the Options button and select New Manual Commission Transaction Notes.
For more information about using notes in SmartOffice, see Contacts and Businesses - SmartPad.
Mass Resetting Validated Transactions
While viewing a speed receipt record, users can reset multiple validated commission transactions at once.
- In the Commission Data list, select one or more transactions.
- Click the Options button and select Reset Selected Transactions.
Mass Modifying Transactions
SmartOffice's Mass Modify feature is available in the Commission Data list of a speed receipt record. This feature can be helpful when the user wants to change the due date or commission type of multiple transactions to the same value, for example.
and select Advanced Options > Mass Modify.
Important: Do not use Mass Modify to modify the policy numbers associated with transactions.
Manually Linking a Transaction to a Policy
If Speed Receipts is unable to find a matching policy for a transaction or transactions using regular validation, but the policy exists in SmartOffice, do the following:
- Open the speed receipt record.
- In the Commission Data list, tag one or more transactions.
- Click the Options button and select Policy Selection to open the Search Policies dialog box.
- Search for and select the appropriate policy.
Calculating Missing Expected Commissions
Normally, SmartOffice calculates expected commissions automatically. However, there may be cases in which expected commission records are not generated during the normal process, preventing Speed Receipts from properly validating the transactions received from the carrier.
Rather than force the user to leave Speed Receipts to resolve the issue, SmartCommissions enables the user to generate the missing commission records directly from Speed Receipts. This process can be used on transactions whose validation status is Projection Not Found or Projection Found But Out of Date Range.
Note: This feature is available only for policies that use a contract and rates. Commissions cannot be calculated in this way for policies that use an advanced commission split; for these policies, the user must either enter commission transactions manually or perform an illustration import.
- Open the speed receipt record.
- In the Commission Data list, tag one or more transactions.
- Click the Options button and select Calculate Commission.
If multiple transactions are selected, the Match/Merge option selected in the Calculation Setup section of Commissions Setup also comes into play, as follows:
- If the Match option is selected, separate expected commission records are generated for each carrier commission transaction, even if all of the carrier transactions have the same due date.
- If the Merge option is selected, a single expected commission record is generated for all carrier transactions having the same due date. For carrier transactions having different due dates, separate expected commission records are generated for each transaction.
Recalculating Expected Commissions (Current Value Calculation)
Like the Calculate Commission feature, this feature generates expected commission records in SmartOffice using the transactions received from the carrier. The difference is that this feature deletes existing expected commission records and then calculates new expected commissions based on the premium data sent by the carrier.
- Open the speed receipt record.
- In the Commission Data list, tag one or more transactions.
- Click the Options button and select Current Value Calculation.
Accepting a Transaction as an Adjustment
The user can validate transactions in a speed receipt record as adjustment entries.
- Open the speed receipt record.
- In the Commission Data list, tag one or more transactions.
- Click the Options button and select Accept as Adjustment. If no house account is specified in the Calculation Setup section of Commissions Setup, the system prompts the user to select a house account.
Creating a Calendar Activity Linked to a Transaction
While viewing commission transactions in Speed Receipts, the user can create a calendar activity related to a transaction.
- Open the speed receipt record.
- In the Commission Data list, tag one or more transactions.
- Click the Options button and select Launch Activity.
- Fill in the activity details (see Calendar - Activity Detail dialog). SmartOffice automatically does the following:
- Sets the subject of the activity to "Commission Issue."
- Sets the activity type as To Do. - Adds the name of the primary contact on the associated policy to the activity's Contact field. - Adds the associated case manager as a participant (if the SmartCaseManager module is being used).
- Inserts the associated policy number into the activity's Keywords field.
Special Columns in Speed Receipts
In a speed receipt record, the Commission Data list contains several special columns that can help users be more productive while using Speed Receipts.
(If these columns are not visible, a user with the appropriate user rights can add them to the list. For more information, see List Layout Customization.
Quick Match/Reset SRE
This column can be used to quickly validate transactions that have a status of Projection Found but out of Date Range (see Understanding Transaction Validation Statuses).
 to open a list of expected commission records that can be associated with that specific speed receipt transaction. From that list, select an existing commission record or create a new one.
 to change the transaction's status back to Projection Found but out of Date Range.
Policy Alert
The Policy Alert column gives SmartCommissions users a way to read alerts related to the policy linked to a particular transaction. Alerts display as hyperlinked text in this column. Click the text to view the full alert.
For more information about policy alerts, see Record Alerts.
Sending Speed Receipt Transactions to Carrier Posting
Once transactions have been validated in Speed Receipts, they are ready to be moved to Carrier Posting for reconciliation. The transactions can be added to a new or existing carrier posting record, as needed.
Speed Receipts contains several features related to Carrier Posting.
Validating Reconciliation Status
Speed Receipts contains a "preview" feature that enables the user to see the reconciliation status of one or more transactions before actually moving them to Carrier Posting. This feature saves the user the trouble of having to move transactions from Carrier Posting back into Speed Receipts if errors related to validation occur in Carrier Posting.
- Open the speed receipt record, or select it from the Speed Receipt List.
- Select Menu > Validate Reconciliation Status.
SmartCommissions verifies the amount in the Commission Amount field of each imported transaction against the amount in the Expected Amount field of each expected commission record. It then determines whether transactions will remain open or be marked as reconciled after they are linked to a carrier posting. The system tolerance defined in the Carrier Posting Setup section of Commissions Setup is also considered. Records are classified as Not Validated, Validated/Open or Validated/Reconciled.
To view the reconciliation status of each transaction, the user must have the Reconciliation Status column in the speed receipt's Commission Data list. If this column is not visible, a user with the appropriate rights can add it to the list. For more information, see List Layout Customization.
For more information about reconciliation statuses, see Carrier Posting.
Creating a Carrier Posting
To move all of the transactions in a speed receipt into a new carrier posting record:
- Open the speed receipt record, or select it from the Speed Receipt List.
- Select Menu > Create New Carrier Posting.
- Select one or more carriers.
Linking Transactions to an Existing Carrier Posting
- Open the speed receipt record.
- In the Commission Data list, tag one or more transactions.
- Click the Options button and select Link to Existing Carrier Posting to open the Search Carrier Postings dialog box.
- Search for and select the appropriate carrier posting.
Updating Posting Status
This feature changes the status of a Speed Receipt record from Open to Reconciled. It can be used only when the amount in the speed receipt record's Posted field matches the check amount.
- Open the speed receipt record, or select it from the Speed Receipt List.
- Select Menu > Update Posting Status.