Last updated: 2025-09-19
Pending Cases - Creating Pending Cases
- Overview
- Creating a Case from the Add New Menu
- Advisor Verification for New Cases
- Other Ways to Create a Pending Case
- From the Side Menu
- From the Pending Case List
- PCM Preferred Add
- Copying a Pending Case
- Creating Informal and Multi-Life Child Cases
Overview
The user can create formal and informal pending cases using several methods.

Creating a Case from the Add New Menu
- Select Pending Case from the Add New menu to open the Pending Case Add dialog box.
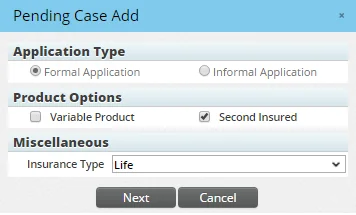
- Application Type: This option determines whether the new case is a formal or informal case. Formal Application is the default setting. To add a case that can be shopped to multiple carriers, select the Informal Application option.
- Product Options: Select whether the new pending case is for a variable product and/or a second insured product.
- Miscellaneous: Select the insurance type from the drop-down list. If this is an informal application, a Plan Type drop-down list is also available, enabling the user to select a plan type based on the insurance type selected.
- Select the following options:
- Click the Next button to open the Pending Case Add Detail dialog box.

- Carrier and Plan Name in the Basic Policy Information section (formal applications only). Note that only carriers with a status of Active are available for selection. Status is specified on the carrier's Detail content link.
- Enter the following mandatory information:
- Primary Insured in the Insured –1 section
- Second Insured in the Insured – 2 section (for second insured products only)
- Primary Contact's Last Name in the Interested Parties section
- Primary Advisor in the Advisor Information section
- For an informal case, enter the carriers to which the application will be sent. To do so, click the Carrier hyperlinks in the Shopping Carriers section to search for the appropriate carriers (see Insurance Carriers for information about searching for carriers). A child case is created for each carrier. Basic policy information, benefits, important contacts and insured and advisor information is saved for all child cases and the parent informal application. No product information is required when creating an informal application.
Watch the Training Class: Shopping a Case
- If the application involves a second insured product, complete the fields in the Insured-2 section. The second insured is treated the same as the primary insured; requirements are automatically created based on the product's underwriting guidelines for the appropriate age, gender, risk class and face amount.
- Complete any other fields necessary for underwriting requirements to be automatically created in the case's Requirements content link.
- Click the Finish button.
- If configured to do so in Policy/Case Setup - Licensing/Contracting Setup, SmartCaseManager checks the advisor's license, contract, appointment and compliance coverage information for the selected line of business, state and carrier and displays a prompt if any issues are discovered (see the next section for a detailed description of this process).
- If configured to do so in Policy/Case Setup - PCM Workflows, SmartCaseManager tries to automatically generate underwriting requirements for the new case. If no requirements are automatically created on the Requirements content link due to missing information (i.e., no class, state or face amount is specified, or no gender or age is specified for the insured contact), a message displays to notify the user.

- If a record alert exists for the primary advisor on the case, the alert appears. For more information, see Record Alerts.
Advisor Verification for New Cases
During case creation (or when a case is assigned a status specified in the Policy/Case Setup), SmartOffice can verify whether the selected advisor has active license, contract, appointment and compliance coverage information and alert the user to any issues.
If an advisor does not have a license, contract, appointment or compliance coverage for the selected line of business, state and carrier—and if the pending case options for the selected carrier are set to prompt the case manager—a verification dialog box opens while a case is being created.
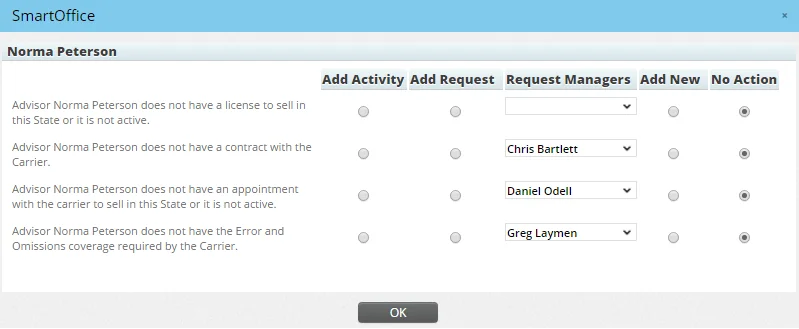
The user can then select an option to resolve each issue:
- Add Activity: This option opens the Activity dialog box, enabling the user to create a calendar activity to address the issue.
- Add Request: This option adds an advisor request to the Advisor Requests content link of the pending case.
- Request Managers: Select the SmartOffice user who will be responsible for following up on the advisor request.
- Add New: This option opens a dialog box that enables the user to update the advisor's license, contract, appointment or compliance coverage information if that information is immediately available.
- No Action: This option leaves the issue unresolved.
Note: In the Insurance Carriers module, alert setups can be modified on the carrier PCM Options content link to verify advisor license, contract, appointment and/or compliance information. The agency also has the option of turning the prompt off and having the advisor requests added without an alert.
Other Ways to Create a Pending Case
From the Side Menu
- From the SmartOffice side menu, select Insurance and then select Pending Cases from the expanded list of options.
- In the Search Pending Cases dialog box, click the New button.
From the Pending Case List
From the Pending Case List, do any of the following:
- Click the Workflow to Enter a New Case button in the Custom Button Bar.
- Select Menu > Workflow to Enter a New Case.
- Press CTRL\+INSERT.
PCM Preferred Add
If the user creates cases with the same application type, product options, insurance type and/or carrier on a regular basis, the PCM Preferred Add feature saves the user time by automatically filling in that information during case creation.
Note: PCM Preferred Add is available only if the user has selected options in the PCM Preferred Add section of Policy/Case Setup.
To use this feature:
- From the Pending Case List, select Menu > Preferred Add.
- In the Pending Case Add Detail dialog box, select the Plan Name hyperlink to search for the appropriate product. The Product List opens, listing those products that satisfy the conditions set in the PCM Preferred Add options.
Copying a Pending Case
To create a pending case that is similar to an existing case, the user can create a copy of the existing case and modify the copy as needed. This feature saves the user the time and effort involved in creating a pending case record from scratch.
Note: The copy feature works with formal pending cases only. Informal cases cannot be copied.
- Search for a pending case.
- Open the case record or select it from the list of search results.
- Select Menu > Advanced Options > Copy Pending Case.
- In the dialog box that opens, use the Yes and No options to select the types of data that should be copied to the new pending case record.
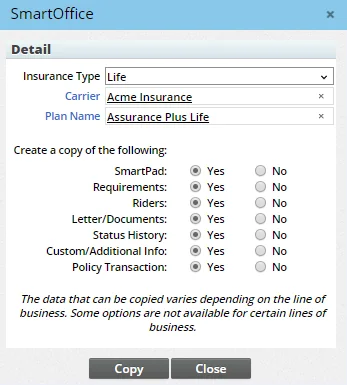
Note: The user can change the insurance type, carrier and plan name from this dialog box. However, changing any of these prevents some information in the original case from being copied to the new case.
- Click the Copy button.
When the copy operation is finished, the new pending case record's Detail content link opens. The policy number is the same as the original except for the addition of a "-CP" suffix. The user can then make any changes to the pending case and save it.
Creating Informal and Multi-Life Child Cases
Child cases for informal applications are created from the Informal Application content link of the parent case. Child cases for multi-life policies are created from the Related Policies content link of the parent case.