Last updated: 2025-09-19
Pending Cases - Additional Pending Case Management Features
- Policy Warnings
- Pending Case Alerts
- Pending Case Notes
- Viewing Pending Case Notes
- Creating a Pending Case Note
- Pending Case Correspondence
- E-mail Case Manager
- Manual Correspondence
- Automated Correspondence
- Policy List
- Premium Calculation Report
- Linking to an Existing Case
- Unlinking a Case
- Requirement Follow-Ups
- Case and Requirement Manager Reassignment
- Mass Assigning an Advisor to Multiple Pending Cases
- Copying Data from One Pending Case to Other Pending Cases
- Linking a Case to a Presale Activity/Proposal
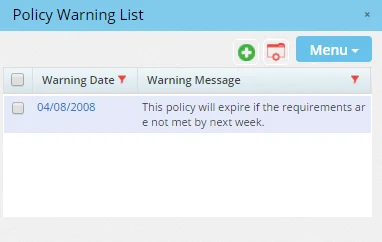
Policy Warnings
Policy warnings enable the user to notify other users in the office about important issues regarding a pending case that require attention.

To view, add, modify or delete policy warnings, tag a case from the Pending Case List or open the case. Then select Menu > Policy Warnings to open the Policy Warning List.
To enter a new warning, select Menu > New 'Policy Warning' record to open the Policy Warning dialog box.
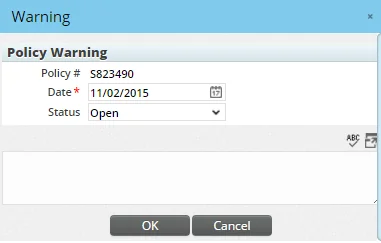
 to remind the user that something important needs to be addressed on the case.
To change the warning status to Closed, tag the warning in the Policy Warning List and then select Menu > Close Warning.
Note: Policy warnings can also be viewed from the SmartPolicies module.
Pending Case Alerts
A pending case alert can be created for a case to notify all users about issues that require attention. In a sense, a pending case alert is like a policy warning. However, a pending case alert is more visible, displaying in a pop-up window as soon as any user in the office views the case.
Pending Case Notes
Pending case notes can be viewed separately from other types of notes in SmartOffice, enabling the user to see notes related to a specific pending case without having to sort through other notes that may be unrelated to that case.
Viewing Pending Case Notes
- Tag a case in the Pending Case List or open a case for viewing.
- Select Menu > View Pending Case Notes.
- In the Pending Case Notes dialog box, click a note's date to open it.
Creating a Pending Case Note
- Do one of the following:
- - From the Pending Case Notes dialog box, select Menu > New 'Pending Case Notes' record. - Tag a case in the Pending Case List (or open a case for viewing) and then select Menu > New Pending Case Note.
The New Pending Case Note dialog box opens.
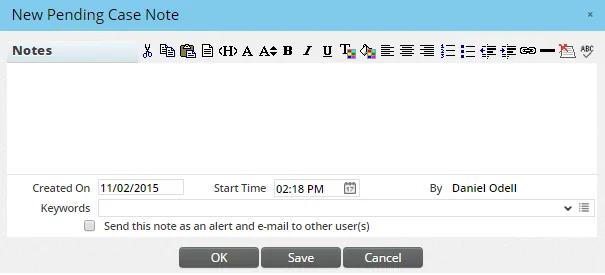
- Enter the note in the text field.
- (Optional) Edit the dates in the Created On and Start Time fields if necessary.
- (Optional) Select the Send this note as an Alert to other User(s) option to alert other users in the office about the note. Users will be able to view the note in the SmartOffice Alert Center.
- Click the Save button to save the note and continue editing it, or click the OK button to close the completed note.
Pending Case Correspondence
SmartOffice features both manual and automated workflows for sending case-related correspondence. Make sure you understand the basics of correspondence in SmartOffice before sending pending case correspondence.
E-mail Case Manager
SmartOffice Pro provides a shortcut for sending an e-mail message to the case manager on a pending case. These steps enable the user to bypass the full correspondence workflow and immediately open a blank e-mail message addressed to the case manager. The subject line of the message is automatically populated with the name of the primary insured, the name of the carrier, the unique case ID and the policy number.
- Select a case in the Pending Case List or open a case for viewing.
- Select Menu > Communication > E-mail Case Manager.
- If prompted to download an .sopro configuration file, save and open the file. Also, if prompted, sign in to the Microsoft Plug-in for SmartOffice.
- Type the e-mail message and send it as you normally would.
Manual Correspondence
SmartOffice features a special manual correspondence workflow for policies and pending cases. Using this workflow, users can send e-mail messages or printed form letters to any contact associated with a policy/pending case (e.g., primary contact, primary insured, primary advisor, carrier and so on).
- Search for the policy or pending case.
- In the list of search results, select one or more policies, or open a policy or pending case record.
- Click the Correspondence button
 or select Menu > Communication > Correspondence to open the correspondence options dialog box. The options presented differ depending on whether a single policy/case or multiple policies/cases were selected.
| Single Policy/Case | Multiple Policies/Cases |
|---|---|
| Image from base_dialog_pending_case_corr.png | Image from base_dialog_pending_case_corr_mass.png |
 menu.
menu.
- Select recipients as follows:
- For a single policy/case: Select one or more recipients under Related Contacts.
- For multiple policies/cases: Select a role under Select Recipient (e.g., Carrier, Primary Advisor, Primary Contact, etc.). The correspondence will be sent to the contact with that role on each selected policy/case.
- Under Correspondence Options, select the type of correspondence you want to create (E-mail Form Letter, Print Form Letter, etc.).
Note: The Launch Word and Launch E-mail options open a blank document or e-mail message, allowing you to create correspondence directly from MS Word or Outlook. You may prefer these options when sending one-off correspondence that is not based on a form letter template to a single recipient (these options do not support mass correspondence). Selecting one of these options and clicking the Next button exits the Correspondence Wizard. Learn more about creating SmartOffice correspondence directly from Word or Outlook.
- (Optional) Select Apply correspondence default options to indicate that your default correspondence options specified in User Preferences should be used. Selecting this option skips many of the remaining steps in the correspondence workflow.
- Click the OK button.
- Tip: To save users time when they send pending case correspondence, administrators can configure default letters for carriers and advisors in the PCM Communication section of Policy/Case Setup. Once default letters are specified, those letters are selected automatically when users create pending case correspondence. However, the user who creates the correspondence is free to change the letter.
Automated Correspondence
SmartOffice can generate correspondence automatically when the status of a pending case or requirement changes (for details and setup instructions, see Policy/Case Setup - Letter Setup).
When an automated correspondence workflow is triggered, SmartOffice displays a confirmation dialog box that lists the recipients, the letters that are about to be generated and any other messages the user needs to be aware of.
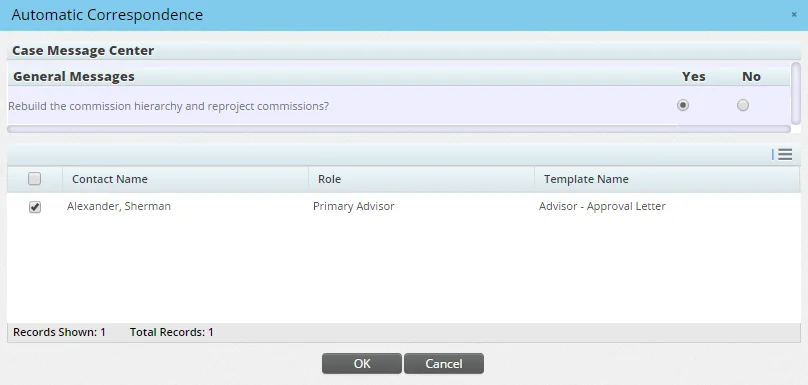
) or change the correspondence template on the fly.
Policy List
The user can go quickly from viewing a pending case to viewing the case's associated policy in the SmartPolicies module.
- Open a case for viewing.
- Select Menu > Policy List.
Similarly, from SmartPolicies, the user can select Menu > Pending Case Management to return to the associated pending case in SmartCaseManager.
Premium Calculation Report
While viewing a case's Detail or Delivery content link, select Menu > Premium Calculation Report to generate a report based on entries in the Insurance Products module.
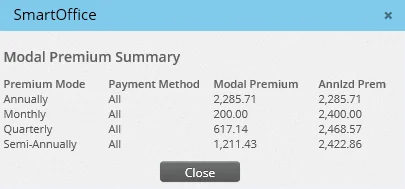
During pending case creation, when the premium, premium mode and payment method values are entered and the information is saved, the system calculates premiums based on the Modal Fee Information section of the product's Detail content link. If these values are not available at the product level, the values specified on the carrier's Product Fees content link are used.
Linking to an Existing Case
An existing case can be linked to a multi-life case as a child case. This feature is available only if the existing case is not currently linked to another case.
To link a case:
- Open the case.
- Select Menu > Link to Existing Case to open the Search Pending Cases dialog box.
- Click the Search button to display a list of multi-life cases.
- Select a case from the list (this will be the parent case).
The current pending case becomes a child case and is listed on the Related Policies content link of the parent case.
Unlinking a Case
This feature is available only for child cases that are linked to multi-life parent pending cases. To unlink a child case from a multi-life parent case:
- Do one of the following:
- Open the parent case's Related Policies content link and tag the child case. - From any list of pending cases, open the child case for viewing.
- Select Menu > Unlink Case.
Requirement Follow-Ups
The user can display a convenient list of all pending case requirements that have a follow-up date equal to the current date and up to three months in the past. Follow-up dates that have passed appear in red.
Tip: To be notified automatically at sign-in when follow-ups come due, users can enable the Pending Case Follow-Ups option in their sign-in preferences. For more information, see User Preferences - Sign-In Events.
To display the Follow-Up list:
- In the side menu, select Insurance > Requirement Follow-Ups to open the Search Follow-Ups dialog box.
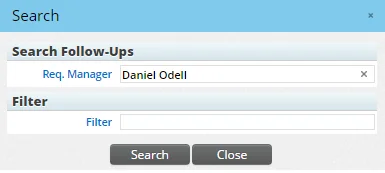
The signed-in user's name appears by default in the Req. Manager field.
- To search for follow-ups for another user, click the Clear button in the Req. Manager field. Then click the Req. Manager hyperlink to select another user.
- (Optional) To limit the search to follow-ups that meet certain filter criteria, click the Filter hyperlink to select a filter.
- Click the Search button to display the Follow-Up list.
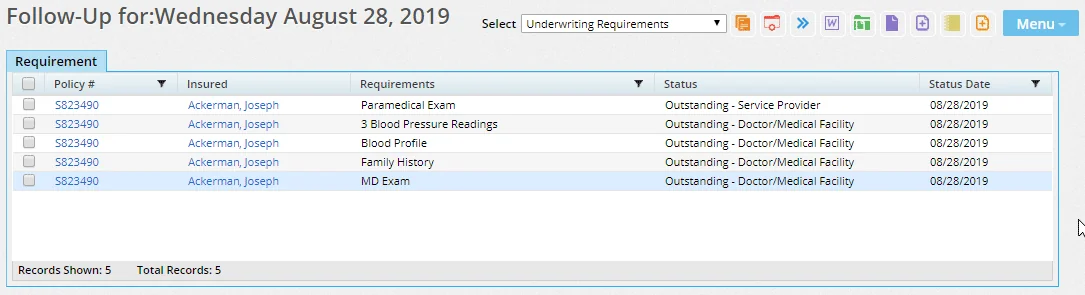
The list displays follow-ups for the current day and up to three months in the past.
- Use the Select drop-down list to narrow the list down to a certain requirement type:
- - All - Underwriting Requirements - Delivery Requirements - Case-Related Advisor Requests (not including license, contract, appointment and compliance) - Activities - Policy Owner Service Requirements - Auto-Updated Requirements - Electronic Order Requirements - Reimbursement - Group Requirements
From the Follow-Up list, the user can perform these actions:
- View requirement details: Click the first-column hyperlink of a follow-up entry to view and/or edit the details of the requirement. For information about requirement fields, see Pending Cases - Requirements Content Link.
- View the pending case to which the requirement belongs: Select a requirement and then select Menu > Pending Case Management to view the associated pending case. This feature is available only for underwriting requirements, delivery requirements, case-related advisor requests, auto-updated requirements and electronic order requirements.
- View the policy to which the requirement belongs: Select a requirement and then select Menu > Policy List to view the policy to which the requirement belongs. This feature is available only for policy owner service requirements.
- Change requirement dates/status: Select one or more requirements, and then select Menu > Change Date/Status to open the Requirement Dates dialog box.
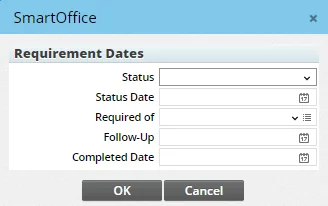
Enter new values in any of the fields (Status, Status Date, Required Of, Follow-Up and/or Completed Date), and then click the OK button to apply those values to all of the selected requirements.
Important: If a value for the Completed Date field is entered in this dialog box and no value is entered in the Follow-Up field, the Follow-Up dates for the selected requirements will be deleted.
- Reset the follow-up date: Select one or more requirements, and then select Menu > Reset Follow-Up Date to recalculate the follow-up date based on the current date. The system calculates the new follow-up date based on settings specified on the carrier PCM Options content link and in Policy/Case Setup - Follow-Up.
- Change the requirement manager: To assign requirements to another manager, select one or more requirements, and then select Menu > Change Requirement Manager.
- View associated documents: Select a requirement, and then select Menu > Document List to open the Document List dialog box, which displays a list of files that have been attached to the selected requirement. Additional files can be linked to the requirement from this dialog box by clicking the New button.
- View the linked form: Select a requirement, and then select Menu > View Linked Form to open the form linked to the requirement. To link a form to a requirement, view the requirement's details and click the Form hyperlink (for more information about linking forms, see Pending Cases - Requirements Content Link).
- Correspondence: Select a requirement, and then select Menu > Communication > Correspondence to send a letter to a contact associated with the requirement.
Case and Requirement Manager Reassignment
This feature assigns a new case manager or requirement manager to one or more pending cases.
Note: This feature is available to users with the SmartCase View license as well as the SmartCaseManager license (see Pending Cases - User Setup). However, SmartCase Viewer users can use this feature on one pending case at a time.
- Select multiple cases in the Pending Case List (SmartCaseManager users only), or open a pending case record.
- Select Menu > Advanced Options > Case Manager Reassignment to open the Available Users dialog box, which lists available case managers who have the SmartCaseManager license.
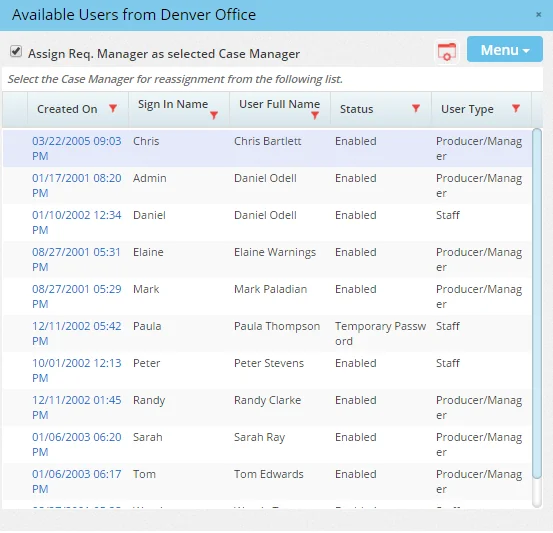
- (Optional) Select the Assign Req. Manager as selected Case Manager option to designate the new case manager as the new requirement manager as well.
- Select the new case manager from the list.
- If another dialog box listing available users opens, select the user who will be the requirement manager.
Note: If Enterprise View is turned on, the SmartOffice users available for reassignment will be from the current office only, not from other offices in the hierarchy.
Mass Assigning an Advisor to Multiple Pending Cases
This feature enables the user to quickly assign an additional (i.e., non-primary) advisor to more than one pending case at the same time.
- Tag multiple cases in the Pending Case List.
- Select Menu > Advanced Options > Mass Assign Advisor to open the New Advisor dialog box.
- From the Role drop-down list, choose the advisor's role for the selected cases.
- In the Advisor field, search for the advisor's name either by typing it (last name, first name) or clicking the Advisor hyperlink. Learn more about searching for advisors.
Note: Advisors added to policies in this way are assigned a split percentage of zero.
Copying Data from One Pending Case to Other Pending Cases
Users can copy data such as notes, requirements, documents, and more from one pending case to one or more existing cases. Tip: This feature is also available for policy records. For more information, see SmartPolicies - Other Policy Management Features.
- Search for the pending case and open it to view the Detail content link.
- Select Menu > Advanced Options > Copy Case Data to Existing Pending Case to open the list of data types you can copy.
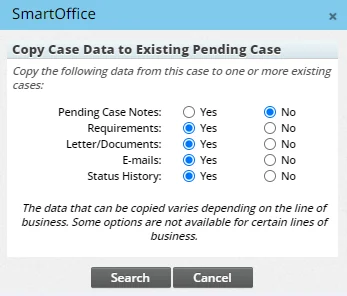
- Select the Yes option for every data type you want to copy, and then select Search.
- Perform a pending case search for the case or cases you want to copy the data to. The search is limited to pending cases linked to the same primary contact.
- In the list of search results, select one or more cases, and then select Copy.
Linking a Case to a Presale Activity/Proposal
To quickly link an accepted illustration or quote to a pending case:
- Search for the pending case and open it to view the Detail content link.
- Select Menu > Link to Existing Presale Activity/Proposal to open the presale activity/proposal search dialog box. Data from the pending case—including the primary insured's name, the insurance type, and the plan type—is automatically populated to make searching faster.
- Add any additional search criteria, and then select Search (for more search help, see Searching for Proposals).
- From the list of search results, select the appropriate presale activity/proposal.
Once the presale activity is linked to the case, SmartOffice displays the details of the proposal on the case's Presale Activity/Proposals content link, where the presale activity/proposal can be unlinked if necessary.