Last updated: 2025-09-19
SmartLeads - Accepting Leads
- Overview
- Manually Accepting Leads
- Accepting Leads Automatically using Record Matching
- Moving Custom Data from Accepted Leads
- Leads Associated with Marketing Campaigns
- Leads Not Associated with Marketing Campaigns
- Updating an Accepted Lead's Status
Overview
In SmartLeads, advisors accept leads that have been assigned to them by leads coordinators. When a lead is accepted, SmartOffice creates a contact for that lead and transfers the information from the lead, including any notes, to the new contact.
Manually Accepting Leads
- Tag one or more leads in the Unaccepted Leads List.
Note: To accept multiple leads at once, the advisor must select leads that are of the same type (i.e., contact, advisor or business) and that are associated with the same marketing campaign. This restriction also applies when one selected lead belongs to a campaign while another does not.
- Select Menu > Accept.
Tip: The user can customize the layout of the Unaccepted Leads List to display the Accept column. This column displays an Accept icon for each lead that the user can click. See List Layout Customization.
- Depending on the lead, one or more of the following dialog boxes opens:
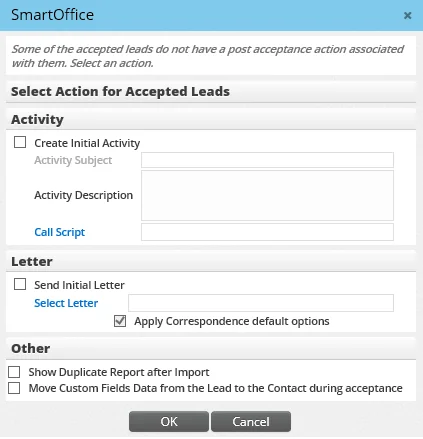
- - Available Users: Select the user or users to assign to the newly created contacts. (To prevent this dialog box from opening, the user can select the Do not show user list while accepting a lead option in User Preferences - Basic Info.) - Select Action for Accepted Leads: If the lead has no post-acceptance action associated with it (such as a campaign), use this dialog box to create a calendar activity, send a letter or perform other actions.
Accepting Leads Automatically using Record Matching
To check whether a lead already has an associated contact record in SmartOffice, the advisor can use SmartOffice's automatic record-matching feature. This helps prevent the creation of duplicate contacts and opportunities.
- From the Unaccepted Leads List, tag one or more leads.
- Select Menu > Auto-Accept Leads Using Record Matching to open the Leads with Matches dialog box.
- Select a lead in the dialog box to view its matches.
- - To merge with an existing opportunity, click the Merge Opportunity button. - To create a new opportunity, click the Create Opportunity button.
Moving Custom Data from Accepted Leads
Leads Associated with Marketing Campaigns
If a lead is associated with a marketing campaign, the leads coordinator can specify whether the data in the lead's Custom content link should be moved to the contact, business or advisor record created when the lead is accepted.
The Move Custom Fields Data from the Lead to the Contact during acceptance option is specified on the Handling Options content link of the marketing campaign.
See SmartCampaigns for more information.
Leads Not Associated with Marketing Campaigns
If a lead is not associated with a campaign, its custom field data can still be moved to the contact, business or advisor record as follows:
- From the Unaccepted Leads List, select a lead that is not associated with a campaign.
- Select Menu > Accept.
- When the Select Action for Accepted Leads dialog box opens, select Move Custom Field Data.
- Click the OK button.
Note: The custom data is moved only when the custom fields are customized on the contact's Custom content link. In addition, if the lead has custom data entered in the Lookup Fields to be transferred, the Lookup Fields information must be available as custom choices on the contact's Custom content link as well.
Updating an Accepted Lead's Status
The process of updating the status of an accepted lead in SmartLeads is called leads disposition.
- Tag one or more accepted leads.
Tip: To quickly see all accepted leads, click the Lead Status drop-down list and select Accepted.
- Select Menu > Leads Disposition.
- When the Activity Outcome dialog box opens, select the appropriate status options.
- Click the OK button.