Last updated: 2025-09-19
SmartCommissions - Commissions Setup
- Overview
- Carrier Posting Setup
- Calculation Setup
- Split Definition
- Creating a Split Definition
- Deleting a Split Definition
- Viewing and/or Editing a Split Definition
- Illustration Import
- Creating an Illustration Import Setup
- Split Commission Payout Import
- Creating a Split Commission Payout Import Setup
- Importing Split Commission Payout Data
- Advisor Payout Import
- Creating an Advisor Payout Import Setup
- Importing Advisor Payout Data
- Change Supervisor
- Validate Advisor Contracts
- Invalid Policy List
- Commission Export Setup
- Mass Contracting
- CTM Dashboard Queue
Overview
As part of the module setup process for SmartCommissions, the administrator must configure office-level default settings in Commissions Setup.
Note: Only users with the CTM Administrator license can access Commissions Setup (see User Setup). Also, before using Commissions Setup, the administrator must know which SmartCommissions module configuration is appropriate for his/her organization. For help deciding, see Module Setup.
To access Commissions Setup, select Setup > Commissions Setup from the SmartOffice side menu. To navigate to the various sections in Commissions Setup, use the left menu. These sections are described below.

Carrier Posting Setup
Note: This section must be configured for both contract/rate-based and advanced commission split module configurations.
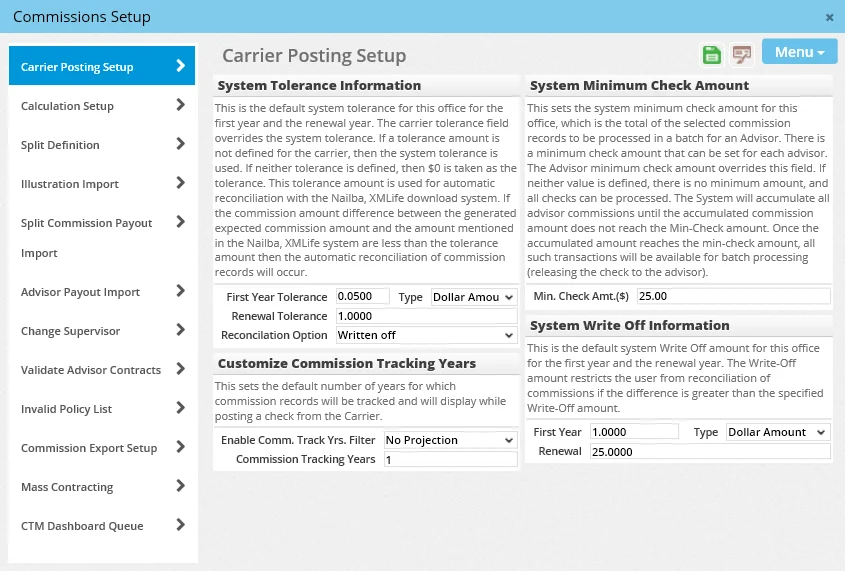
- System Tolerance Information: When commission data sent from the carrier is imported or entered into SmartOffice, the carrier's amounts may not always match the expected amounts exactly. Instead of requiring a 100% match on the values, SmartCommissions can be configured to allow discrepancies within a specified range. The discrepancy amount is called the "tolerance" and can be expressed either as a dollar amount or a percentage, as defined in the Type drop-down list. This tolerance information is primarily used when commission transactions are passed from Speed Receipts to Carrier Posting. Different tolerances can be configured for first-year and renewal-year commissions. When the user moves a carrier transaction into Carrier Posting for reconciliation with the expected commission amounts—and if the transaction falls within the specified tolerance—SmartOffice automatically reconciles the transaction as determined by the choice selected from the Reconciliation Option drop-down list:
- Create a balance due/excess pay record: When this option is selected, the system modifies the original transaction to show just the dollar amount received and creates an additional transaction for the difference. Select this option if the balance or excess is expected to recur in subsequent checks from the carrier. - Modify advisor commissions: This option modifies payments to the advisor and supervisors based on the commission and premium identified from the carrier. A second transaction is generated and attached to the policy for the difference; however, this transaction is placed in a Closed status and therefore does not display on future carrier postings. - Written off: This option means that the amount retained by the house is adjusted either up or down based on the difference between the transactions. The advisors or supervisors in the hierarchy are paid as projected.
- Customize Commission Tracking Years: This section determines whether commission projections occur automatically during carrier posting. It also controls what policies are displayed in Carrier Posting.
- Enable Commission Tracking Yrs Filter: This drop-down list can be set to No projection, Project for previous month or Project from the policy date. When Project for previous month or Project from the policy date is selected, the system looks at all policies for the carrier selected during carrier posting and projects commission records if none are found. Note that customers who track a large number of policies in SmartOffice may encounter processing delays if they choose to project commissions in this way; for these customers, selecting the No projection option here and instead using the Mass Projection feature to project commissions is recommended. - Commission Tracking Years: This feature enables the user to control the volume of transactions that display when users post checks from the carrier. If the value is 1, only transactions for one year prior to the check date will display in Carrier Posting. For example, if the check is dated January 1, 2012, and the setting in this field is 1, then transactions from January 1, 2011 – January 1, 2012 will display; if the field value is 2, transactions from 2010 to 2012 will display.
- System Minimum Check Amount: The Min. Check Amt. field in this section enables the administrator to set a minimum amount that must be met before transactions will be sent to the check writer. Any advisor check that is below the minimum check amount is retained in the commission system until the total of all transactions exceeds the minimum. This minimum applies to all advisors. To specify a different minimum amount for a particular advisor, go to that advisor's Add'l Detail content link and enter the amount in the Min. Check Amt. field.
- System Write-Off Information: These fields enable the administrator to establish a maximum write-off amount for the office. This is a security feature designed to prevent a SmartCommissions user from writing off a large dollar amount while reconciling a carrier posting. The administrator can specify first year and renewal write-off values and whether those values are dollar amounts or percentages. The amounts/percentages specified here also apply when advisor payments are modified based on the amounts received by the carrier.
- License/Contract/Appointment Check Setup: Select Menu > License/Contract/Appointment Check Setup to display the License/Contract/Appointment Check Setup settings.
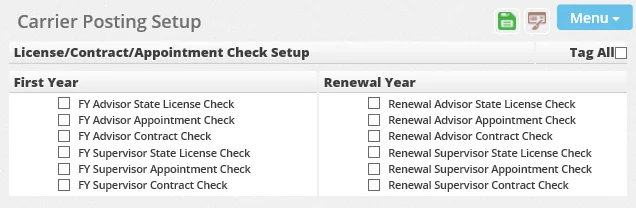
These settings tell the system to hold advisor commission transactions during carrier posting if any problem is detected with an advisor or supervisor license, contract and/or appointment. The checks are conducted for the advisors listed on the policy as well as the supervisors.
These settings apply to all carriers in the office, but carrier-specific settings can be configured that override these office-level settings. For more information about managing held transactions, see Advisor Payment List.
Calculation Setup
Note: This section must be configured for both contract/rate-based and advanced commission split module configurations. Some settings apply only to one of these configurations; these are noted in the following descriptions.
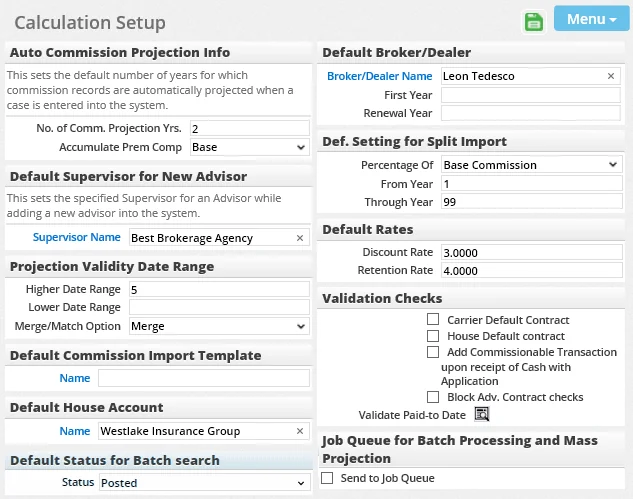
- Auto Commission Projection Info: (This setting applies only to contract/rate-based module configurations.) Specify the number of years for which SmartCommissions should project commissions automatically when a pending case is created or when the status of a policy is changed. In addition, from the Accumulate Prem Comp drop-down list, select the premium components of a case that should be accumulated to determine the base commissionable premium. The premium components are rolled into the base commission amount.
- Default Supervisor for New Advisor: To establish a default supervisor for new advisor records, click the Supervisor Name hyperlink to search for and select a supervisor. This setting saves the user from having to manually specify a supervisor when creating an advisor record. The supervisor can still be changed in any individual advisor record.
- Projection Validity Date Range: These fields apply to the Speed Receipts area of the SmartCommissions module. They control the matching of incoming carrier transactions to the expected commission records in SmartOffice policy records. This range allows for a variance between the due date of a carrier transaction and the due date of the expected commission record in SmartOffice. The carrier-identified due date can differ from the expected due date carrier-identified due date by the amount specified, and the transaction will still validate.
- Higher Date Range: The higher date range is used to locate a single expected record that may be on a quarterly, semi-annual or annual mode. In using the higher date range, the system will check the specified number of days in the past as well as in the future to try to find an expected projection that matches. - Lower Date Range: If multiple records are found within the higher date range, the system reverts to this date range and tries to locate a match to policies. - Merge/Match Option: If multiple records are found in the lower date range, the merge/match option selected from this drop-down list determines what happens to the records. If the Match option is selected, SmartOffice tries to find a one-to-one match between a single speed receipt entry and a single expected commission record in SmartOffice. If the Merge option is selected, multiple speed receipt entries can be merged and then linked to a single expected commission record in SmartOffice. The Merge option is useful in situations in which a single rate is used to project an expected commission in SmartOffice but the carrier has broken that commission down into multiple components (for example, a base component and an override component).
- Default Commission Import Template: (This setting applies only to advanced commission split module configurations.) This field specifies the default template created to import illustration data into individual pending case and policy records. A default can be defined if all illustration programs support a specific import format. Additional templates can be created and selected at the time of import.
- Default House Account: (This setting applies only to advanced commission split module configurations.) This field specifies the default house account that is used when an advanced commission split definition calls for the role of house account. Click the Name hyperlink to search for and select the advisor or agency record that will serve as the default house account. If no default house account is specified here, the user can select a house account when establishing the commission split on a pending case or policy.
- Default Status for Batch Search: This is the office-default setting for the Status field in the Search Commission Batches dialog box when users perform commission batch searches.
- Default Broker-Dealer: (This setting applies only to advanced commission split module configurations.) Click the Name hyperlink to search for and select the advisor or agency record that will serve as the default broker-dealer in pending cases or policies. Then specify the default first year and renewal percentages that will display when the broker-dealer is specified on a pending case or policy. The user can specify a different broker-dealer and percentages at any time for a pending case or policy.
- Def. Setting for Split Import: (This setting applies only to advanced commission split module configurations.) Use this setting to establish default values for importing commission split definition data from third-party commission software. The Percentage Of field specifies what the imported rates represent (i.e., premium or base commission). Base commission represents the total compensation being paid to the house on a policy. The From Year and Through Year fields establish default values for the number of years for which commissions will be paid. The data in the import file must match these settings. To import multiple splits, place the splits in separate files, then change the settings here and import the files.
- Default Rates: Discount and retention rates can be specified for reporting purposes only.
- Validation Checks: Validation checks allow contract checks to be disabled during pending case or policy management if a contract/rate hierarchy or advanced commission split is being used.
- Carrier Default Contract and House Default Contract: Select these options to enable the user to add default advisor contracts while creating advisor records. - Add Commissionable Transaction upon receipt of Cash with Application: Select this option to enable the user to automatically add a commission transaction record on the Policy Transactions content link of a pending case when cash with application has been entered. - Block Adv. Contract Checks: Select this option to disable all messages that prompt the user to add a contract or recalculate commissions based on changes to a pending case or policy. - Validate Paid to Date: Click this button to update the paid-to dates for all Issued- and Active-stage policies. This feature is useful for organizations that were using another commission tracking system before converting to SmartCommissions. Run this validation after the conversion to synchronize converted commission transactions to a paid-to date in the policy.
- Job Queue for Mass Projection and Batch Processing: When setting up a Mass Projection or Batch Processing job, the user can choose whether to process the job immediately or send it to the SmartOffice Job Queue. The Send to Job Queue option in this section determines the default initial setting for new Mass Projection and Batch Processing jobs. The setting can be changed on a job-by-job basis.
Split Definition
Note: This section needs to be configured only for the advanced commission split module configuration.
A key component of the advanced commission split method of payment is establishing default split definitions for the office. The administrator must create at least one split definition when using the advanced commission split module configuration.
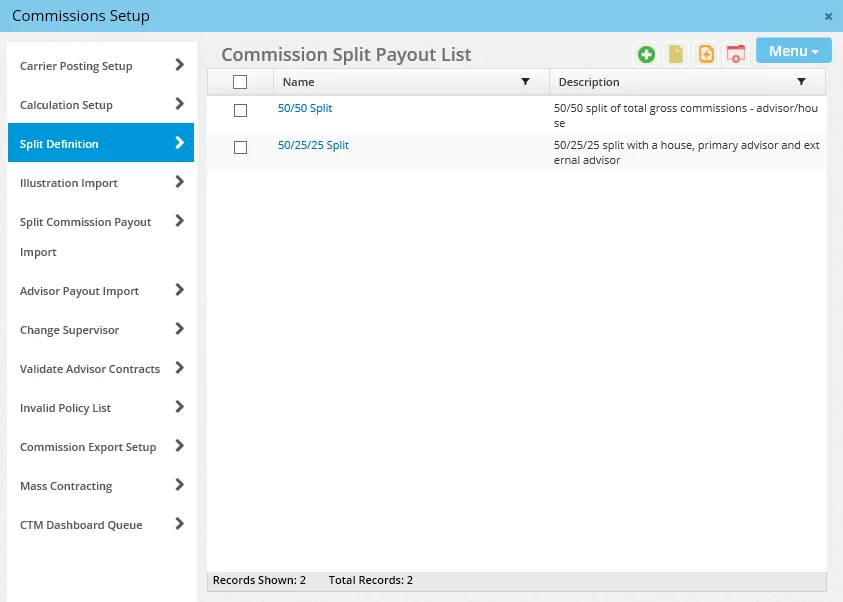
A split definition defines the party role (primary advisor, house, writing advisor, etc.) and an initial payout to each, expressed either as a percent of base commission or a percent of premium. Once the initial definition has been established, the user can modify the rates on a per-policy basis.
Creating a Split Definition
- From the Split Definition section of Commission Setup, select Menu > New 'Commission Split' record to open the New Commission Split dialog box.
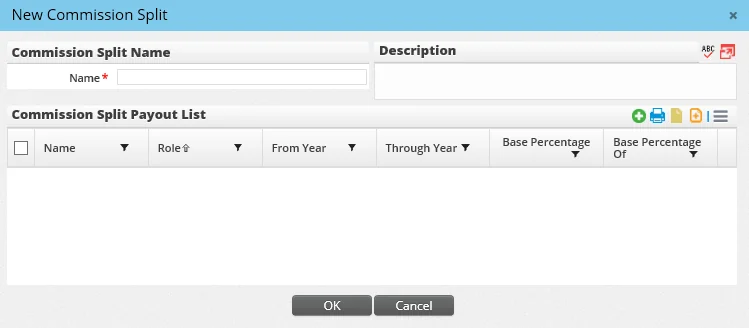
- Enter the split name and a description in the appropriate fields.
- In the Commission Split Payout List, click the Options button
 and select New 'Commission Split Definition' record to open the Commission Split Payout Detail dialog box.
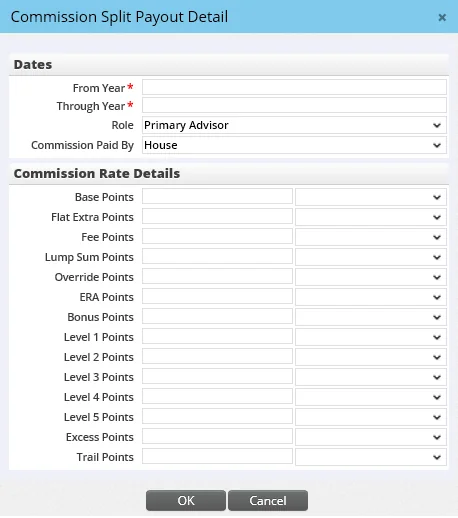
- In the Commission Rate Details section, complete the appropriate fields:
- From Year and Through Year: The years that this rate will be paid. Example: From Year \= 2 and Through Year \= 5\. If it is a first year rate, enter a value of 1 in both fields.
- Role: The party on the policy that is being paid this rate. The roles available for selection are the same as those defined in the Policy Advisor List of policy records. - Commission Paid By: The party paying the commission (carrier or house).
- Base Points: Base points calculate for the modal commissionable premium amount on the policy. - Flat Extra Points: Flat extra points pay the rate entered based on the flat extra premium on the case only. - Fee Points: Fee points pay on the commissionable policy fee identified on the case. - Lump Sum Points: Lump sum points pay based on the lump sum premium value found on the policy. - Override Points, ERA Points, Bonus Points and Level 1 – Level 5 Points: These points all pay an additional amount based on the base premium paid. - Excess Points: Excess points pay based on any premium paid over the target value. - Trail Points: Trail points pay the rate entered based on imported trail premium information
- Click the OK button.
- Repeat steps 3–5 to define any additional payouts for other parties.
- When finished, click the OK button on the New Commission Split dialog box to complete the commission split.
Deleting a Split Definition
- From the Split Definition section of Commission Setup, tag a split definition in the list.
- Select Menu > Delete 'Commission Split' record.
Viewing and/or Editing a Split Definition
- From the Split Definition section of Commission Setup, click the name of a split definition.
- Make any changes, if necessary, and then click the OK button.
Illustration Import
Note: This section needs to be configured only for the advanced commission split module configuration.
To enable users to import illustration values for commissions, the administrator must define one or more illustration import setups.
An import setup is a template that users in the office can run when they want to import illustration data into SmartOffice. An import setup is used to map the commission data in a saved illustration to specific fields in SmartOffice.
SmartCommissions uses SmartOffice's Data Import feature to handle illustration imports. The instructions below provide a brief overview of creating an import setup in Commissions Setup. For detailed information about creating and managing data import setups, see Data Import.
Creating an Illustration Import Setup
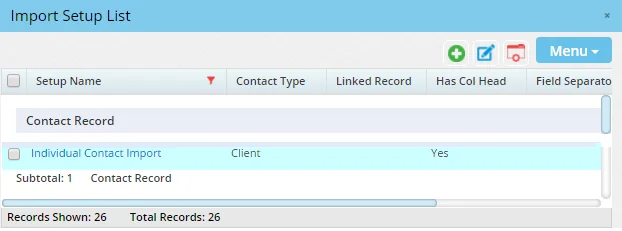
- From Commission Setup, click Illustration Import in the left menu to open the Import Setup List dialog box.
- Select Menu > New 'Import Setup' record to open the Add Import Definition dialog box.
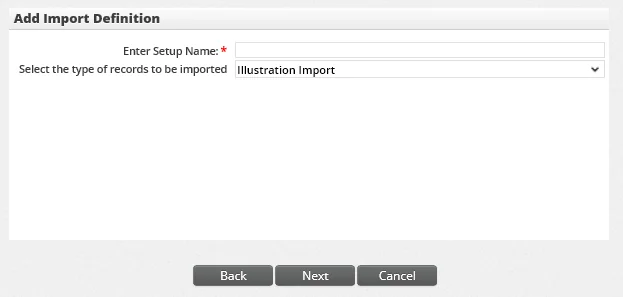
- Enter a name that will help identify the illustration import in the system.
- Click the Next button.
- Follow the remaining steps in the wizard to define the import file format and the column mappings. The fields available to map to in SmartOffice include:
- Age of the insured
- Base Commission 1–10 (all of these premium components will be merged together into a single base commission field) - Bonus commission - Due Date - ERA Commission - Excess Commission - Fee Commission - Flat Extra Commission - Level 1–5 Commission - Lump Sum Commission - Override Commission - Premium paid - Target Premium - Trail Commission - Year of the policy
Split Commission Payout Import
Note: This section needs to be configured only for the advanced commission split module configuration. The Split Commission Payout Import section enables administrators to import split definitions from third-party systems into SmartOffice policy records.
Before using this feature, the administrator must define the Default Setting For Split Import settings in the Calculation Setup section of Commissions Setup.
The administrator must define one or more split commission payout import setups. An import setup is a template that the administrator can run anytime to import split commission payout data. The import setup maps the payout data from a comma-separated values (CSV) file to specific fields in SmartOffice.
SmartCommissions uses SmartOffice's Data Import feature to handle split commission payout imports. The instructions below provide a brief overview of creating an import setup in Commissions Setup. For detailed information about creating and managing data import setups, see Data Import.
Creating a Split Commission Payout Import Setup
- From Commissions Setup, click Split Commission Payout Import in the left menu to open the Split Commission Payout Import List.
- Select Menu > New to open the Import Setup List dialog box.
- Select Menu > New 'Import Setup' record to open the Add Import Definition dialog box.
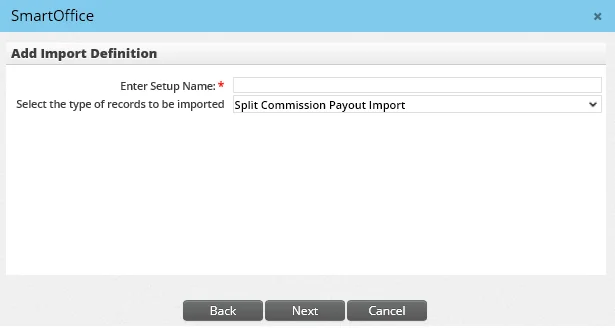
- Enter a name that will help identify the import in the system.
- Click the Next button.
- Follow the remaining steps in the wizard to define the import file format and the column mappings. The fields available to map in SmartOffice include:
- - Advisor Code: This is the advisor code assigned by the sending system. This code will be linked to the Code field on the Personal content link of the advisor record in SmartOffice. - Advisor Role Code: This field specifies whether the advisor is the primary advisor, writing advisor, external advisor or house. Expected values in this field include: P – Primary Advisor, W – Writing advisor, E – External Advisor and H – House. - Commission Type: This field specifies whether this is base or trail commission. If this field is not identified, the commission type is assumed to be Base. Base or Trail is expected in this field. The terms "Base" and "Trail" must be spelled out in the import file for successful mapping to occur. - Paid By: This field specifies whether the carrier is paying the party or whether the house account/SmartOffice user is paying. - Policy \# - Split Percentage: This is the rate being paid.
Importing Split Commission Payout Data
- After creating a split commission payout import setup, open the Split Commission Payout Import List if it is not open.
- Select Menu > New to open the Import Setup List.
- Do one of the following:
- Click the name of the appropriate import setup in the list.
- Select an import setup, and then select Menu > Run Setup.
- Click the Browse button to locate and select the import file.
- Click the Next button.
- Review the field mappings and make any necessary changes.
- Click the Run Import button. The data is imported, and SmartOffice displays the number of records successfully imported.
- Click the Cancel button to return to the Split Commission Payout Import List.
- Open the just-completed import by clicking its first-column hyperlink.
- Review the data to ensure that it was imported correctly.
- Ensure that the Status column is visible. If it is not, add it (see List Layout Customization).
- Click the Options button and select Match Records with SmartOffice. Check the Status column to identify any records that have one of the following error statuses:
- Policy and Agent Not Found
- Policy Not Found - Agent Not Found
- Correct any errors. Then click the Options button and select Match Records with SmartOffice again. Continue the process of resolving errors until all records display a status of Record Resolved.
- Once all records are resolved, click the Options button and select Import Split Definition to import the data into the SmartOffice Advanced Commission Split tables. Only items with a Record Resolved status are imported. Once imported, these items display a status of Data Imported.
Advisor Payout Import
Advisor Payout Import makes it possible to import historical advisor payout transactions from other systems into existing policies in SmartOffice. Note: Only Base- and Trail-type commission transactions can be imported using this method.
The imported file must contain carrier codes that match the Carrier ID found on the carrier Detail content link in SmartOffice.
The administrator must define one or more advisor payout import setups. An import setup is a template that the administrator can run anytime to import advisor payout data. The import setup maps the payout data from a comma-separated values (CSV) file to specific fields in SmartOffice.
SmartCommissions uses SmartOffice's Data Import feature to handle advisor payout imports. The instructions below provide a brief overview of creating an import setup in Commissions Setup. For detailed information about creating and managing data import setups, see Data Import.
Creating an Advisor Payout Import Setup
- From Commissions Setup, click Advisor Payout Import in the left menu to open the Advisor Payout Import List.
- Select Menu > New to open the Import Setup List dialog box.
- Select Menu > New 'Import Setup' record to open the Add Import Definition dialog box.
- Enter a name that will help identify the import in the system.
- Click the Next button.
- Follow the remaining steps in the wizard to define the import file format and the column mappings. The fields available to map in SmartOffice are listed below. At the very least, the Comm. Amount Due, Comm. Due Date and Policy \# fields must be mapped:
- - Advisor Code: This corresponds to the Code field under Detail Information on the advisor Personal content link.
- Advisor License Number: This field is for informational purposes only and is not imported into the system. - Advisor Name: This field is for informational purposes only and is useful for correcting mapping errors with the agent code. - Carrier Code: This corresponds to the Carrier ID field found on the carrier Detail content link.
- Carrier Name: This is for informational purposes only and is useful for carrier code mapping. - Check Number: This information is stored in the Remarks field. - Comm. Amount Due: This data is imported into the advisor payment record. - Comm. Due Date: This data is imported into the advisor payment record. - Comm. Paid Date: This data is imported into the advisor payment record. - Comm. Paid Amt.: This data is imported into the advisor payment record. - Comm. Rec. Status: This includes the R-received and E-expected values. - Commission Type: This includes the Base and Trail values. - Component Premium: This is imported into the advisor payment record. - Policy \#: This is used to match the imported transaction to the policy in SmartOffice. A carrier match must occur before the policy is matched. - Renewal/First Yr. Comm.: This indicator displays the RN – Renewal and FY – First Year. - Src. Agency No.: This is the source agency number and is used for informational purposes only.
Importing Advisor Payout Data
- After creating an advisor payout import setup, open the Advisor Payout Import List if it is not open.
- Select Menu > New to open the Import Setup List.
- Do one of the following:
- Click the name of the appropriate import setup in the list.
- Select an import setup, and then select Menu > Run Setup.
- Click the Browse button to locate and select the import file.
- Click the Next button.
- Review the field mappings and make any necessary changes.
- Click the Run Import button. The data is imported, and SmartOffice displays the number of records successfully imported.
- Click the Cancel button to return to the Advisor Payout Import List.
- Open the just-completed import by clicking its first-column hyperlink.
- Review the data to ensure that it was imported correctly.
- Ensure that the Status column is visible. If it is not, add it (see List Layout Customization).
- Select Options > Match Records with SmartOffice and check the Status column to identify any records that have one of the following error statuses:
- Policy and Agent Not Found
- Policy Not Found - Agent Not Found - Carrier Not Found
- Correct any errors, and then select Options > Match Records with SmartOffice again. Continue the process of resolving errors until all records display a status of Record Resolved.
- Once all records are resolved, select Options > Import Agent Payout Records button to import the data into the appropriate policy records. Only items with a Record Resolved status are imported. Once imported, these items display a status of Data Imported. The necessary agency records are also created.
To view the imported data in a policy, go to the policy Basic Information content link or pending cases Detail content link and select Menu > List Commission Records.
Change Supervisor
Note: This section applies only to contract/rate-based module configurations.
The administrator can use the Change Supervisor utility to assign a new supervisor and contract to all advisors who have a certain supervisor and contract. This can be useful if a supervisor leaves the current commission hierarchy, for example.
- From Commissions Setup, select Change Supervisor from the left menu to open the Select Supervisor to Change dialog box.
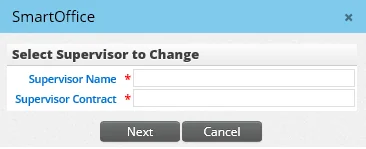
- Enter the departing supervisor's name (last name, first name) or click the Supervisor Name hyperlink to search for and select the supervisor.
- Click the Supervisor Contract hyperlink to search for and select the contract that will be changed.
- Click the Next button to display additional fields.
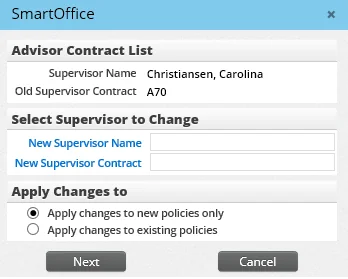
- In the Select Supervisor to Change section, enter the new supervisor and contract that will be assigned to all advisors who hold the contract specified previously.
- In the Apply Changes To section, select the appropriate option to specify whether the changes should be applied to new policies only or to new and existing policies.
- Click the Next button to display a list of advisors who have the current supervisor.
- Tag the appropriate advisors to be changed.
- Click the Next button. A message informs the user when contracts have been modified.
- Click the OK button in the message to proceed to validation. A list of advisors that must be validated displays.
- Click the Validate Modified Advisor Contracts button. The list of advisors refreshes, removing those records that have been validated. All policies associated with those advisors are also updated with the new hierarchy.
Validate Advisor Contracts
Note: This section applies only to contract/rate-based module configurations.
This feature is used when the Change Supervisor feature in Commissions Setup has been run but not all of the advisors have been changed to the new supervisor. After resolving the issues, follow these steps:
- From Commissions Setup, select Validate Advisor Contracts from the left menu to display the Validate Modified Advisor Contracts list.
- Tag a record or group of records, and then select Menu > Validate Modified Advisor Contracts.
Invalid Policy List
Note: This section needs to be configured only for the contract/rate based module configuration.
When a commission rate changes or the banding for a rate changes, commissions for all policies linked to the rate have to be reprojected. Because reprojecting commissions can be time-consuming, the Invalid Policy List enables the user to reproject those commissions when it is convenient for the user.
This feature is also useful when an error occurs after using the Change Supervisor feature. For example, suppose that the supervisor change is done and the effective date of the new supervisor's contract is 1/1/2013\. If a policy is dated 2011, it will not pick up a valid hierarchy and will display in this list for revalidation.
- From Commissions Setup, select Invalid Policy List from the left menu to open the Validate Policies list.
- Select one or more policies, and then select Menu > Recalculate Commission on Rate Change.
Commission Export Setup
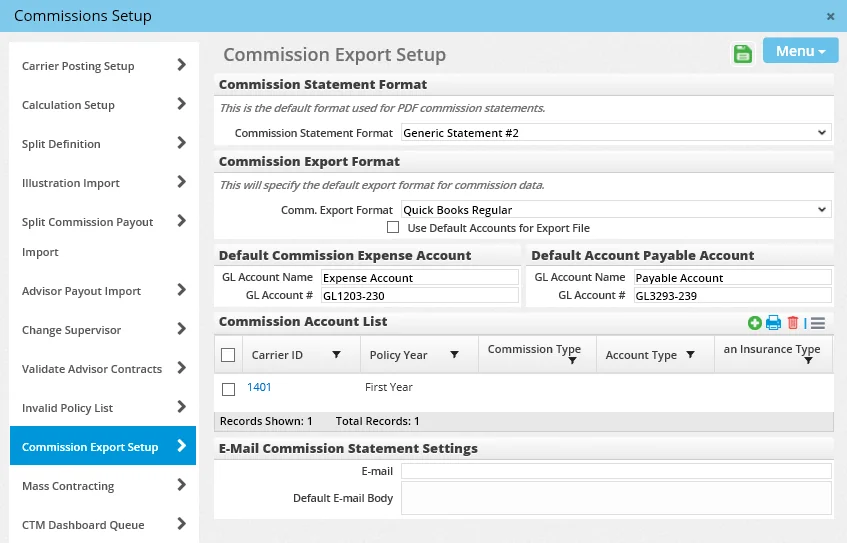
The Commission Export Setup settings define commission statement options and export options for the Batch Processing feature.
- Commission Statement Format: This drop-down list enables the user to define the look and layout of generated PDF commission statements. To see how each format looks, see the section about commission PDF reports in Reports.
- Commission Export Format: This field specifies the default file format in which commission data is exported from Batch Processing for import into other programs. (Although the drop-down list displays three options, only the QuickBooks Regular format is currently implemented.)
- Default Commission Expense Account and Default Account Payable Account: The export to QuickBooks format was built to work with a version of QuickBooks from 2007\. Consequently, it was designed to create "bills" within QuickBooks that need to be paid out. To pay a bill in QuickBooks, an expense and payable account must be defined. The default QuickBooks accounts to be used for importing commission data from SmartOffice can be defined in these sections.
- Commission Account List: This section applies to the not-yet-implemented MS Excel and QuickBooks with Acct. export formats. When those formats are implemented, this section will enable the user to link a transaction to a specific account instead of putting all transactions into a specific expense and payable account.
- E-mail Commission Statement Settings: These default settings apply to commission statements sent by e-mail from SmartOffice.
- E-mail: Enter the e-mail address of the person in the organization who will appear as the sender of commission statements. This person will typically receive all questions regarding statements, so it is important to enter a valid e-mail address. - Default E-mail Body: This is the standard text that will appear in the e-mail message that commission statements are attached to.
Mass Contracting
Mass Contracting is similar to Change Supervisor in that it enables the administrator to quickly change associations for a group of advisors. The key difference is that Mass Contracting can be used to change a supervisor who may be on a blanket contract, or to change the contract for a group of advisors who are assigned to a particular supervisor.
- From Commissions Setup, select Mass Contracting from the left menu to open the Select Supervisor to Change dialog box.
- Enter the supervisor's name (last name, first name) or click the Old Supervisor Name hyperlink to search for and select the supervisor.
- Click the Next button to display a list of advisors who have the selected supervisor identified in their contract records.
- Tag the advisors to be changed, and then click the Next button.
- Complete the New Supervisor Name and the New Supervisor Contract fields, and then click the Next button. Note that the new supervisor can be the same as the old supervisor if the only objective is to change the contract relationship.
- When the message displays "Terminate old contracts with old supervisor or replace on existing contracts?" click one of the following buttons:
- - Replace: When the user clicks this button, SmartOffice prompts the user to change existing cases. Note that it will still be necessary to go to the Invalid Policy List to validate the policies. They will not be dynamically changed, only flagged for recalculation. - Terminate: When the user clicks this button, SmartOffice prompts the user to enter the termination date and the effective date of the new contract.
CTM Dashboard Queue
The CTM Dashboard Queue gives the administrator a view into the processes that generate the database tables for CTM Dashboard reporting via Dynamic Reports. When a commission batch is posted or unposted, this queue receives a job to reprocess the files for the commission tables.
To view the status of the CTM Dashboard Queue, in Commissions Setup, click CTM Dashboard Queue in the left menu.
A helpful feature in this section enables the administrator to dynamically refresh a dashboard for a specific advisor for a specific period of time. To access it, select Menu > Refresh CTM Dashboard to open the CTM Dashboard Queue Detail dialog box.
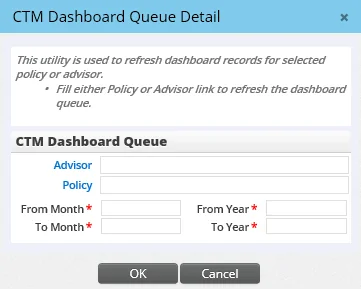
Specify the advisor or policy and the appropriate date range. If the Advisor and Policy fields are left blank, the utility tries to reprocess all dashboards for that period.
Another helpful feature is the ability to reprocess an entry that may have failed. To use this feature, tag a pending transaction in the list and select Menu > Refresh Commission Dashboard Tables. The transaction is queued again for processing.