Last updated: 2025-09-19
Integrations - IP Telephony
Overview
SmartOffice integrates with many popular PBX IP telephony systems to enable these features:
- Click to dial: Select phone numbers in SmartOffice to dial them on your phone.
- Inbound call matching: For an incoming call, SmartOffice looks for a match in its database and automatically displays information about the associated contact.
Setup
Phone System Setup
The following table lists popular phone systems and provides information about configurations known to work with SmartOffice. Because PBX systems can be set up in a variety of ways, alternative configurations may exist. The table provides general information as well as links to documentation that can help IT or other technical personnel achieve a working configuration. For additional help, contact SmartOffice Technical Support.
Note: If your phone system is not listed below, check whether your system is compatible with ucplus, a middleware solution that is compatible with SmartOffice. If your phone system is supported by ucplus, see our ucplus integration guide for information about integrating your phone system with SmartOffice.
Even if your phone system is not compatible with ucplus, the SmartOffice team may be able to help you set up a working configuration. Contact SmartOffice Technical Support for more information.
Important: To configure inbound call matching, you will need the address of your SmartOffice server. To find it, sign in to SmartOffice Pro and look at the server address in your browser's address bar. An example of a server address would be mysmartoffice.ez-data.com. In the instructions below, replace any highlighted reference to *\[your SmartOffice server]* with the address of your server.
| Phone System | Software Required | Supported Browsers | Click-to-Dial Setup | Inbound Call Matching Setup |
|---|---|---|---|---|
| 3CX | 3CX Browser Extension | Chrome, Edge | See 3CX's instructions | In the 3CX Web Client, go to Settings > Integration and select Auto launch a Custom Contact URL using variables. Then enter this URL in the Open Contact URL field: https://\[your SmartOffice Server]/cdsApp?trustedWindow\=1&Module\=DeepLink&Object\=ContactPhone&Type\=Inbound&Operation\=View&Data\=%CallerNumber% |
| 8x8 | 8x8 Work for Desktop and 8x8 Web Dialer | Chrome | See 8x8's instructions | See 8x8's instructions for setting up the Caller Info Pop-Up feature. After accessing the settings, enter this URL in App or web URL for caller info pop-up box: https://\[your SmartOffice Server]/cdsApp?trustedWindow\=1&Module\=DeepLink&Object\=ContactPhone&Type\=Inbound&Operation\=View&Data\=%%CallerNumber%% |
| Allworx | Allworx Interact Professional (select the Install Interact Sync option during setup) | Chrome, Firefox | See the instructions in Allworx's Interact User Guide for setting up the Interact Sync feature. | See the instructions in Allworx's Interact User Guide for setting up the External Program Link feature. When adding a rule, select URL under Type of action and enter this URL: https://\[your SmartOffice Server]/cdsApp?trustedWindow\=1&Module\=DeepLink&Object\=ContactPhone&Type\=Inbound&Operation\=View&Data\=%CALLNUM% |
| Asterisk | FOP2 (server and Chrome extension) | Chrome | In the Chrome extension's options, enable Clickable Numbers. | Inbound call matching is not currently supported. |
| Avaya IP Office | Avaya IP Office (CTI Link Pro Interface) and ucplus (server and PC client) | Chrome, Firefox, Edge | See Integrations - ucplus | See Integrations - ucplus |
| Cisco Contact Center | Cisco Finesse | Chrome, Firefox, Edge | Contact Cisco for information | See Cisco's instructions for adding a Browser Pop action to a workflow in Finesse. Use this URL for the action: https://\[your SmartOffice Server]/cdsApp?trustedWindow\=1&Module\=DeepLink&Object\=ContactPhone&Operation\=View&Data\= Then click the tag button next to the URL field to add a variable representing the caller's phone number. |
| Cisco Jabber | Cisco Jabber | Chrome, Firefox, Edge | See Cisco's instructions | For help setting up inbound call matching, contact SmartOffice Technical Support (there is no additional fees for this setup). |
| GoTo (formerly Jive) | GoTo for Google Chrome | Chrome, Edge | See GoTo's instructions | See GoTo's instructionsfor setting up a screen pop. Make a custom URL template using this URL: https://\[your SmartOffice Server]/cdsApp?trustedWindow\=1&Module\=DeepLink&Object\=ContactPhone&Operation\=View&Data\=${CNUM} |
| Metaswitch | MaX UC Desktop | Contact Metaswitch for information | In MaX UC Desktop Options, select Use Max UC to call phone number links in emails and web pages. See Metaswitch's instructions for details. | Configure a search URL for inbound calls through Metaswitch's admin website. Use the following URL and append the appropriate value representing the incoming caller's phone number to the Data parameter in the query string: https://\[your SmartOffice Server]/cdsApp?trustedWindow\=1&Module\=DeepLink&Object\=ContactPhone&Operation\=View&Data\= |
| net2phone | net2phone Google Chrome Extension | Chrome | See net2phone's instructions | Inbound call matching is not currently supported. |
| Nextiva | Go Integrator Cara | Chrome, Firefox, Edge | See Go Integrator's instructions | See Go Integrator's instructions for Call Events settings. Add an external program, and then set the call event type to Call: Connected and the direction to In. In the Parameter field, enter this URL: https://\[your SmartOffice Server]/cdsApp?trustedWindow\=1&Module\=DeepLink&Object\=ContactPhone&Operation\=View&Data\=%Call\\CallerContact\\Tel% |
| RingCentral | RingCentral Phone for Desktop | All browsers | See RingCentral's instructions. For additional click-to-dial features, see RingCentral's instructions for setting up RingOut. | See RingCentral's instructions for setting up a URL to launch for incoming calls. In the Execute Command field, enter this URL: https://\[your SmartOffice Server]/cdsApp?trustedWindow\=1&Module\=DeepLink&Object\=ContactPhone&Operation\=View&Data\=%P |
| Telebroad | TeleConsole Desktop | Chrome | See Telebroad's instructions | Inbound call matching is not currently supported. |
| Vonage | Vonage Integration Suite (VGIS) - Web | Chrome, Firefox | Open the VGIS panel, select Integrations and enable Click to Connect. See Vonage's documentation for more details | Open the VGIS panel, select Integrations and set up a Web Launcher site for SmartOffice using this URL: https://\[your SmartOffice Server]/cdsApp?trustedWindow\=1&Module\=DeepLink&Object\=ContactPhone&Operation\=View&Data\={{phoneNumber}} See Vonage's documentation for more details. |
| Zoom Phone | Zoom Client for Meetings with Zoom Phone license | Chrome, Firefox | See Zoom's instructions | Inbound call matching is not currently supported. |
SmartOffice Setup
In SmartOffice Pro, you can display phone numbers that you can dial by clicking. If your click-to-dial setup is configured properly (see Phone System Setup), your dialing software will detect the phone number when you click it and automatically place the call.
 > List Options > Customize List Layout) to display one of the following columns:
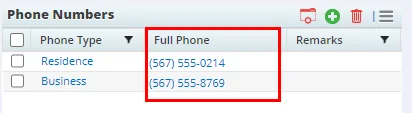
- Full Phone: This column displays phone numbers formatted as hyperlinks. These links use the dialing URL protocol specified in the Protocol to use for clickable phone numbers drop-down list in User Preferences - Activity Options, so make sure you've selected the correct protocol for your phone system on that page.
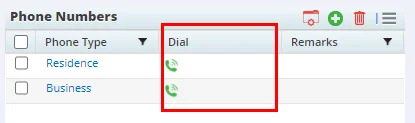
- Dial: This column displays hyperlinked phone icons. These links use the dialing URL protocol specified in the Protocol to use for clickable phone numbers drop-down list in User Preferences - Activity Options, so make sure you've selected the correct protocol for your phone system on that page.
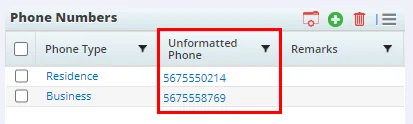
- Unformatted Phone: This column displays an unformatted phone number, which is useful for certain click-to-dial applications (such as the 3CX browser extension) that use their own methods of creating phone number hyperlinks.
Note: The first time you click a phone number in SmartOffice to dial it, your web browser may request permission to allow the dialing workflow to proceed.
Using SmartOffice's Inbound Call Page
When inbound call matching is properly configured and the user has the Open call tracking page when calls connect option turned on in User Preferences - Activity Options, SmartOffice automatically opens a new browser tab to display an inbound call page for the matching SmartOffice contact.
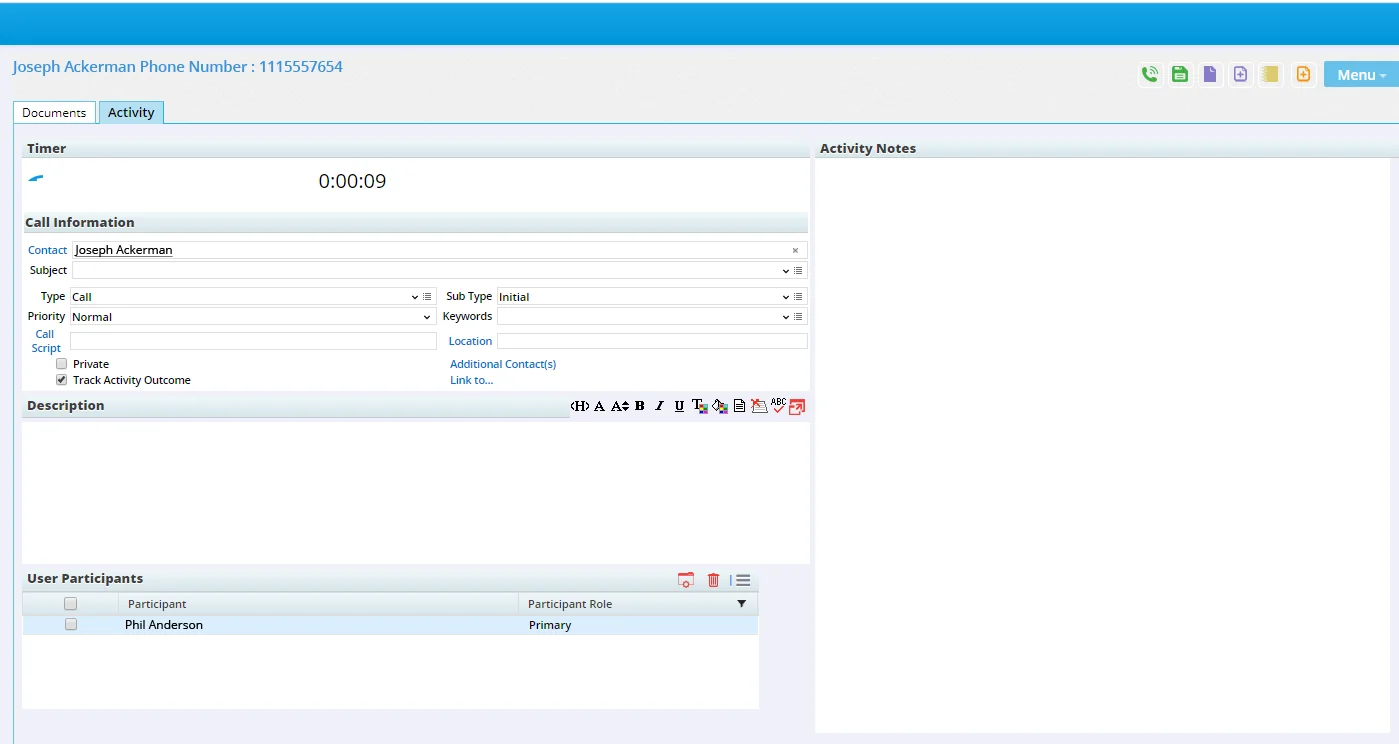
The page contains Activity and Documents tabs, which are described in the following sections.
Activity Tab
Use this tab to enter details about the call. When the call ends, SmartOffice uses these details to create an activity on your calendar showing that the call took place. SmartOffice also starts the Activity Outcome wizard, enabling you to select more detailed outcome options, create follow-up activities, and more.
Note: While entering information on this tab,you can select Menu > Save to save your progress. The sections of this tab are:
- Timer: The Timer starts automatically when the call begins. When the call ends, select the Stop Timer/Hang Up Phone button to the left of the timer to stop it. The number of minutes spent on the call will appear in the Minutes Spent field of the Activity Outcome wizard.
- Call Information: Use this section to enter details about the activity, such as the subject, type and any keywords (for more information about these fields, see SmartCalendar - Activity Detail).
- Description: Any text entered in this field will appear in the Description field of the activity.
- User Participants: Your name appears in this list by default. Add any other SmartOffice users who are participating in the call (for more information about managing participants, see SmartCalendar - Activity Detail). SmartOffice will link all participants to the activity.
- Activity Notes: Use the Activity Notes box to record what happened during the call, including any thoughts, observations or action items. These notes will appear in the Outcome Notes field of the Activity Outcome wizard.
Documents Tab
On the Documents tab, you can post files to the contact's record. Learn more about file posting. Note: This tab does not show any existing documents already posted to the contact's record.