Last updated: 2025-09-19
Integrations - Google Contacts, Calendar and Gmail
Overview
SmartOffice's integration with Google enables automatic sync of contact and calendar data between Google and SmartOffice, as well as automatic posting of e-mail messages from Gmail to the SmartPad in SmartOffice.
Requirements
- Google Workspace (formerly G Suite) business account: This integration requires a paid subscription to a Google Workspace business plan (see the Google Workspace website). The integration is not compatible with free Google Workspace services, such as personal Gmail accounts, or the free version of Google Calendar.
Google Setup
This is a one-time setup that must be performed before you can sync SmartOffice with Google. If you have already performed this setup, you can skip this section and go to SmartOffice Setup.
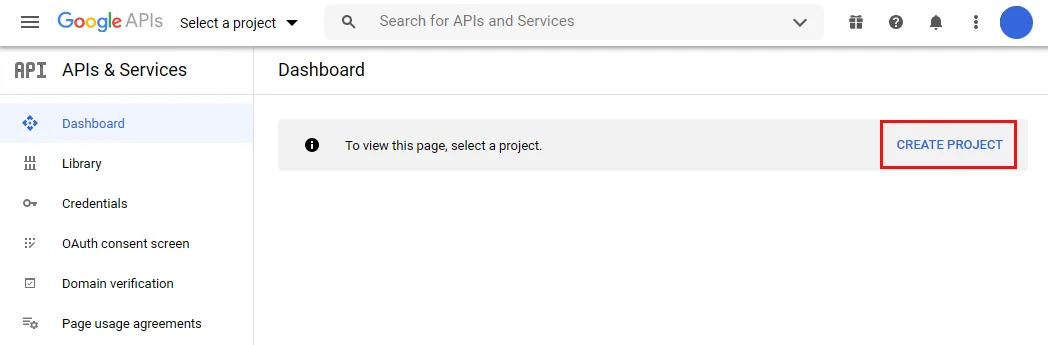
- Go to the Google Cloud Platform website and sign in to your Google account.
- When the Dashboard page appears, select Create Project.
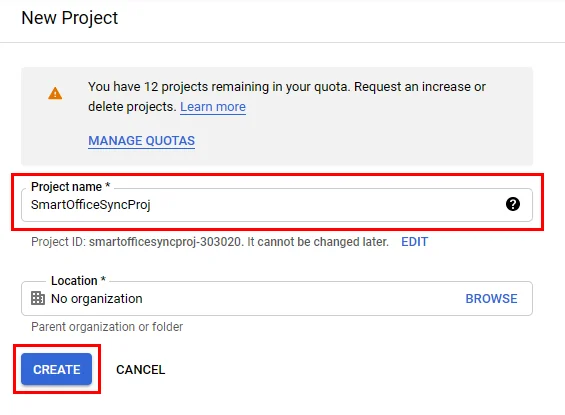
- In the Project name field, type SmartOfficeSyncProj, and then select Create.
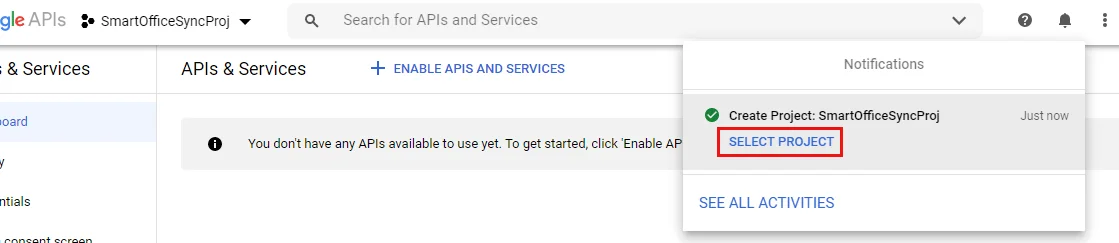
- When you see the notification that the project has been created, select Select Project in the notification.
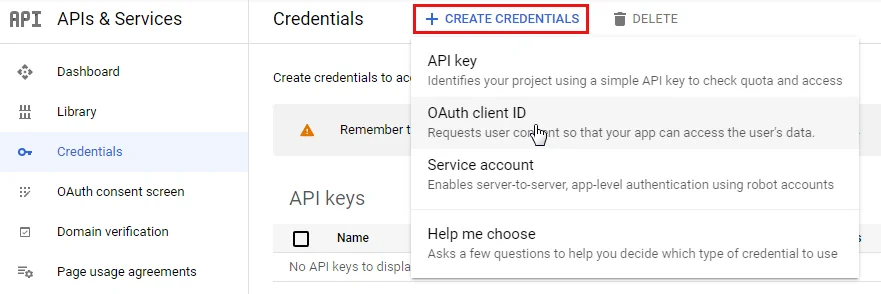
- In the left menu, under APIs & Services, select Credentials.
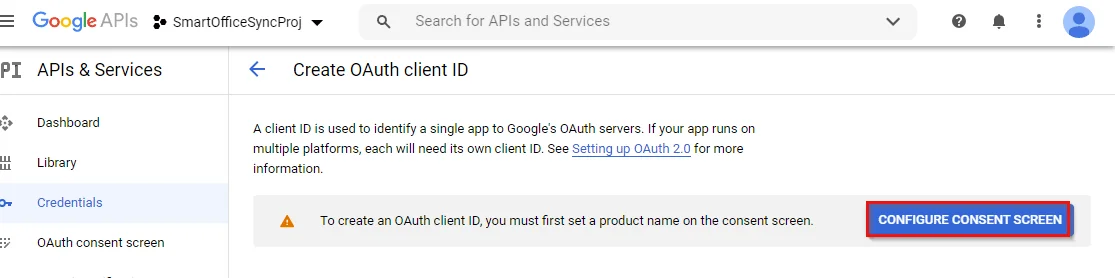
- Select Create Credentials, and then select OAuth client ID.
- On the Create OAuth client ID page, select Configure Consent Screen.
- On the OAuth consent screen page, under User Type, select Internal.
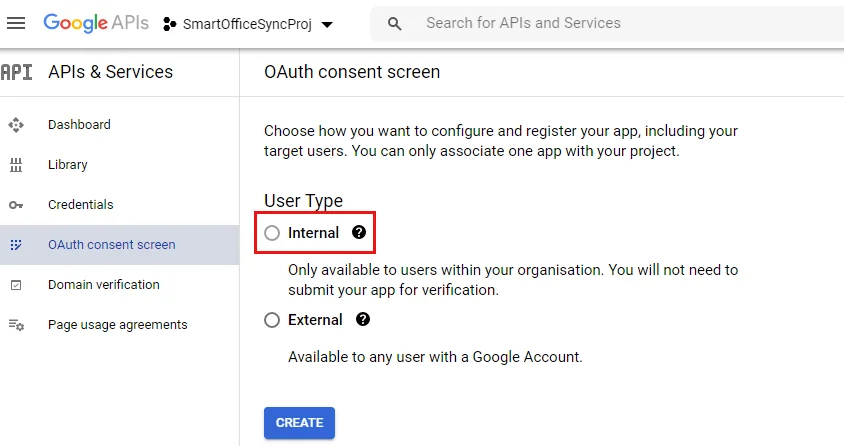
- Select Create to open the Edit app registration page.
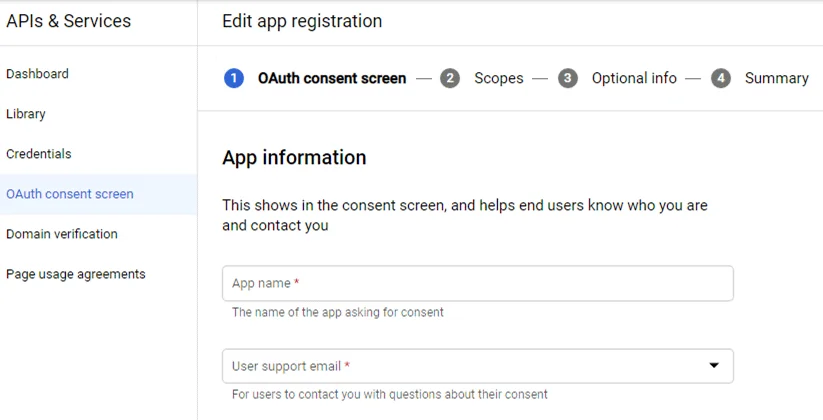
- App name: SmartOfficeSyncApp
- User support email: Your internal support e-mail address
- Application home page: https://syncsetup.smartofficecrm.com/
- Authorized domains: smartofficecrm.com
- Developer contact Information: Your internal development or IT e-mail address
- Fill out the following fields:
- Select Save and Continue to go to the Scopes page.

- At the bottom of the page, select Add or Remove Scopes.
- In the dialog box that opens, select the Google API Library hyperlink.
- In the search box, type Google Calendar API. When Google Calendar API appears in the search results, select it.
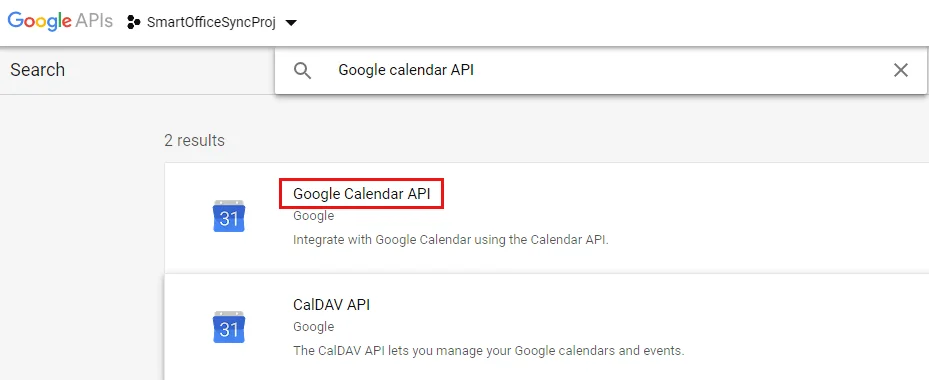
- On the Google Calendar API page, select Enable.
- In the search box, type People API. When People API appears in the search results, select it.
- On the People API page, select Enable.
- In the search box, type Gmail API. When Gmail API appears in the search results, select it.
- On the Gmail API page, select Enable.
- At the top of the page, select SmartOfficeSyncProj.

- Application type: Web Application
- Name: SmartOfficeSyncClient
- Authorized JavaScript Origins
- URIs: https://syncsetup.smartofficecrm.com/
- Authorized Redirect URIs
- URIs: https://syncsetup.smartofficecrm.com/AuthCallback
- When the project page opens, select SmartOfficeSyncProj in the list of projects.
- In the left menu, under APIs & Services, select Credentials.
- Select Create Credentials, and then select OAuth client ID to open the Create OAuth client ID page.
- Fill out the following fields:
- Select Create. You should see the OAuth client created dialog box.
- Copy the Client ID and Client Secret values and save them in a text file. You will need these values later during SmartOffice setup. (If you ever need to retrieve these values again in the future, return to the Credentials page and select SmartOfficeSyncClient under OAuth 2\.0 Client IDs.)
- Select OK to close the dialog box.
SmartOffice Setup
User Setup
A SmartOffice user who has administrator rights to modify user accounts must follow these steps for each SmartOffice user who will be setting up and/or using the Google integration.
 .
.
- If you are setting up the integration for another user account, select Setup > User Accounts on the SmartOffice side menu, and then search for the user account.
- Sign in to SmartOffice Pro.
- Do one of the following:
- With the user account record open, click the User Rights content link.
- In the User Rights column, select SmartOffice Sync & E-mail Posting for Google in the Integration section.
- Select Menu > Save.
Office Setup
This setup must be performed by a SmartOffice user who has administrator rights to change office settings as well as the user rights described in the previous section.
- Sign in to SmartOffice Pro.
- From the side menu, select Setup > Office Settings.
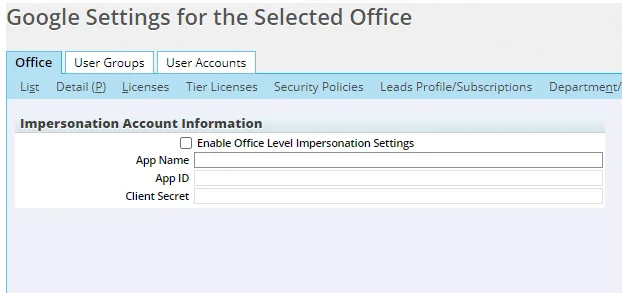
- Select the Server Sync Options content link to open the Google Settings page.
Note: The Server Sync content link is visible only on specific server configurations. If you do not see this content link, contact your SmartOffice server administrator.
- App Name: SmartOfficeSyncApp
- App ID: The Client ID value that you saved at the end of the Google setup process.
- Client Secret: The Client Secret value that you saved at the end of the Google setup process.
- Select the Enable Office Level Impersonation Settings option.
- Fill out the following fields:
- Select Menu > Save.
Google Sync Setup
Once office setup and user setup are complete in SmartOffice, follow these steps to configure Google sync and e-mail posting options.
 button in the upper-right to make any changes, or select the Delete sync setup
  button to start over.
- In the SmartOffice side menu, select Setup > Google Sync Setup.
- If prompted, sign in to your Google Workspace account.
- When the Google account permissions screen appears, make sure all of the permissions listed are selected (if you see check boxes).
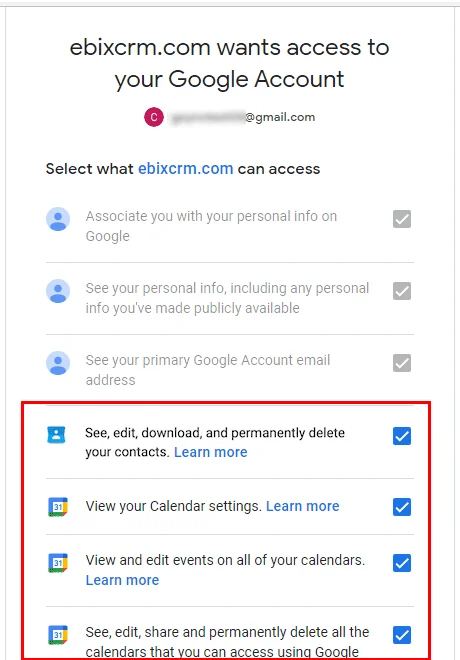
- Select Allow.
- When the SmartOffice Sync Settings page opens, configure your sync and e-mail posting settings as described in Contact Sync Options, Calendar Sync Options and Automatic E-mail Posting Options.
- Select Save. A confirmation page appears when your setup is successfully saved.
- Wait for an e-mail message containing a sync preview report (it may take several minutes for this report to arrive).
- Review the sync preview report to make sure your sync setup will work the way you expect it to. Then do one of the following:
- If the report looks good, select the Approve link to send an approval message to the SmartOffice team. Your sync setup will then become active, and sync between Google and SmartOffice will occur automatically.
- If you see any issues in the preview report, select the Reject link to send a rejection message to the SmartOffice team. Then change your sync setup as described at the beginning of this section.
If you encounter an error message, follow these steps to reset your settings and try again:
- Go to
- In the list of third-party apps with access to your Google account, select SmartOffice, and then select Remove Access.
- Repeat the Google Sync Setup process.
Once you save your sync setup, you will receive two e-mail messages: one confirming that your sync setup was created, and a second containing a preview report that you can review to make sure your sync setup will work the way you expect it to (these messages may take several minutes to arrive). Follow the instructions in preview report e-mail message to approve or reject the preview. Once you accept a preview, sync will become active.
Contact Sync Options
This section describes the contact sync options available for the Google integration. To modify these options at any time, in the side menu, select Setup > Google Sync Setup.
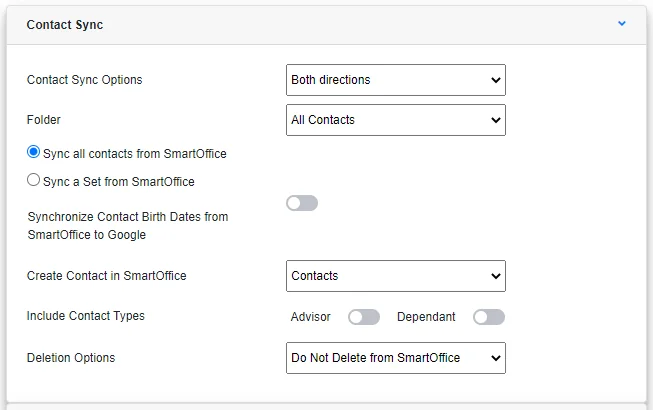
- Contact Sync Options: Specify whether contact sync is enabled and, if so, whether sync will occur in one direction (i.e., from SmartOffice to Google or from Google to SmartOffice) or both directions. The default setting is for no sync to occur (Do Not Sync).
- Folder: Select All Contacts from this drop-down list to sync all of your Google contacts with SmartOffice. To sync only those contacts that have a particular Google Contacts label, select that label from this drop-down list.
- Synchronize all Contacts from SmartOffice: Select this option to sync the entire SmartOffice contact database with Google. Note that this option can be hidden by your SmartOffice server administrator and may not be available.
- Synchronize a set from SmartOffice: Select this option to limit sync with Google to those contacts belonging to a particular SmartOffice contact set. This option is useful if sync is needed only for a subset of the entire SmartOffice contact database. After selecting this option, search for the set by typing its name in the Set Name field. For more information about sets, see Sets – Introduction.
- Synchronize Contact Birth Dates from SmartOffice to Google: Select this option to sync birth dates from SmartOffice to Google (birth dates are not synchronized from Google to SmartOffice). When birthdays are synchronized, they are also added to Google Calendar.
- Create Contact in SmartOffice: This setting defines the types of records that SmartOffice creates when synchronizing contacts from Google. The default choice, Contacts, is the most common, but the option to create advisor records in SmartOffice is also available.
- Include Contacts Type: Use these options to define whether Advisor- and Dependent-type contacts in SmartOffice are included in sync operations.
- Deletion Options: This drop-down list specifies what happens to contacts in SmartOffice when they are deleted from Google. When the user is synchronizing a SmartOffice set, the Only Remove From Set (Do Not Delete) option removes the contact from the set being synchronized but leaves the contact in SmartOffice. The other options are Delete from SmartOffice and Do Not Delete From SmartOffice. Note that contacts deleted from SmartOffice after sync are moved to the Deleted Records area of SmartOffice.
Calendar Sync Options
This section describes the calendar sync options available for the Google integration. To modify these options at any time, in the side menu, select Setup > Google Sync Setup.
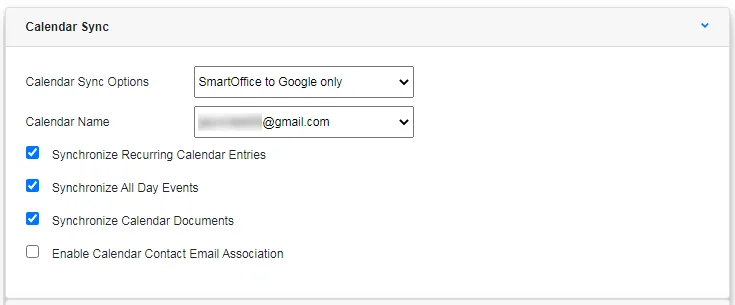
- Calendar Sync Options: Specify whether activity sync is enabled and, if so, whether sync will occur in one direction (i.e., from SmartOffice to Google or from Google to SmartOffice) or both directions. The default setting is for no sync to occur (Do Not Sync).
- Calendar Name: The name of the calendar in Google that will be synchronized with SmartOffice. Although Google supports multiple calendars, SmartOffice can synchronize with only one.
- Synchronize Recurring Calendar Entries: When this option is selected, any instances of timed activities that are recurrences are synchronized.
- Synchronize All Day Events: When this option is selected, all-day events are included in the sync process.
- Synchronize Calendar Documents: When this option is selected, any documents attached to timed activities are synchronized.
- Enable Calendar Contact Email Association: When this option is selected, activities created in Google are automatically linked to SmartOffice contacts when the activities are synchronized to SmartOffice. This makes it possible to use SmartOffice features like activity outcome tracking. To determine the correct contact to link to an activity, SmartOffice looks at the activity's guest list and checks for contacts with matching e-mail addresses in SmartOffice. The first guest with a matching SmartOffice contact is designated as the primary contact of the activity. Any remaining guests with matching SmartOffice contacts are added to the activity as additional contacts. Guests without matching SmartOffice contacts are not added to the activity. Note that this option is available only when the Calendar Sync Options field is set to Google to SmartOffice only or SmartOffice to Google & Vice-Versa.
Automatic E-mail Posting Options
This section describes the e-mail posting options available for the Google integration. To modify these options at any time, in the side menu, select Setup > Google Sync Setup.
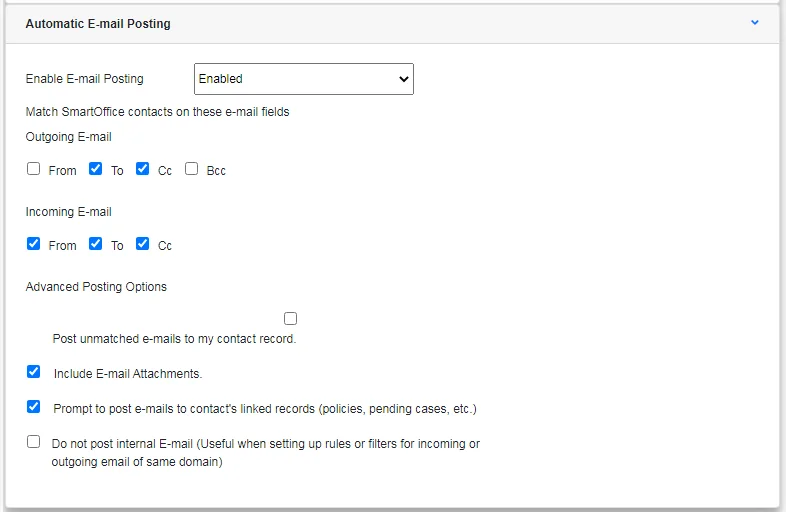
- Enable E-mail Posting: Select Enabled from this drop-down list to turn on Google e-mail posting capabilities.
- Outgoing E-mail: Specify which e-mail message headers in outgoing e-mail messages (From, To, Cc and/or Bcc) will be compared to SmartOffice contact records to determine a match.
- Incoming E-mail: Specify which headers in incoming e-mail messages (From, To and/or Cc) will be compared to SmartOffice contact records to determine a match.
- Post unmatched e-mails to my contact record: For e-mail messages that do not match any SmartOffice contacts based on the Outgoing E-mail and Incoming E-mail settings, selecting this option posts those messages to the user's own SmartPad, which the user can access from Utilities > User SmartPad. If this option is not selected, unmatched e-mail messages are moved to the SmartOfficeUnmatched folder in the user's Gmail account.
- Include e-mail attachments: By default, attachments are posted to SmartOffice. Clear this option to post e-mail messages without their attachments. Attachment file size restrictions configured by the SmartOffice administrator apply.
- Prompt to post e-mails to contact's linked records: When this option is selected, the user can also choose to post e-mail messages to the notes of policies, pending cases, and other records linked to the contact.
- Do not post internal e-mail: Select this option to prevent e-mail messages from the user's e-mail domain from being posted to SmartOffice. When this option is selected, these messages are moved to the SmartOfficeFailed folder in the user's Gmail account.
Using the Integration
Calendar Sync
Once calendar sync options are configured, the integration works automatically in the background to sync your Google and SmartOffice calendars. Sync occurs every 5–15 minutes provided that setup has been completed correctly and there are no connection issues.
Note: Sync is available only as an automated process. There is no option to sync manually.
E-mail Posting
The following section describe how to post e-mail from Gmail to SmartOffice.
Note: When office security is enabled in SmartOffice, users are restricted in terms of the contacts they can access. Those restrictions also apply to e-mail posting. If you do not normally have access to a particular contact in SmartOffice, SmartOffice cannot post e-mail messages to that contact’s SmartPad.
Basic E-mail Posting Steps
- In Gmail, select one or more e-mail messages.
- Add the SmartOffice label (created automatically by SmartOffice) to those messages. For help with adding labels to e-mail messages in Gmail, refer to Google's documentation.
Tip: To automate the process of posting incoming Gmail messages, you can create a filter in Gmail that applies the SmartOffice label to incoming messages. To learn how to set up filters in Gmail, see Google's documentation.
After you add the SmartOffice label to any messages, SmartOffice looks at your e-mail posting options to determine whether the messages match any SmartOffice contacts. Messages that match are posted to the appropriate contacts' SmartPads in SmartOffice.
Whether or not a match is found, SmartOffice changes the label on each message to indicate its posting status, as described in the following section.
Reviewing E-mail Posting Status
SmartOffice indicates the posting status of a Gmail message using the following labels:
- SmartOfficePosted: This label is added to messages that were successfully processed and posted to SmartOffice.
- SmartOfficeFailed: This label is added to e-mail messages that could not be posted. Messages typically have this label for one of the following reasons:
- The message is internal (i.e., it is from the same e-mail domain as your e-mail address). This applies only if the Do not post internal e-mail option is enabled in your e-mail posting options.
- The message contains an e-mail attachment that exceeds the attachment size limit set by the SmartOffice administrator. This applies only if the Include e-mail attachments option is enabled in your e-mail posting options.
- SmartOffice's e-mail posting service has experienced a temporary outage.You can try to post a failed message again by adding the SmartOffice label to it as described in the previous section..
- SmartOfficeUnmatched: This label is added to messages when SmartOffice finds no matching contacts, unless the Post unmatched e-mails to my contact record option is selected in your e-mail posting options. To determine why no match was found, check your posting options regarding incoming and outgoing e-mail messages and make sure the e-mail addresses in SmartOffice and in the message itself are exactly the same. If you are a Bcc recipient on an unmatched e-mail message, one of two things will happen:
- If you don't have the Post unmatched e-mails to my contact record option enabled, the message will be labeled as SmartOfficeUnmatched in your mailbox, but the message might still be posted to SmartOffice if other SmartOffice users are To or Cc recipients and the message matches based on those users' e-mail posting options.
- If you have the Post unmatched e-mails to my contact record option enabled, the message will be labeled as SmartOfficePosted and will be posted to the SmartPad of the contact record linked to your SmartOffice user account. However, the message will not be posted to the contact records of any To or Cc recipients, even if your e-mail posting options are set up to match on those headers. This is to prevent those other recipients from discovering that you were a Bcc recipient on the message.