Last updated: 2025-09-19
Integrations - ucplus
- Overview
- Requirements
- ucplus Setup
- Server Setup
- User/Client Setup
- SmartOffice Setup
- User Setup
- Data Setup
- Using the Integration
- Making Outbound Calls
- Receiving Inbound Calls
- Using the Inbound Call Page
Overview
The ucplus integration is a computer telephony integration (CTI) that enables organizations to link their PBX phone systems to their PCs and to SmartOffice Pro. The integration enables a range of telephony features and automated workflows that users can access directly from their SmartOffice Pro and Windows.
Note: For some phone systems, SmartOffice Pro supports direct integration and does not require ucplus. To find out whether SmartOffice Pro integrates with your phone system directly, see Integrations - IP Telephony.
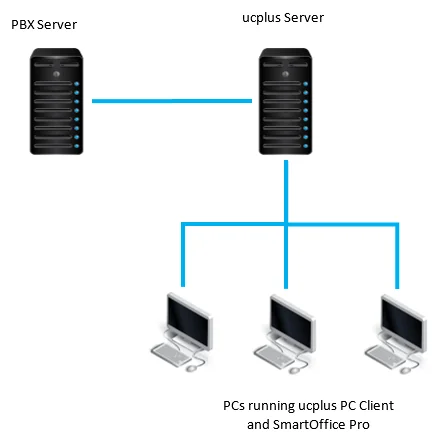
ucplus, made by Plus Software, is a client-server solution, as illustrated in the following diagram.
Requirements
- A phone system supported by ucplus (see ucplus's list of supported phone systems)
- A server connected to the local office network that meets ucplus's hardware and software requirements
- The ucplus Server software (available from the ucplus Downloads page)
- The ucplus PC software (available from the ucplus Downloads page)
ucplus Setup
Server Setup
The SmartOffice team will work with your organization to install and configure the server to work with your phone system.
User/Client Setup
The ucplus client software must be installed on the computer of each SmartOffice user who will be using the telephony integration. Important: Before the ucplus client software can be configured on a user's computer, the user's phone extension must be registered in the ucplus server configuration under Equipment > Extensions.
- Download the ucplus PC software and install it. At the end of the installation process, the ucplus Telephony configuration screen appears.
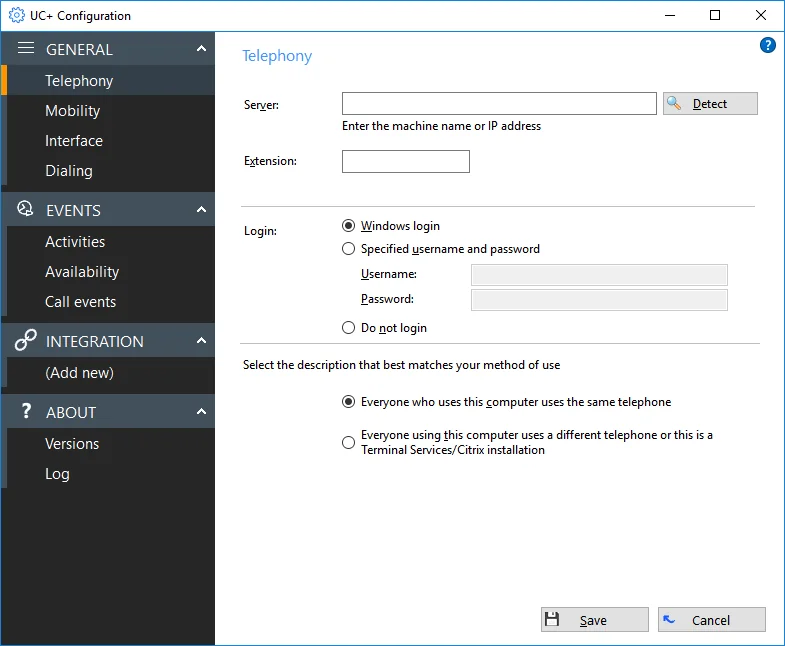
- Enter your organization's ucplus server address and your phone extension in the Server and Extension fields. For the other options in this dialog box, the default values are generally adequate, but you may need to change them in some cases (for more information, see ucplus's instructions).
- In the left navigation menu, select Call events in the Events section.
- Create an event for inbound calls:
- Select the Add button to open the Event dialog box.
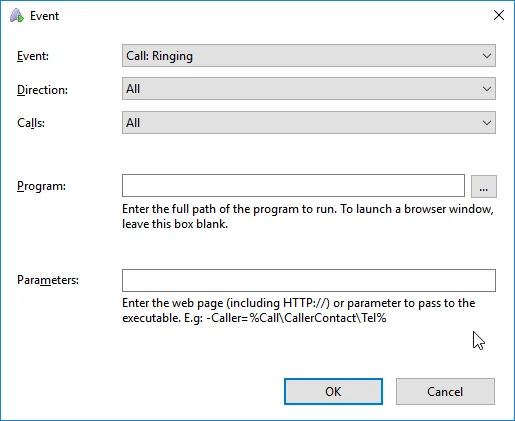
- From the Event drop-down list, select Call: Connected.
- From the Direction drop-down list, select In.
- In the Parameters field, enter the following address: https://*\[your SmartOffice Server]*/cdsApp?trustedWindow\=1&Module\=DeepLink&Object\=ContactPhone&Operation\=View&Data\=%Call\\CallerContact\\Tel%
Make sure to replace *\[your SmartOffice server]* with the address of the server you use to sign in to SmartOffice Pro. If you do not know what to enter for *\[your SmartOffice Server]* in the Parameters field, sign in to SmartOffice Pro and look at the server address in the browser's address bar. An example of a server address: myso6\.smartofficecrm.com
- Select the OK button.
- Create an event for outbound calls:
- Select the Add button again to open a new Event dialog box.
- From the Event drop-down list, select Call: Connected.
- From the Direction drop-down list, select Out.
- In the Parameters field, enter the following address: https://*\[your SmartOffice Server]*/cdsApp?trustedWindow\=1&Module\=DeepLink&Object\=ContactPhone&Operation\=View&Data\=%Call\\CalledContact\\Tel%
Make sure to replace *\[your SmartOffice server]* with the address of the server you use to sign in to SmartOffice Pro.
- Select the OK button.
- Install the appropriate call handler for your web browser to enable click-to-dial support:
- In the left navigation menu, select Dialing in the General section.
- Select Dialing Handlers to display a list of web browsers.
- Select the button for your web browser to download and/or install the call handler software. For more details, see ucplus's instructions.
- Select the Save button to save all configuration settings.
SmartOffice Setup
User Setup
For each SmartOffice user who will be using the integration, go to User Preferences - Activity Options and make sure that none of the options under Activity Outcome/Dialer Options are selected.
Data Setup
Ensure that the contacts that users will be calling have a phone number. The integration uses the phone number to automatically match outbound and inbound calls to SmartOffice records.
Using the Integration
Making Outbound Calls
With the ucplus integration, you can place outbound calls directly from SmartOffice Pro. These instructions work from many SmartOffice Pro pages, including:
- Tasks list (any calendar view)
- Contact and business records and lists
- Advisor and agency records and lists
- Leads records and lists
- Opportunity records and lists
- Dynamic Reports result lists (certain categories)
- Pending case records and lists
- Policy records and lists
- Carrier records and lists
- Investment account records and lists
To make an outbound call:
- From the appropriate record or list in SmartOffice Pro, select Menu > Advanced Options > Make/Receive a Phone Call.
- If SmartOffice's call dialog box opens, select the appropriate call options (see SmartDialer for details about these options).
- Select the OK button.
- In the Phone Numbers list, make sure the Dial column and/or the Unformatted Phone column is visible (if neither column is visible, customize the list layout to add one or both).
- Do one of the following:
- In the Dial column, select the phone icon
 for the number you want to call.
 - In the Unformatted Phone column, select the phone number you want to call.
- If you see a message asking whether you want to open the PhoneHelper application, select the Open PhoneHelper button.

Note: If the Activity/Document page opens but the dialer does not open, the Open PhoneHelper? prompt may be hidden. Switch back to the SmartOffice browser tab that you dialed from, and then select the Open PhoneHelper button to open the dialer.
The ucplus dialer opens and dials the number, and SmartOffice automatically opens the Activity/Documents page in a new tab/window.
Tip: If you have multiple monitors connected to your computer, you can drag the newly opened contact tab to a different display. This enables you to continue navigating to other pages in SmartOffice Pro.
Receiving Inbound Calls
When your phone rings, answer as you normally do, or select the Answer button in the ucplus Preview window that appears.
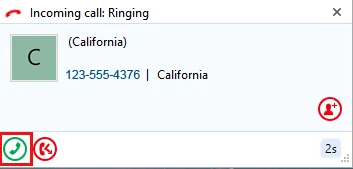
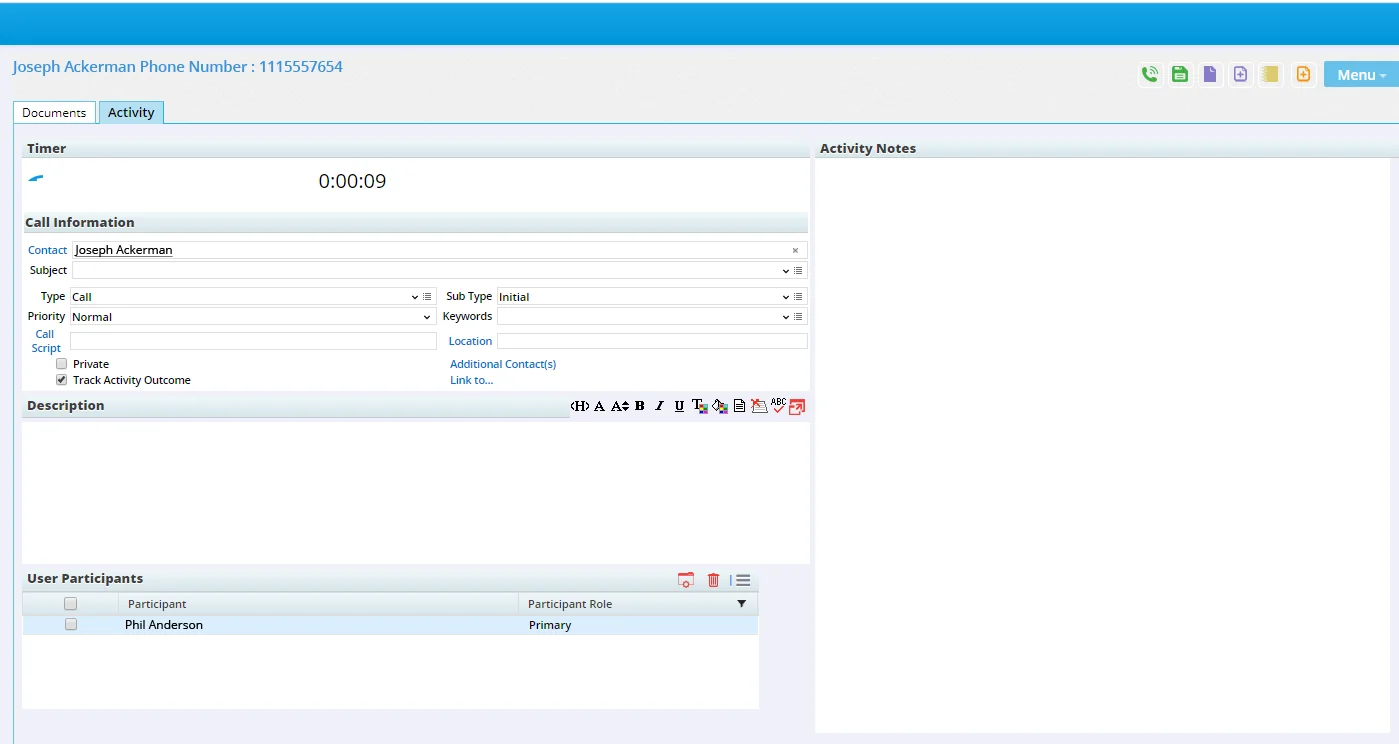
SmartOffice Pro looks for the phone number in its database and, if it exists, opens the Activity/Documents page in a new tab/window.
Tip: If you have multiple monitors connected to your computer, you can drag the newly opened contact tab to a different display. This enables you to continue navigating to other pages in SmartOffice Pro.
Using the Inbound Call Page
When an inbound and/or outbound call matching is properly configured, SmartOffice automatically opens a new browser tab/window to display the Activity/Documents page.
For more information about using this page, see the section about the inbound call page in our IP telephony documentation.