Last updated: 2025-09-19
Integrations - Laser App
- Overview
- Requirements
- Setting Up Data in SmartOffice
- Client (Person)
- Spouse
- Client (Business)
- Beneficiaries
- Using the Laser App Integration
- Opening Laser App from SmartOffice
- Entering Additional Information in Laser App
- Tips and Tricks
- Filling Out Forms for Spouses and Other Registration Types
- Including Representative Information in Forms
- Changing a Representative’s Information
- Troubleshooting Tip
Overview
The Laser App integration for SmartOffice exports data from SmartOffice into the Laser App form-filling software, dramatically reducing the amount of time needed to populate forms with client data. (This integration is for the Laser App desktop application; an integration for the web-based Laser App Anywhere is also available.) For more information on the Laser App application, visit www.laserapp.com.
laser app
Requirements
- Laser App 8\.0 or higher
- Laser App license in SmartOffice (see User Accounts - User Rights Content Link)
- Advisor Contract/License Management license in SmartOffice (see [User Accounts
- User Rights Content Link](/help/pro/user/accounts/user/rights/content/link))
Setting Up Data in SmartOffice
For the most accurate and consistent results when exporting data into Laser App, the data must be entered correctly in SmartOffice. The following sections describe the correct way to enter data.
Client (Person)
The table below lists the SmartOffice contact fields that can be exported to Laser App, along with the corresponding Laser App fields. Special instructions and information about certain fields are included in the Comments column.
In Laser App, the fields listed below are in the Client Information dialog box.
| SmartOffice Fields | Comments | Laser App Fields |
|---|---|---|
| The following data is entered on the Personal content link. | ||
| First Name | First Name | |
| Middle | MI | |
| Last Name | Last Name | |
| Greeting | Salutation | |
| Birth Date | DOB | |
| Marital Status | Marital Status | |
| Gender | Sex | |
| Employer | Employer | |
| Occupation | Occupation | |
| SS \# | SSN | |
| Primary Residence Phone Number | Make sure to select the Primary Residence option. If only one phone number exists, Laser App will take that value regardless of the Primary Residence Option. | Home Phone |
| Mobile | The first mobile number entered will be the one used by Laser App. | Cell Phone |
| Primary Business Phone Number | Make sure to select the Primary Business Phone option. If only one business phone number exists, Laser App will take that value regardless of the Primary Business Phone option. | Employer’s Phone |
| Primary Business Phone Extension | Employer’s Phone Extension | |
| Business Fax | The first business fax number entered will be the one used by Laser App. | Employer’s Fax |
| Preferred E-mail Address | Make sure to select the Preferred option. If only one e-mail address exists, Laser App will take that value regardless of the Preferred option. | |
| Primary Residence Address | ||
| Address Block, Line 2, Line 3 | Make sure to select the Primary Residence Address option. If only one address exists, Laser App will take that value regardless of the Primary Residence Address option. | Address |
| City | City | |
| State | State | |
| ZIP Code | ZIP | |
| Country | Country of Residence | |
| Primary Business Address | ||
| Address Block, Line 2, Line 3 | Make sure to select the Primary Business Address option. If only one address exists, Laser App will take that one regardless of the Preferred Address option. | Employer’s Address |
| City | Employer’s City | |
| State | Employer’s State | |
| ZIP Code | Employer’s ZIP | |
| Preferred Address | ||
| Address Block, Line 2, Line 3 | Make sure to select the Preferred Address option. If only one address exists, Laser App will take that one regardless of the Preferred Address option. | Legal Address |
| City | Legal City | |
| State | Legal State | |
| ZIP Code | Legal ZIP | |
| The following data is entered on the Add’l Personal content link. | ||
| Total Income | Client Income | |
| Net Worth | Net Worth | |
| Citizenship | Citizenship | |
| Driver’s License \# | Driver’s License \# | |
| State | Issuing Entity | |
| Expiration Date | Exp. Date | |
| The following data is entered on the Key Relations content link. | ||
| Relationship (Accountant) | Only the Name and Preferred Phone Number fields are used by Laser App. | Accountant Name Acct. Phone & Phone ext. |
| Relationship (Attorney) | Only the Name and Preferred Phone Number fields are used by Laser App. | Attorney Name Attorney Phone & Phone ext. |
| The following data is entered for businesses. This is only available when the client is an owner of a business. Key Relations > Business Relations (Role \= Owner) | ||
| Business Name | Company Name | |
| Tax ID | Tax ID | |
| Business Address | ||
| Address Block, Line 2, Line 3 | Company Address | |
| City | City | |
| State | State | |
| ZIP Code | Zip | |
| Business Phone | Phone and Ext. | |
| Preferred E-mail Address | Make sure to select the Preferred option. If there is only one e-mail address, Laser App will take that value regardless of the Preferred option. | |
| Business Fax | The first business fax number entered will be the one used by Laser App. | Fax |
Spouse
Spouse information is used for joint applications, applications for spouses and beneficiary information. The spouse must be designated as a contact’s key relation in SmartOffice in order for the spouse’s information to display in Laser App.
The table below lists the relevant SmartOffice fields and their corresponding Laser App fields. Special instructions and information about certain fields are included in the Comments column.
In Laser App, the fields for spouse data are in the Client Information dialog box, under the Spouse tab. Refer to the Working with Laser App topic for further details and instructions.
| SmartOffice Fields | Comments | Laser App Fields |
|---|---|---|
| The following data is entered on the Personal content link. | ||
| First Name | First | |
| Middle | Mi | |
| Last Name | Last | |
| Greeting | Salutation | |
| Birth Date | DOB | |
| Gender | Sex | |
| Employer | Employer | |
| SS \# | SSN | |
| Occupation | Occupation | |
| Mobile | The first mobile number entered will be the one used by Laser App. | Cell Phone |
| Primary Business Phone Number | Make sure to select the Primary Business Phone option. If only one business phone number exists, Laser App will take that value regardless of the Primary Business Phone option. | Employer’s Phone |
| Primary Business Phone Extension | Employer’s Phone Extension | |
| Business Fax | The first business fax number entered will be the one used by Laser App. | Employer’s Fax |
| Preferred E-mail Address | Make sure to select the Preferred option. If only one e-mail address exists, Laser App will take that value regardless of the Preferred option. | |
| Primary Residence Address | ||
| Note that the client’s Primary Residence Address will be used for the Spouse’s Home Address in Laser App. | ||
| Primary Business Address | ||
| Address Block, Line 2, Line 3 | Make sure to select the Primary Business Address option. If only one address exists, Laser App will take that value regardless of the Primary Business Address option. | Employer’s Address |
| City | Employer’s City | |
| State | Employer’s State | |
| ZIP Code | Employer’s ZIP | |
| The following data is entered on the Add’l Personal content link. | ||
| Total Income | Spouse Income (Banking/Finances tab) | |
| Citizenship | Citizenship | |
| Driver’s License \# | Driver’s License \# | |
| State | Issuing Entity | |
| Expiration Date | Exp. Date |
Client (Business)
The table below lists the SmartOffice business fields that can be exported to Laser App, along with the corresponding Laser App fields. Special instructions or information about certain fields are included in the Comments column.
In Laser App, the fields listed below are in the Client Information dialog box. Please refer to the Working with Laser App topic for further details and instructions.
| SmartOffice Fields | Comments | Laser App Fields |
|---|---|---|
| The following data is entered on the Business Detail (P) content link. | ||
| Business Name | Last Name/Co. (Basic Info tab) Company Name (Corp/Trust Info tab) | |
| Tax ID | Tax ID (Corp/Trust Info tab) | |
| Tax | Client Tax Bracket (Banking/Finances tab) | |
| Preferred Phone Number | Make sure to select the Preferred option. If only one phone number exists, Laser App will use that value regardless of the Preferred option. | Phone (Corp/Trust Info tab) |
| Primary Business Phone Extension | Phone Extension (Corp/Trust Info tab) | |
| Business Fax | The first business fax number entered will be the one used by Laser App. | Fax (Corp/Trust Info tab) |
| Preferred E-mail Address | Make sure to select the Preferred option. If only one e-mail address exists, Laser App will take that value regardless of the Preferred option. | Email (Corp/Trust Info tab) |
| Preferred Address | ||
| Address Block, Line 2, Line 3 | Make sure to select the Preferred Address option. If only one address exists, Laser App will use that value regardless of the Preferred Address option. | Address |
| City | City | |
| State | State | |
| ZIP Code | ZIP | |
| Business Address | ||
| Address Block, Line 2, Line 3 | The first business address entered will be the one used by Laser App. | Legal Address |
| City | Legal City | |
| State | Legal State | |
| ZIP Code | Legal ZIP | |
| The following data is entered on the Key Relations content link. | ||
| Role (Accountant) | Name and Preferred Phone Number | Accountant Name Acct. Phone & Phone ext. (Banking/Finances tab) |
| Role (Attorney) | Name and Preferred Phone Number | Attorney Name Attorney Phone & Phone ext. (Banking/Finances tab) |
Beneficiaries
This refers to anyone listed on a contact’s Key Relations content link that is specified as a beneficiary. A beneficiary must be designated as a client’s key relation in order for their data to be exported correctly to Laser App.
The table below lists the relevant SmartOffice fields and their corresponding Laser App fields. Special instructions and information about certain fields are included in the Comments column.
In Laser App, the fields for beneficiary data are in the Client Information dialog box, under the Beneficiaries and Others tab. Refer to the Working with Laser App topic for further details and instructions.
| SmartOffice Fields | Comments | Laser App Fields |
|---|---|---|
| The following data is entered on the Contact Personal content link. | ||
| First Name | First | |
| Middle | MI | |
| Last Name | Last | |
| Birth Date | DOB | |
| Employer | Employer | |
| Occupation | Occupation | |
| SS \# | SSN/TID | |
| Preferred Phone Number | Make sure to select the Preferred Phone option. If only one phone number exists, Laser App will take that value regardless of the Preferred Phone option | Phone |
| Primary Business Phone Number | Make sure to select the Primary Business Phone option. If only one business phone number exists, Laser App will take that value regardless of the Primary Business Phone option. | Employer’s Phone |
| Primary Business Phone Extension | Employer’s Phone Extension | |
| Preferred E-mail Address | Make sure to select the Preferred option. If only one e-mail address exists, Laser App will take that value regardless of the Preferred option. | |
| Preferred Address | ||
| Address Block | Make sure to select the Preferred Address option. If only one address exists, Laser App will take that value regardless of the Preferred Address option. | Legal Address |
| City | Legal City | |
| State | Legal State | |
| ZIP Code | Legal ZIP | |
| Primary Business Address | ||
| Address Block, Line 2, Line 3 | Make sure to select the Primary Business Address option. If only one business address exists, Laser App will take that value regardless of the Business Address option. | Employer’s Address |
| City | Employer’s City | |
| State | Employer’s State | |
| ZIP Code | Employer’s ZIP | |
| The following data is from the Key Relations content link. | ||
| Relationship | Relationship |
Using the Laser App Integration
After all data is entered in the appropriate fields in SmartOffice, begin completing the forms.
Opening Laser App from SmartOffice
- Search for the contact or business in SmartOffice and do one of the following:
- Select the contact or business in the Contact List.
- Open the contact or business and click either the Personal or Add’l Personal content link (for a contact) or the Detail (P) or Add’l Detail (N) content link (for a business).
- Select Menu > Integrations > Laser App. SmartOffice sends a LaserApp.lasxml file to your browser for download.
- If Laser App does not launch automatically, do one of the following:
- If you use Chrome, download the LaserApp.lasxml file to your computer, and then select the Always open files of this type option from the download button menu at the bottom of the browser window.
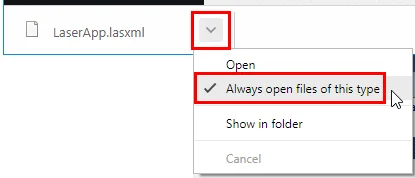
Then click the download button to open the file.
- If you use Internet Explorer, click the Open button on the download prompt to open the LaserApp.lasxml.

Laser App opens with the client’s name displayed on the toolbar.
Entering Additional Information in Laser App
Before selecting a form to fill, review the data exported to Laser App to ensure that everything is entered properly. Laser App’s Client Information dialog box shows the information populated by SmartOffice along with fields for entering additional information that may be needed in a particular form.
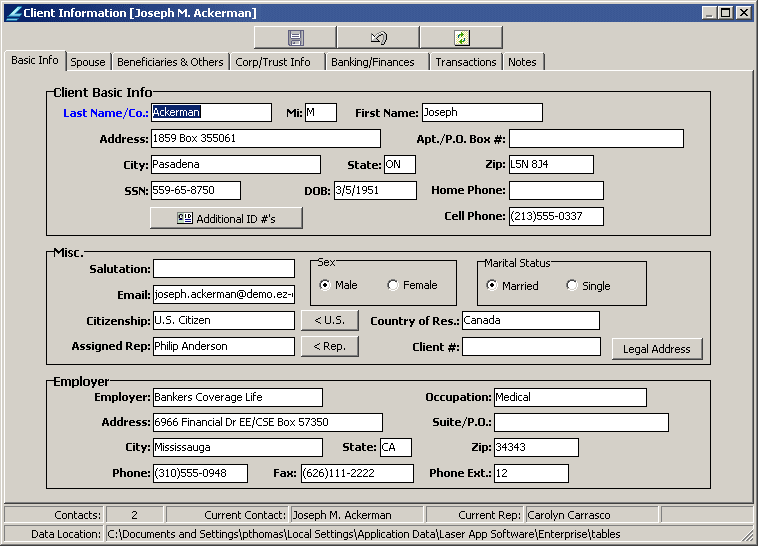
A majority of the fields are already populated by SmartOffice. The remaining information can be entered on the appropriate tabs.
- Click the appropriate tab to review and, if necessary, enter additional information for the:
- - Client - Person (Basic Info tab) - Spouse (Spouse tab) - Beneficiaries (Beneficiaries & Others tab) - Client - Business (Corp/Trust Info tab) - Client’s financial information (Banking/Finances tab)
- Enter information in the appropriate fields.
- Close the Client Information dialog box to begin filling out forms.
Note: Any additional information entered is saved for the current Laser App session only. Once Laser App is closed, the information is no longer available.
Tips and Tricks
Follow these tips to fill out forms more efficiently.
Filling Out Forms for Spouses and Other Registration Types
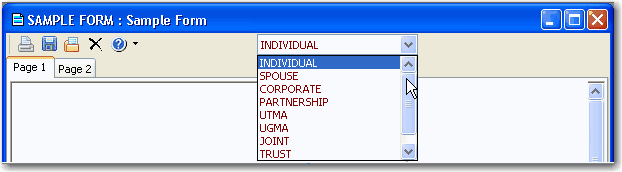
Use Laser App’s Registration Type drop-down list to fill out a form for the client’s spouse, joint application or other registration types. Select the appropriate option to automatically populate the necessary form fields. For further details, refer to the Laser App Help.
Including Representative Information in Forms
The representative’s information comes from Laser App, not SmartOffice. This information is based on what was entered while setting up Laser App.
To display the representative’s information, select Rep Info from the expanded Data View menu (if using Laser App 9, select Rep Info from the expanded Actions & Settings menu). The Installed Rep Licenses dialog box opens.
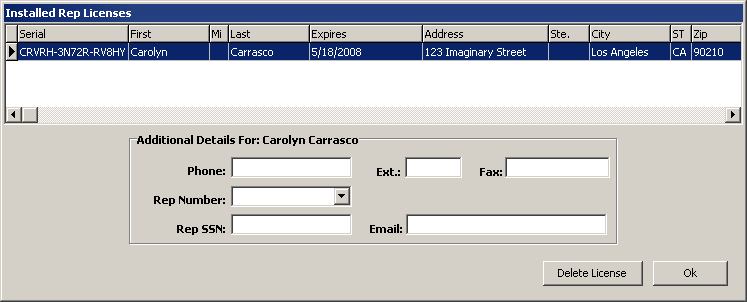
The following fields can be modified:
- Rep Number
- Phone
- Ext.
- Fax
- Rep SSN (Social Security Number)
Changing a Representative’s Information
- In the Installed Rep Licenses dialog box, highlight the representative to be changed.
- Click the Edit License button.
- In the Enter Your Rep Information dialog box, make the necessary modifications.
- Click the OK button to save the changes.
- Close the Installed Rep Licenses dialog box.
Troubleshooting Tip
If an error message displays the “Internet Explorer was not able to open this Internet Site. The requested site is either unavailable or cannot be found. Please try again later” message, make sure the “Do not save encrypted pages to disk” option is cleared (see Requirements).